Sipeed M1 Dock Review
Dear friends welcome to the Sipeed M1 Dock review. This is Nick from educ8s.tv and I am very excited because I am going to show a new development board, the Sipeed M1 Dock which features the revolutionary $10 K210 AI chip. Just like the ESP32, this chip is going to change everything, bringing hardware AI to the maker community. There is a lot to cover so let’s get started!
Intro to the Sipeed M1 Dock Review
Just a few weeks ago, while searching for new boards I discovered the Sipeed M1 Dock board which was featuring an unknown to me at the time processor named K210. There were no reviews for the product but I ordered it anyway to test it. The price was very tempting, I paid less than $30 for a board with a camera and a 2.4” display. You can get it here: https://educ8s.tv/part/SipeedM1
After reading more about the K210 processor the board is using, I was blown away, this thing is extremely powerful! I couldn’t wait to get my hands on it. The last time I was so excited about a board was when the ESP32 was released, two years ago.
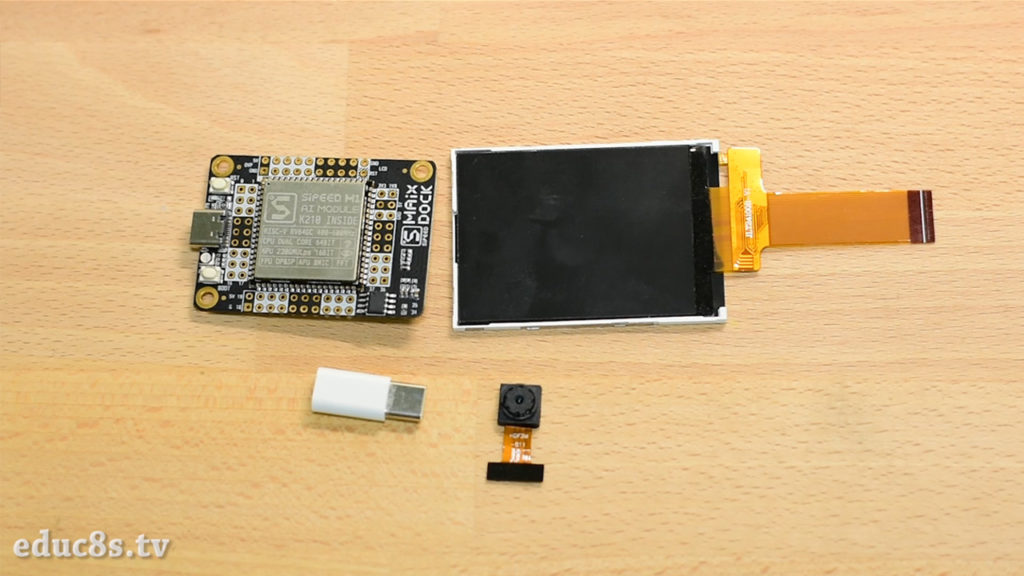
Sipeed M1 Dock
The board arrived in this small box. Let’s see what’s inside. The Sipeed M1 Dock board I got features the following:
- The Kendryte K210 processing unit
- 4” LCD display with a resolution of 320×240 pixels
- A 2MP camera OV2640
- A USB C type connector
- Two pushbuttons
- An RGB led
- A microSD card slot
- And a microphone.
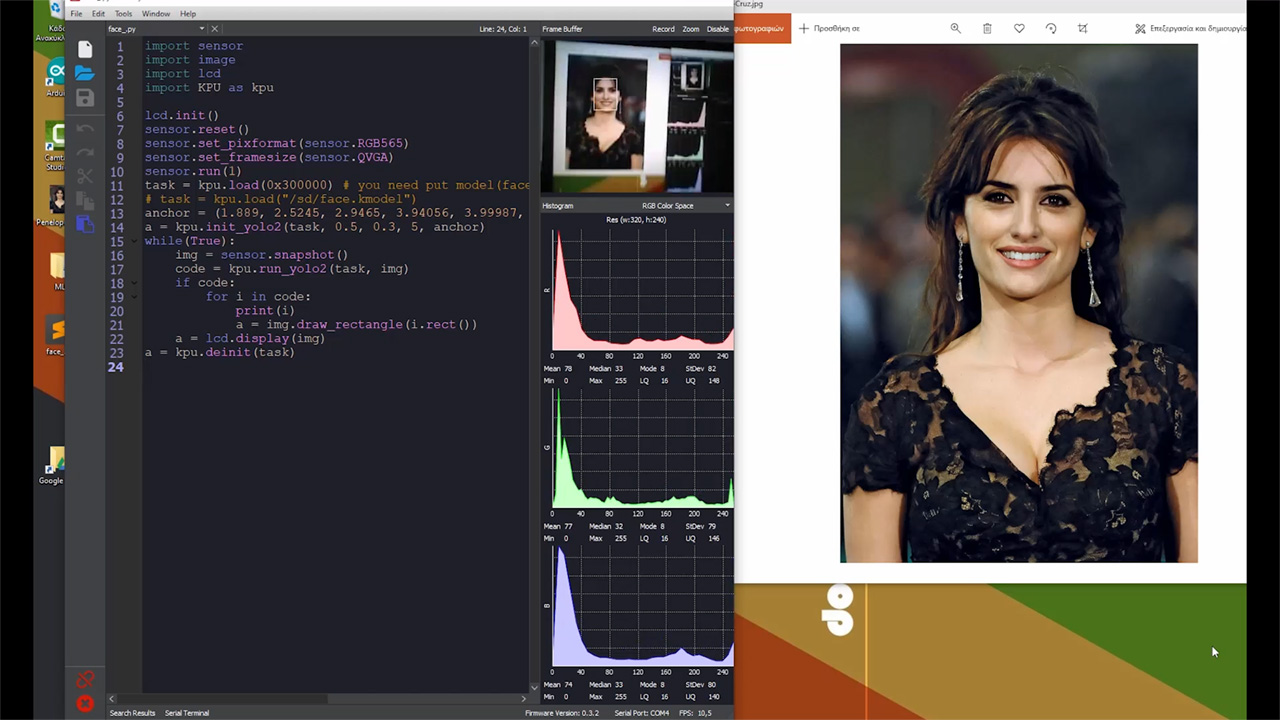
After connecting the display and the camera to the board I managed to get this board to work after a couple of hours. The documentation is in early development stages so it took me more time than usual to get started. Check this out, I have loaded a face detection example, and as you can see the board has no problem to detect many faces at the same time with a great frame rate! Impressive for a $30 board.
[adsense]
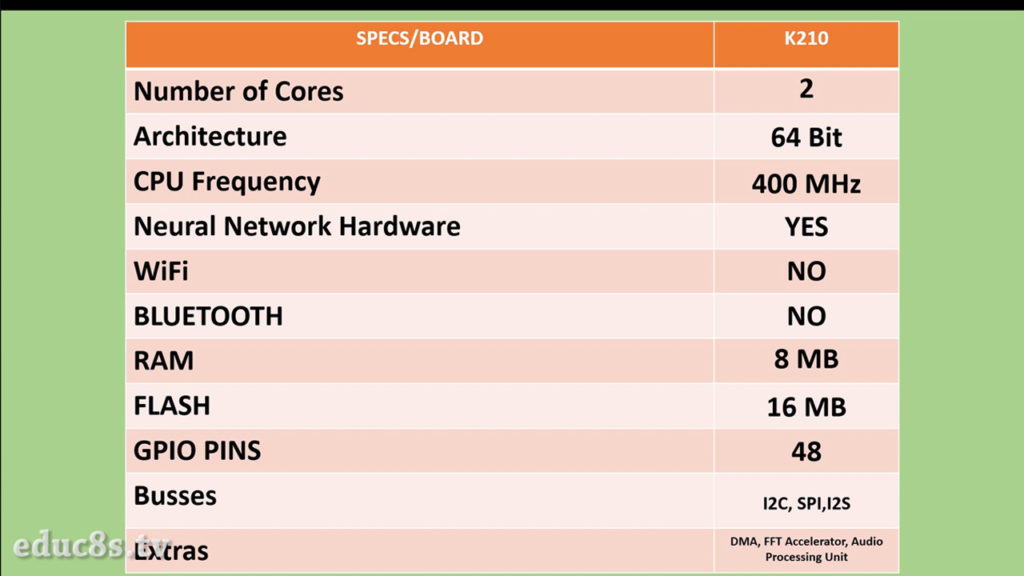
Sipeed M1 Dock Specs
Let’s now take a look at the heart of the board the K210 chip. It features the following:
- 2 64 bit RISC V cores each with a built it independent FPU
- 400 MHz (up to 800MHz)
- KPU High-Performance Convolutional Neural Network hardware accelerator
- Audio Processing Unit
- This version of the chip does not offer WiFi or Bluetooth
- 8MB of RAM memory
- 16MB of Flash Memory
- FFT Hardware Accelerator
- 48 GPIO pins
- I2C, SPI, I2S Interfaces
- PWM
- Direct Memory Access Controller
- And much more
Sipeed M1 Specs
The specifications are fantastic! Can you tell why I am so excited about this chip? Besides the fact that this board uses a very fast processor and a huge amount of RAM, this chip also offers a hardware Neural Network Accelerator! This is huge! This is the real reason I am so excited about this chip. This Hardware Neural Network accelerator is the reason this chip will outperform every other chip at machine vision. Forget about OpenMV, Pixy, Raspberry Pi or the ESP32. This thing is the fastest computer vision board you can get under $60. Amazing stuff. Even if you don’t need the Neural Network Accelerator, you still get an extremely powerful processor! You can get it here: https://educ8s.tv/part/SipeedM1
Sipeed M1 Dock vs other Machine Vision Boards
Check this out. This board outperforms the ESP32 in every field. It has a much faster central processing unit and a massive amount of memory and of course AI hardware.
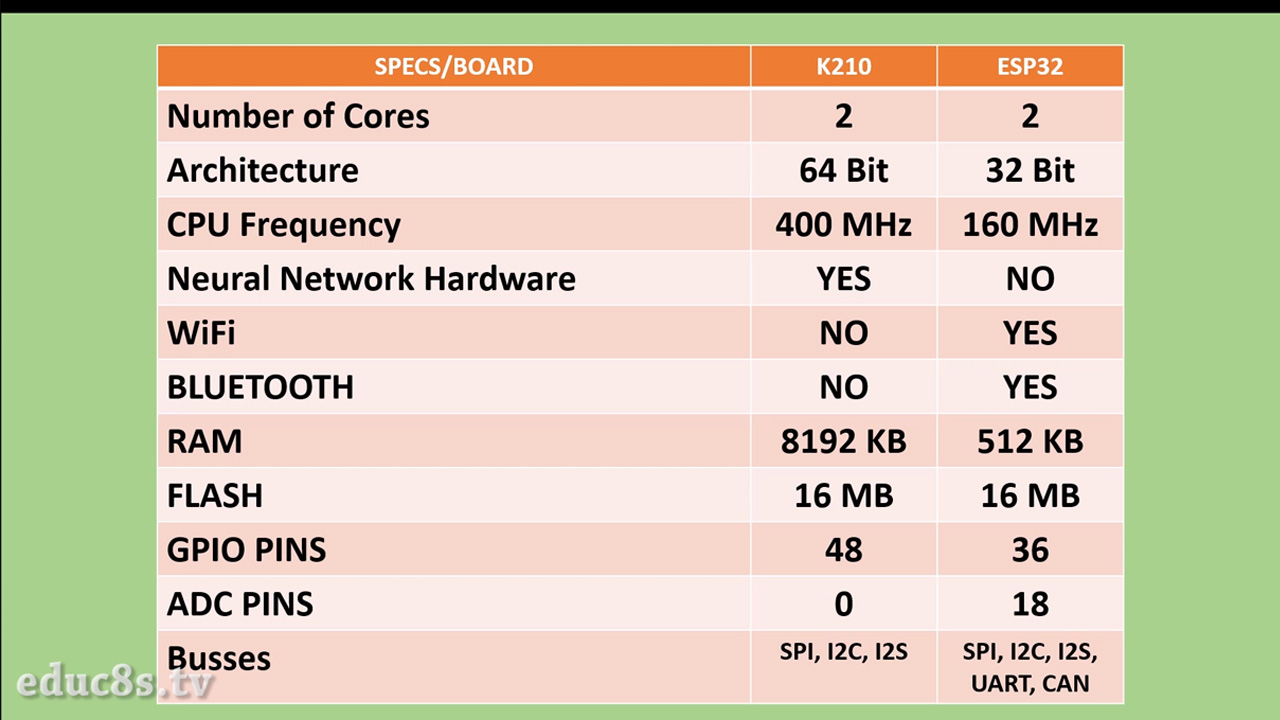
Sipeed M1 VS ESP32
If we compare it with the other machine vision boards I have tried, it outperforms them as well. Nothing can beat this chip in machine vision at this price range. This is the first capable AI board for makers.
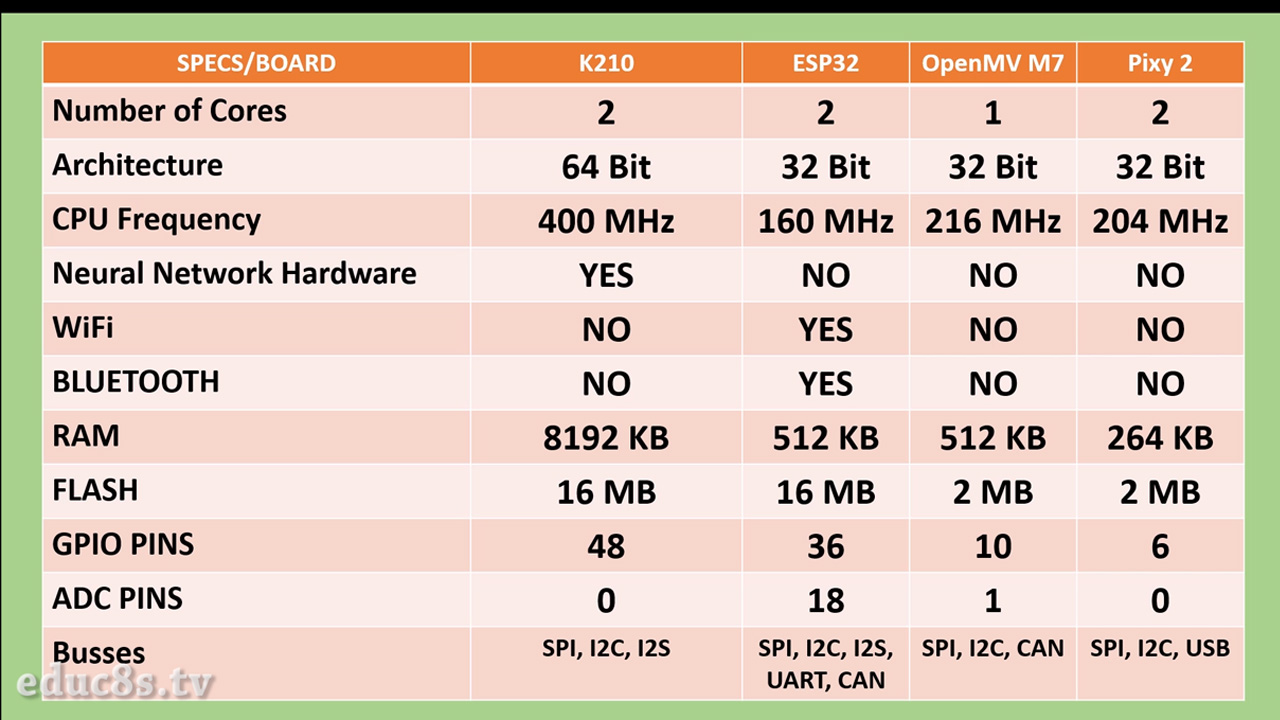
The first ever board to feature AI hardware was the Arduino 101 I reviewed 2 years ago. It featured the Intel Curie processor which was using a very small Hardware Neural Network which was almost useless because it was very small, and Intel never actually taught us how to use it. The board was abandoned by Intel some time ago so, this K210 is the only chip with hardware AI acceleration available today and it is very powerful. It can do object detection at 60fps at VGA resolution. Enough with the specs, let’s now use it for the first time.
Programming the board
There are many ways to program the board. We can even use our familiar Arduino IDE, but I prefer to use the OpenMV IDE which easier to work with.
The procedure is very easy if you know what you have to do. First of all, we have to download the latest firmware version, which is 0.32 at the time of this recording.
? Firmware: https://github.com/sipeed/MaixPy/releases/download/v0.3.2/maixpy_v0.3.2_full.bin
? K Flash GUI: https://github.com/sipeed/kflash_gui/releases
?MaixPY IDE: http://dl.sipeed.com/MAIX/MaixPy/ide/v0.2.2/maixpy-ide-windows-0.2.2.exe
Next, we upload it to the board using the K-Flash utility after selecting the board we have connected to the computer. Now, we need to download the MaixPy IDE and we are ready to go! The MaixPY IDE is a cloned version of the OpenMV IDE, so it feels very familiar. In order to use the board, we have to connect it to the computer, select the board we want to use, and press the connect button. Now we write microPython code here and execute it in the board! Let’s run the first example that comes with the IDE. We press the run button, and the board displays live video from the camera to the LCD display and IDE at the same time. Cool!
Face Detection using the Sipeed M1 Dock
Let’s now load a more advanced example. Let’s load the face recognition example I showed you in the beginning. The example consists of two parts, the Python code which can be found in the Github page of the creators of the board, and the face_detection model we need to use along with the Python script. In order to be able to use the model, we need to burn it in the Flash memory of the chip. We use the K-Flash utility once more and it will automatically burn the model at the correct location to the flash memory of the chip. Now if we run the Python script, the face detection example works great! With just 23 lines of code, we detect faces! Amazing!
Face Detection made easy
Power Consumption
If I connect a power meter to the board while the script is running without the display, we can see that it needs around 200mAs of current! Amazing stuff! We can run AI algorithms on a board that requires just 1W of power to operate!
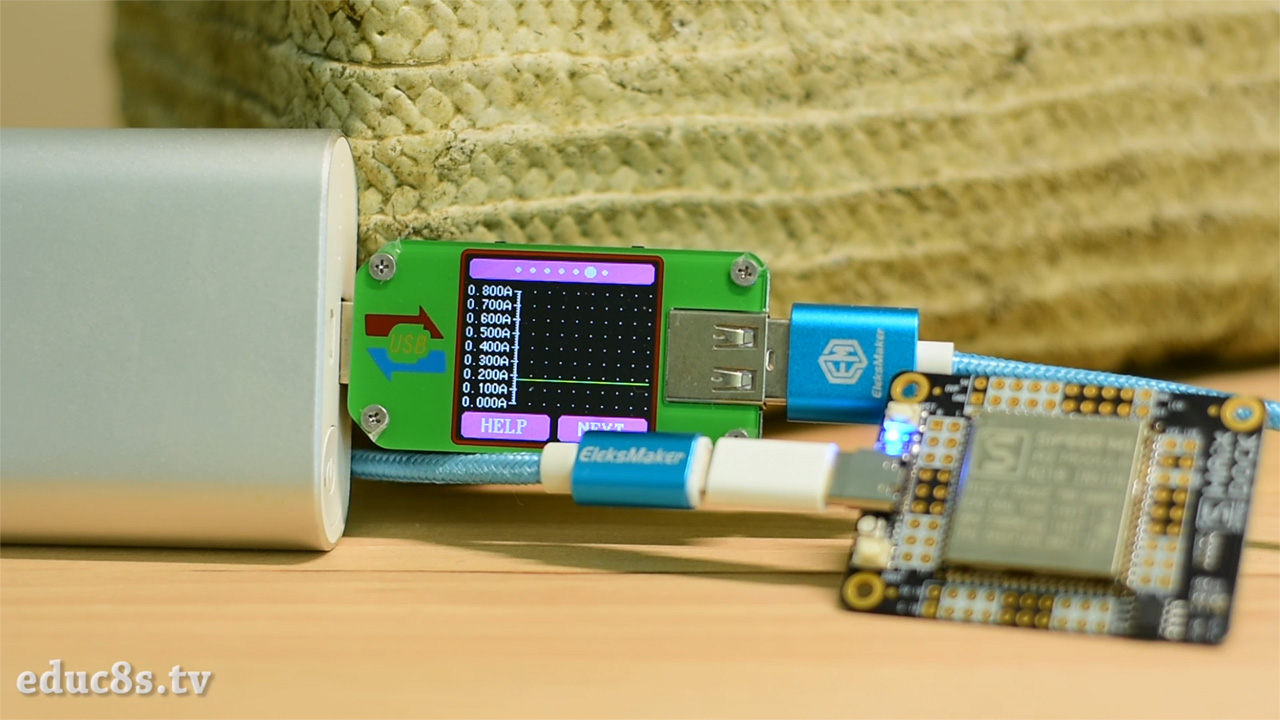
Sipeed M1 Dock Power Consumption
Running Mobilenet on a Sipeed M1 Dock
Let’s now load a more impressive example. I have loaded a pre-trained model, the mobilenet, which is pre-trained to recognize 1000 objects. Check this out! It can detect many everyday objects and many animals with ease! The accuracy is pretty good considering we are running this script on a $30 board! This is truly impressive and revolutionary. You can modify this model if you wish and make it recognize any object you want. I will try this in the future, it sounds so cool!
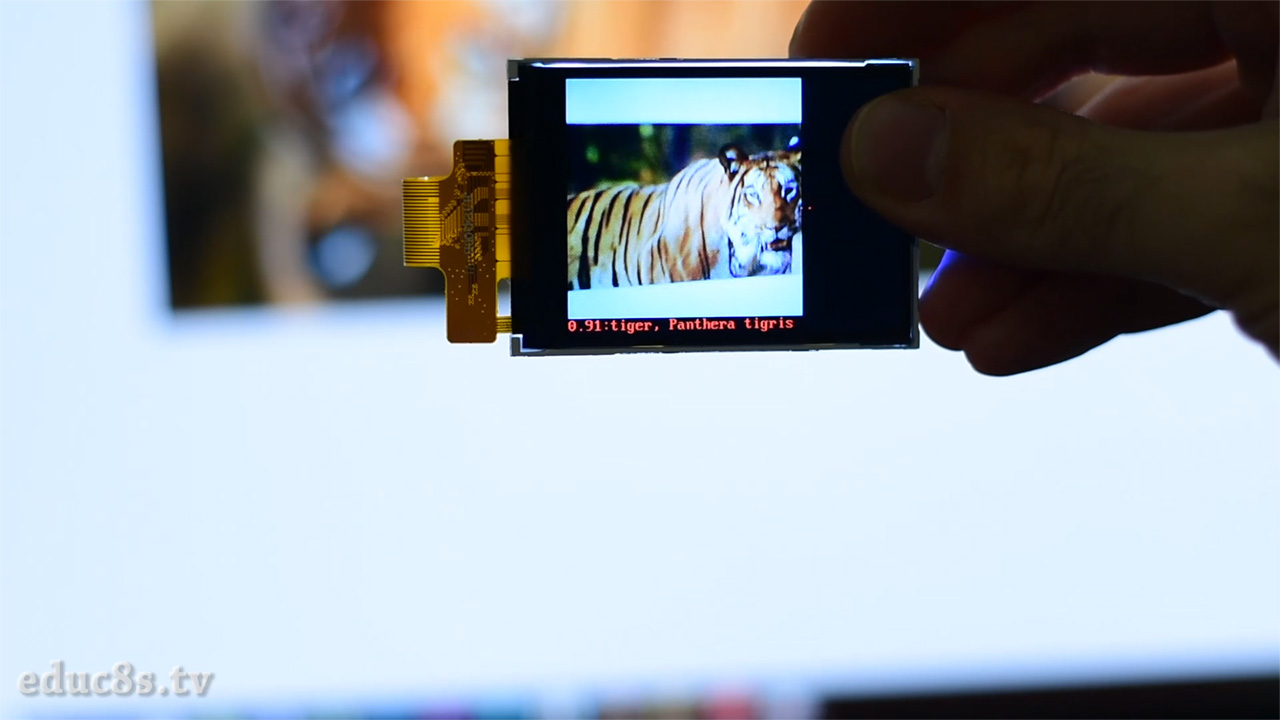
Mobilenet on the Sipeed M1 Dock
This board is not perfect though, it lacks analog inputs, wifi, and Bluetooth. So, Sipeed has just created Maixduino, an Arduino like board, with the K210 chip for AI, and with an ESP32 for everything else. Can’t wait to get my hands on this board as well.
Final Thoughts
The AI revolution has started and it is going to change everything in a few years. This is just the beginning. Boards like this would have been science fiction even 5 years ago. Our projects can now use the power of Artificial Intelligence. The pace at which AI is advancing is extremely fast, so learning the basics of AI is a very useful skill to have. I can’t wait to learn how to develop my own AI models and use them with this board. I would love to know your opinion about this board. What kind of applications do you think they will benefit from a board like this one? Thanks for your ideas and for watching the video. I will see you next week!
——————–
CODE
——————–
——————–
SUBSCRIBE ON YOUTUBE
——————–
Never miss a video: Subscribe to educ8s.tv
Where is the code for the 1000 object mobilenet?
More details here: https://bbs.sipeed.com/t/topic/682
You don’t need to train the model just donwload the trained model and the labels file and you are ready to go.
Hi Nick! Do you know if I can upload a tensorflow trained model?
By the way this link https://bbs.sipeed.com/t/topic/682 doesn’t work anymore :( Thanks for our videos!
https://github.com/tensorflow/models/blob/master/research/object_detection/g3doc/tf1_detection_zoo.md It’s specifically one of those!
When I try to connect to the Maix Dock board using OpenMV the camera is not recognised. I have updated the firmware and the serial connection works ok using putty on windows 10. Also if I open a serial connection in OpenMV itself and do a soft reset an image appears on the lcd.
Please can anyone give some help because it is becoming very frustrating. Thank you
I encountered the same problem. But when you read further then you see that he uses the MaixPy IDE. The OpenMV IDE is only for OpenMV processors NOT Maix / sipeed.