Arduino MP3 Player project
Hi guys, its nick again, welcome to today’s tutorial. Today I will be showing us how to easily build an mp3 player using the Arduino and the DFPlayer mini-module for around 10$.
This project relies heavily on the DFPlayer Mini MP3 Player which is a small and low price MP3 module with an embedded amplifier which gives it a simplified output through which it can be connected directly to a speaker or an earphone jack. The module can be used as a stand-alone module with attached battery, speaker, and push buttons or used in combination with an Arduino UNO or any other microcontroller with RX/TX capabilities.
Some of the features of the Dfplayer mini include:
- Full support for FAT16 , FAT32 file system, maximum support 32G of the TF card, support 32G of U disk, 64M bytes NORFLASH
- Works in a variety of control modes including, I/O control mode, serial mode, AD button control mode
- Can Play with advertising sound waiting function, the music can be suspended. when advertising is over the music continue to play
- Audio data sorted by folder, it supports up to 100 folders, every folder can hold up to 255 songs
- 30 level adjustable volume, 6 -level EQ adjustable

DFplayermini
For this tutorial, we will be building a simple mp3 player which will have 3 buttons, The first button will be used to Play/Pause the music currently being played, while the second one will be used to load the next song(the next button) and the last one will be used to load the previous song ( the previous button). The music files to be played using the DFplayer mini are pre-stored on an SD card which is inserted into the DF player mini.
For this tutorial, we will be using the Arduino Uno, but you can use any other Arduino or microcontroller to build this project. Ready? let’s build!
Required Parts and Where to Buy
The following parts are needed to build this project and each part can be bought by clicking on the link in front of it.
1. DFPlayer Mini ▶ https://educ8s.tv/part/DFPlayer
2. Cheap Arduino Uno ▶ https://educ8s.tv/part/ArduinoUno
3. Small Breadboard ▶ https://educ8s.tv/part/SmallBreadboard
4. Buttons ▶ https://educ8s.tv/part/Buttons
5. Speaker▶ https://educ8s.tv/part/SmallSpeaker
6. Resistor ▶ https://educ8s.tv/part/Resistors
7. Wires ▶ https://educ8s.tv/part/Wires
8. Jumper wires ▶ https://educ8s.tv/part/JumperWires
Full disclosure: All of the links above are affiliate links. I get a small percentage of each sale they generate. Thank you for your support!
[adsense]Schematics
Connect the components as shown in the image below.
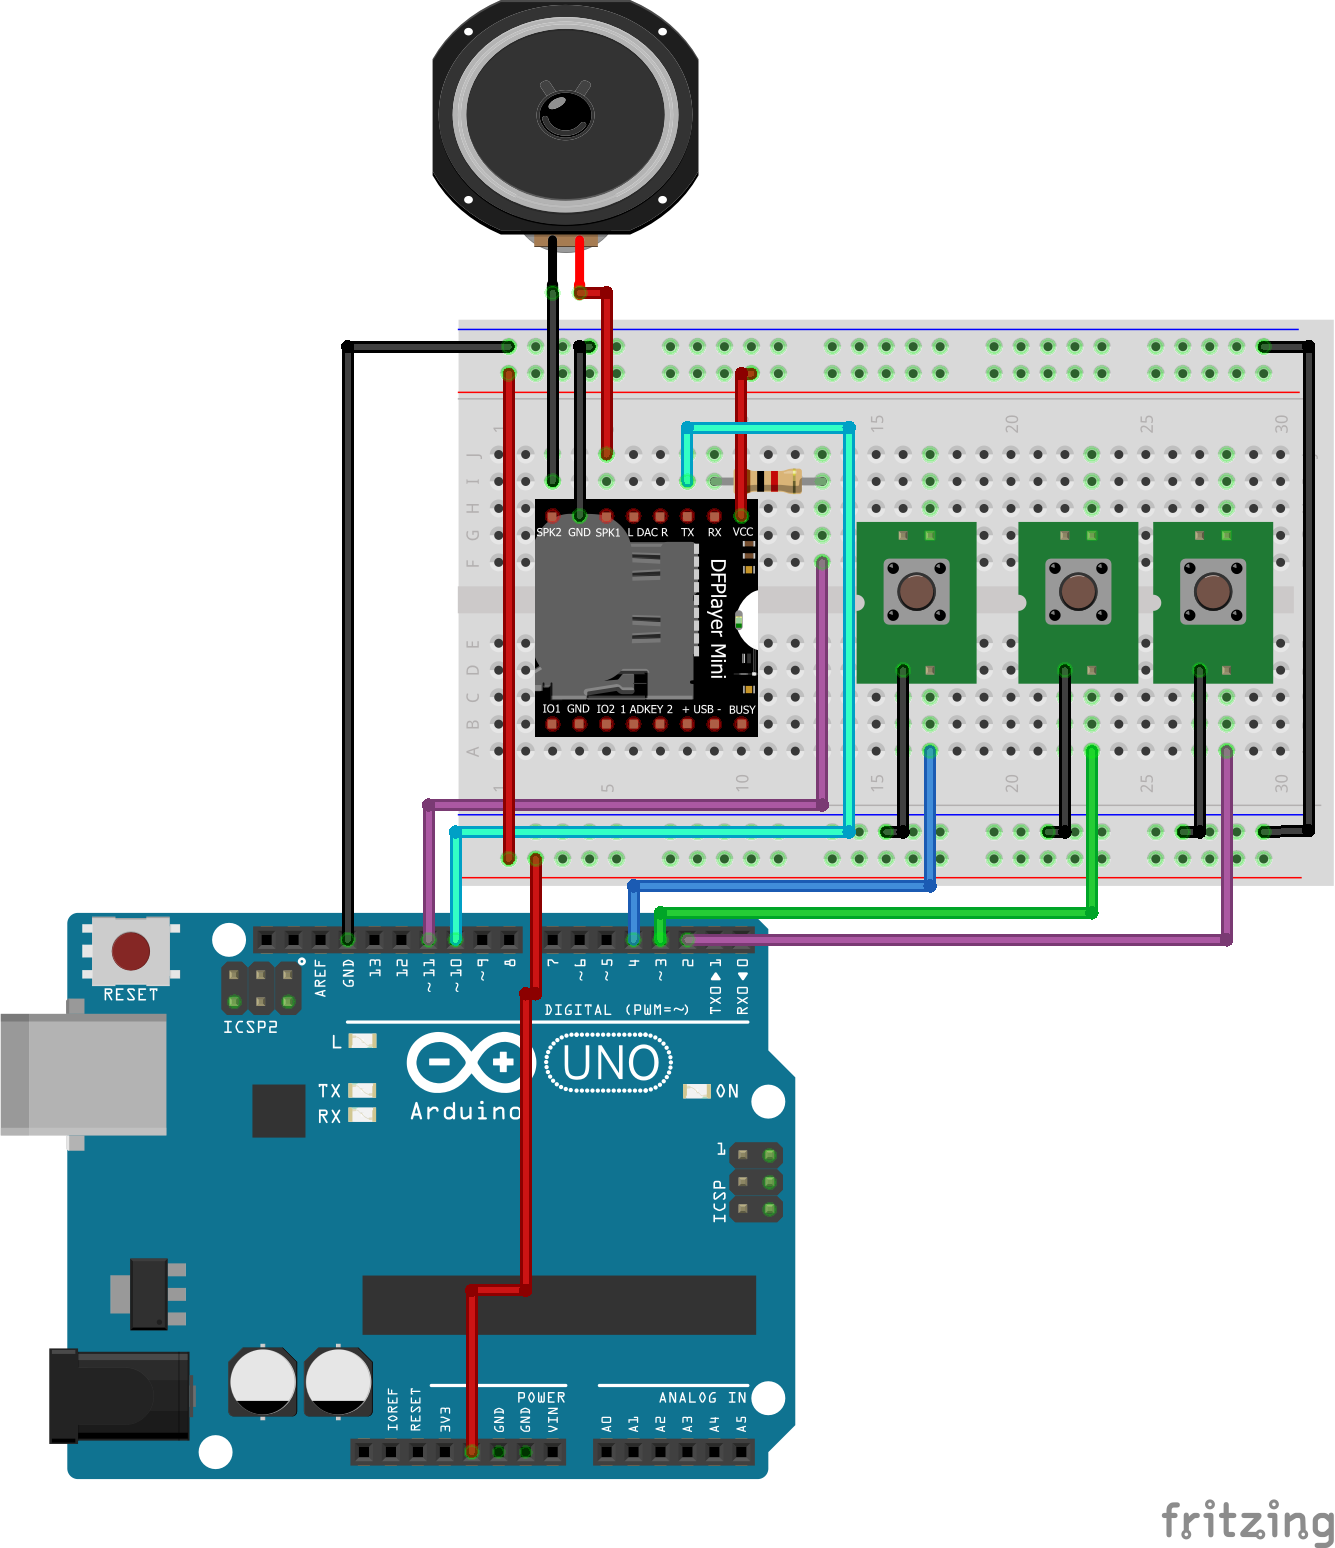
As shown above, the connection between the Arduino and the DFplayer mini is pretty simple. The pin connections are described below to make it easier to follow.
DFplayer Mini – Arduino
Rx(via resistor) ▶ D11
Tx ▶ D10
VCC ▶ 5v
Gnd ▶ Gnd
A speaker is connected to the speaker output(pin 6 and 8) of the DF player mini to air the sound being played.
You probably noticed that the pushbuttons were connected without a pull-up or pull-down resistor, check this (https://youtu.be/UodfePdNfg8) educ8s.tv tutorial to know how to use the pushbuttons without pull up or pull down resistors on the Arduino.
Go over the schematics once again to ensure everything is as it should be before proceeding to the code.
Code
The code for this project is a fairly simple one, we will be using the Arduino software serial library which comes pre-installed on the Arduino IDE as the communication between the Arduino and the DFplayer mini is over serial as earlier stated and to avoid code uploading issues that may arise from using the hardware serial(pin D0 and D1), we will be using a software serial connection. Although the DFplayer mini has its own library that enables us to write the code easily, it is not used for this tutorial, Instead, we created functions which can be called to perform the tasks involved with this project. Additional functions can be found in the description of the video on youtube.
The first thing we do in the code is, as usual, include the libraries needed for the project; in this case, the software serial library.
///              MP3 PLAYER PROJECT
/// https://educ8s.tv/arduino-mp3-player/
//////////////////////////////////////////


#include "SoftwareSerial.h"
Then we declare the pins on the Arduino to which our pushbuttons and Dfplayer mini are connected.
SoftwareSerial mySerial(10, 11);
# define Start_Byte 0x7E
# define Version_Byte 0xFF
# define Command_Length 0x06
# define End_Byte 0xEF
# define Acknowledge 0x00 //Returns info with command 0x41 [0x01: info, 0x00: no info]

# define ACTIVATED LOW

int buttonNext = 2;
int buttonPause = 3;
int buttonPrevious = 4;
boolean isPlaying = false;
Next, we move to the void setup function. here we set the pin mode of the pushbuttons, turn on the Arduino internal pull up resistors, initialize the serial communication among other things.
void setup () {

pinMode(buttonPause, INPUT);
digitalWrite(buttonPause,HIGH);
pinMode(buttonNext, INPUT);
digitalWrite(buttonNext,HIGH);
pinMode(buttonPrevious, INPUT);
digitalWrite(buttonPrevious,HIGH);

mySerial.begin (9600);
delay(1000);
playFirst();
isPlaying = true;


}
With the setup function done, we write the loop function. This, as usual, contains the set of code that will run forever. The void loop function works by reading the state of the pushbuttons after which it calls the function corresponding to the pushbutton state to either play, pause, play next mp3 or play the previous one.
void loop () {

 if (digitalRead(buttonPause) == ACTIVATED)
  {
    if(isPlaying)
    {
      pause();
      isPlaying = false;
    }else
    {
      isPlaying = true;
      play();
    }
  }


 if (digitalRead(buttonNext) == ACTIVATED)
  {
    if(isPlaying)
    {
      playNext();
    }
  }

   if (digitalRead(buttonPrevious) == ACTIVATED)
  {
    if(isPlaying)
    {
      playPrevious();
    }
  }
}
The full code for the project can be downloaded from the link below.
——————–
CODE OF THE PROJECT
——————–
That’s it for this tutorial guys, thanks for watching and reading. Don’t forget to hit the subscribe button, share, and like, its one of the few ways through which you can support educ8s.tv.
Feel free to drop any question you might have as regards this project and if you created a replica or even modified it to something better, don’t forget to share with us via the comments section. See you next time.
——————–
SUBSCRIBE ON YOUTUBE
——————–
Never miss a video: Subscribe to educ8s.tv
Hello
Do you have any plans to up date this video ? I have make this but would like some help to make this into a potable mp3 player with a Stereo Audio Jack Socket, a battery and a USB connection (ideally I would like something that uses all the DFPlayers functions). I have been looking for a simple PCB etching project and think this would be perfect starter project.
Cheers
PB
THANKS A LOT:)
Hello
I am a student, and please help me ..
When the loudspeaker is connected is not clear to me the steps.
Useful project ! Can you please add a volume control ?
Many thks
giorgos stolis
Volume control is already there: setVolume(20);
The volume up and down can be fully controlled by a pair of simple push buttons. connect one end of the button to Ground on both buttons then button 1 will go to pin 9 of the DFPlayer and the other side of switch 2 will go to pin 11 of the DFPlayer. This will then give control to both UP and Down (remember to long press or the track will change)
hello dave and to activate the play with switch puch to gnd and when you release the puch switch, the music is deactivated
I would love to control the volume too.
Hi,
This is my first Arduino project and I use Nano. Is it going to be different?
No it is exactly the same
Hi,
I have a few sounds file on my SD card. How I can play specific file? For example I want play 0004.mp3.
I did a soundboard using this module and code! Very good, i also recommend going to the link with the modules commands.
The soundboard I made has 10 buttons, 6 for sound making, 2 for volume up and down, then 2 for change of “page” when it comes to sound. first 6 sounds are effects. The rest are just sound mp3 files. Keep in mind the order of which you added the files to your SD card is what determines their play order. If they aren’t correct, copy them all into a seperate folder then drag them in at the correct order.
http://s000.tinyupload.com/?file_id=55854855949438320363
Link to my code :) Hope it’s helpfull
Hi, can you send me the code please? Im beginer and i want to do the same idea. It will help me a lot when I see the code from which I can learn.
Check out this article. It tells how to play specific tracks. https://markus-wobisch.blogspot.com/search?q=DFPlayer
Hi Joel. Me too please. The code has been removed – over 100 days :) If you would supply a new link. TIA
Hi,
I have watched your tutorial videos on building the MP3 Player with the DF module. I was successful at getting the project up and running using the play/pause/next buttons. I work with students with disabilities, and I would like to edit the code to change so each assignable button plays a specific song. How would I go about changing the code? I have tried using the soundboard code but didn’t get any luck getting each specific file to play. I have three files on the sd card named 0001, 0002 and 0003? anything i’m missing?
Hi! Can you please tell me about this project the possible ways to adjust the volume? Can I use buttons or a potentiometer?
Yes, you can do that. You can use either a potentiometer or buttons. Check the commands that the module supports.
:28: error: ‘playFirst’ was not declared in this scope
playFirst();
^
:31: error: a function-definition is not allowed here before ‘{‘ token
void loop () {
^
:62: error: expected ‘}’ at end of input
}
^
exit status 1
‘playFirst’ was not declared in this scope
I am sure, you did not copy all of the code or you added some characters, that broke the code
I am a beginner.
Hi !
Thx for your build, its just amazing!
Is it possbile to add a “buttonRandom” ?
I want to play random my music but no works. Have you a little code to help me ? thx a lot!
Thanks for this tutorial. Its a great help to me.
Is it possible to play a specific MP3 file with button 1 pressed say 001.mp3 plays then if button 1 is pressed again then play 006.mp3. ?
Hi Lee, I have the same question. Wondering if you already know the answer… Can you share it as well?
hi, how would it be the code if you just wanted to play a song wiyhout buttons?
will this program work on a elegoo mega 2560?
Hi.
I’m doing a project for my high school students with Arduino and Dfplayer. I am a music teacher and my programming levels are practically nil (also my level of English language). I have managed to reproduce sounds with a keypad and the best skecht, the one that works best for me and adapts to my characteristics, uses the hexadecimal programming system (which I do not understand at all). To locate the track I use “execute_CMD (0x03,0,01);” but I’d like to have 2 folders and I do not know what command to use … I’ve tried this with “execute_CMD (0x3F, 01.02);” but it continues executing only sounds of the first folder …
Please help!
Thank you.
Obrigada
Hi there, I am beginner and trying to experiment the with Adrino MP3 player project. With the circuit shown I am to play the different segments by changing the resistor values. My question is “How do I know which is Segment 1?” Is there any way to specify which audio goes into segment 1 and which to segment 2 and so on?
Any help will greatly appreciated.
Thanks,
Sheela
Hello,
I’m trying to have this MP3 player play continuously. (song after song after song…) but I just can’t figure out how to do this.
Someone has an idea ?
All help will be greatly appreciated !
Play_next()
When busy = 1
Hi. I would like the for the song when selected to only play once and only when the play button is pushed. Is this something I can achieve by adding onto your code?
Hola soy principiante y me gustaria plasmar este proyecto como roger beep en una emisora de CB.Mi pregunta es donde conectar el PTT para que suene la musica o sonido que grabe en la microsd al finalizar transmision.
Un saludo
This is great thank you so much for sharing. So I was trying to do a simple modification to the code to also have an led playing – not synchronized or anything – just in along with the SF Player code, and it does not work no matter what I do? Would love some help here is a link to the code: https://forum.arduino.cc/index.php?topic=677095.0
is it possible to control df player byy using two nano and nrf24 transceiver , i want to use play and pause button by using transmitter side push buttons and receiver side will be only playing audio
playNext and playPrevious were not declared.
.
Is it possible to connect this player to a bluetooth speaker? If yes, what should by Google search read? I am of advanced years and my googling usually brings me more rubbish than info I require. TIA.
j’ai réalisé le tuto mais sans succès… cela ne fonctionne pas…
merci de votre aide
le Df était à l’envers sur le bread…. merci pour votre tuto super !!
merci encore