Dear friends welcome to another Arduino project video! In this video, we are going to build an improved version of the Arduino FM radio project. There is a lot to cover so let’s get started!
Intro to the Arduino FM Radio Project
A few months back I built my first FM radio project on a breadboard using the TEA5767 FM radio module. The project works great, but it has some issues. You can watch that project video by clicking here.
As you can see I have built a new, improved version of the FM radio project, which resolves the issues we had in the previous version of the project. The sound quality the project now offers is much better, and it has some new features as well. But first, let’s hear it play a YouTube safe song I am broadcasting using this small FM transmitter…….
The sound quality is very good in my opinion if we take into consideration that we are using a very inexpensive speaker and amplifier. I replaced the LM386 amplifier module with the PAM8403, and I noticed a huge improvement in the sound quality. The amplifier module offers an embedded potentiometer to control the sound output, so we need one part less. I also replaced the potentiometer I was using to change the frequency of the Radio receiver with a rotary encoder. This way, the frequency the radio receiver is set is stable, and we also gain a button. I am using the rotary encoder button to turn the backlight of the display on or off.
Another feature I added is that if we leave the Radio Receiver at the same frequency for more than 5 minutes, it will automatically save that frequency to the Arduino EEPROM memory. So, the next time we power up the project, the radio will automatically tune in to the frequency we were listening before. Cool isn’t it?
In addition to that, I changed the way the information is displayed on the Nokia 5110 LCD. I have loaded a custom Art Deco style font to display the frequency, and I removed some information from it because I wanted it to look clean. I will publish video soon to show you how to load any font you like to the Nokia 5110 display; it is so cool! Now let’s see the parts needed in order to build this project.
——————–
WHERE TO BUY
——————–
Arduino Nano: https://educ8s.tv/part/ArduinoNano
Nokia 5110 LCD: https://educ8s.tv/part/NOKIA5110
FM Radio Module: https://educ8s.tv/part/FMRadioModule
Speaker: https://educ8s.tv/part/3WSpeaker
Rotary Encoder: https://educ8s.tv/part/RotaryEncoder
Amplifier Module: https://educ8s.tv/part/PAM8403
Wires: https://educ8s.tv/part/Wires
Breadboard: https://educ8s.tv/part/LargeBreadboard
FM Transmitter: http://bit.ly/FMTransmitterSmall
Powerbank: https://educ8s.tv/part/Powerbank
Full disclosure: All of the links above are affiliate links. I get a small percentage of each sale they generate. Thank you for your support!
[adsense]
Now, all we have to do is to connect all the parts together according to this schematic diagram.
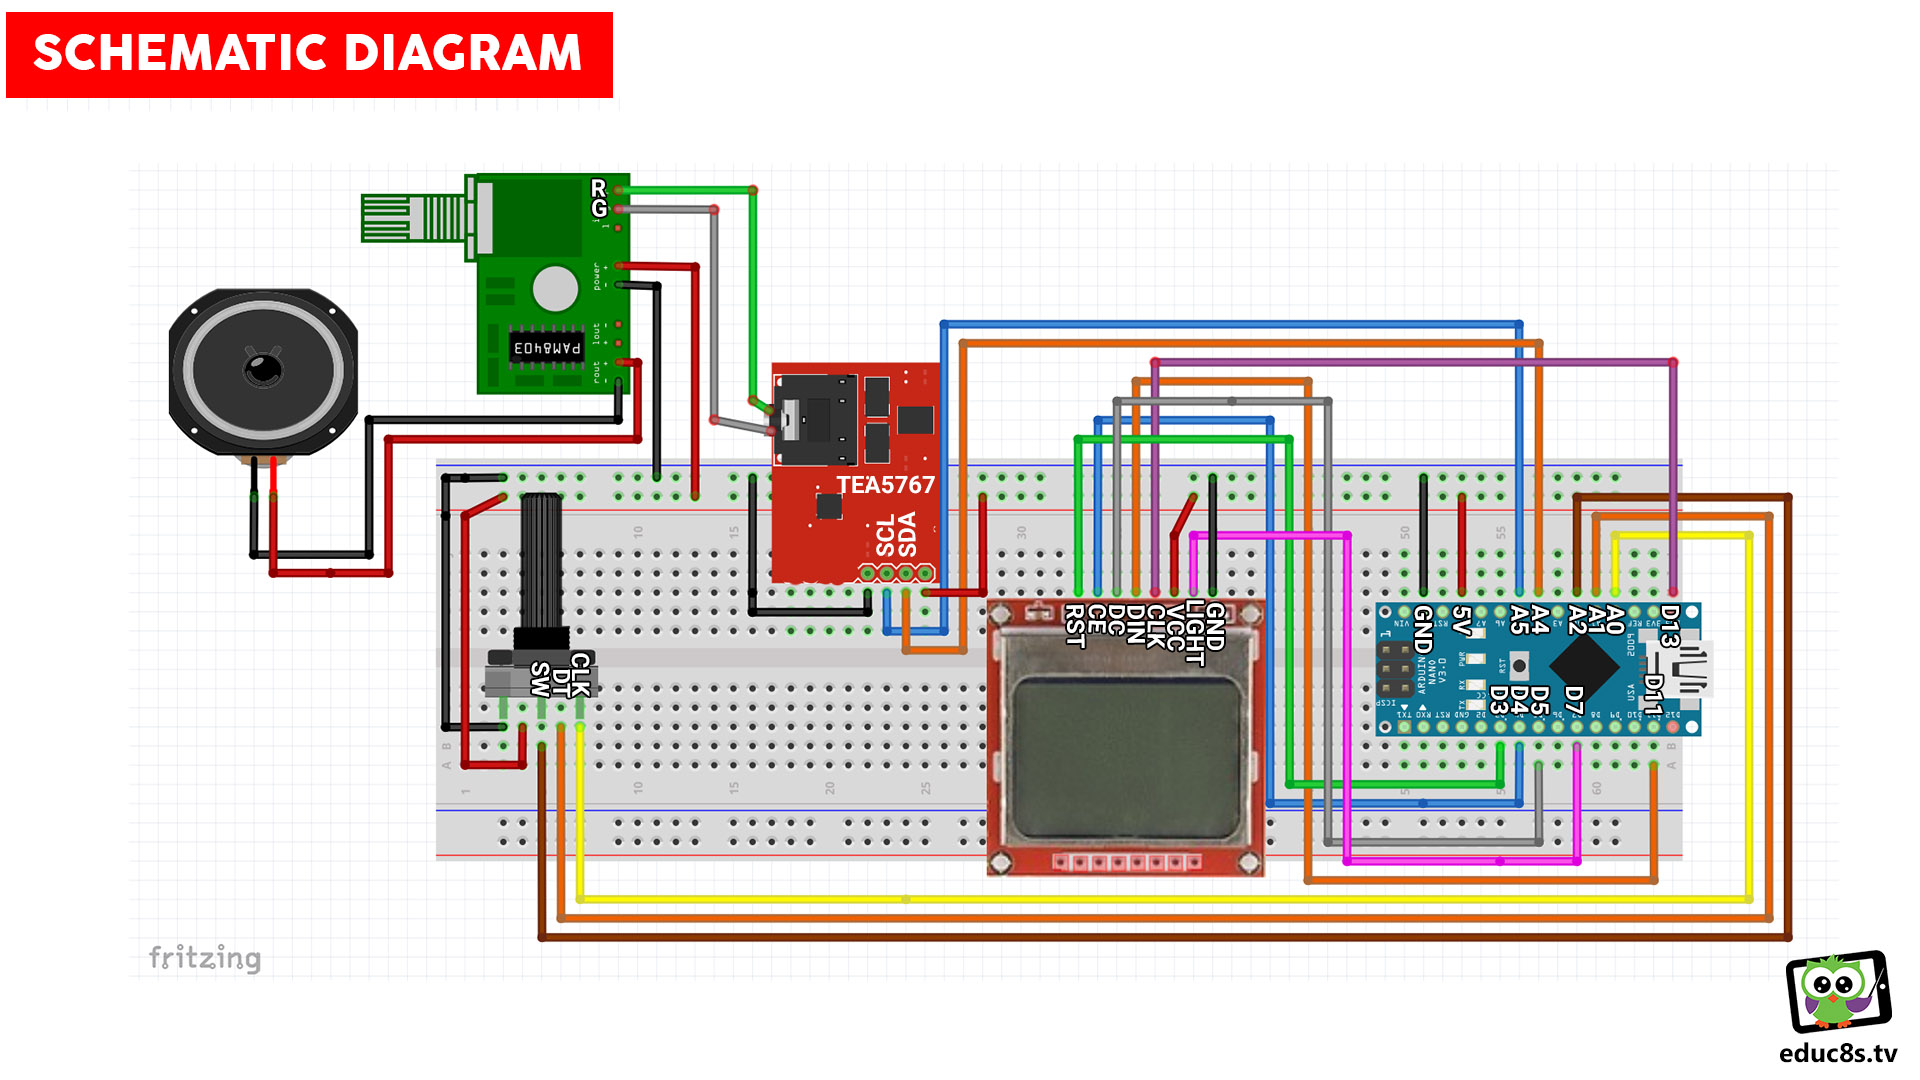
The amplifier module has two audio inputs and two audio outputs. We connect the sound output of the FM radio module to the amplifier module and the output of the amplifier module to the speakers. In this project, I am using only one speaker, so I am going to connect only the right channel of the sound output of the radio module to the right input of the amplifier module. Lastly, the right channel output of the amplifier module is connected to the speaker. Of course, don’t forget to connect the amplifier module to power via these pins here.
Now that we have connected all the parts let’s power up the project to see how it works. As you can see, the project welcomes us with a splash screen for three seconds and then reads from the EEPROM memory the saved frequency we were using before. The project works fine, the frequency knob changes the frequency, this potentiometer increases or decreases the volume of the sound and if we press the button of the rotary encoder, we can enable or disable the backlight of the display.
Let’s now go to the computer to take a quick look at the software side of the project.As you can see we are using a lot of libraries in this project. As always you can find links to all the required libraries in the below.
——————–
LIBRARIES
——————–
? TEA5767 Library: https://github.com/mroger/TEA5767
? GFX Library: https://github.com/adafruit/Adafruit-GFX-Library
? Nokia 5110 Library: https://github.com/adafruit/Adafruit-PCD8544-Nokia-5110-LCD-library
? Timer One Library: https://github.com/PaulStoffregen/TimerOne
? ClickEncoder Library: https://github.com/0xPIT/encoder
The code is more complex than most of the projects we have built so far so I won’t try to explain it in a short video. I tried to make it a simple as possible with easy to read and to understand functions. The basic idea is this: If the rotary encoder shaft has changed position and has stayed in the same position for more than 1 second we need to set that frequency to the FM Radio module. The FM radio module needs around 1 second to tune in to the new frequency so we can’t change the frequency on each rotary encoder change because this way, the frequency change will be very slow. When the new frequency is set to the module, we count how many seconds have passed since the frequency was set. If the time exceeds the 5-minute mark, we save that frequency to the EEPROM memory. You can find the code of this project in a link in the description below.
Now that the electronics are ready I can complete this project by 3d printing an enclosure for it and moving the electronics to a small prototyping board. I have already designed an Art Deco enclosure for it based on an old Radio. I have already uploaded the files to Thingiverse so that you can start 3D printing it at once if you wish. I am going to 3D print this enclosure using wood filament and publish a new video when everything is ready.
I would love to hear your opinion about this FM Radio project. Do you like the improvements I made to it? Also, do you like the enclosure I designed for it? Please post your comments and ideas in the comments section below. Also make sure to like this video if you guys enjoyed it, give me some thumbs up. I really appreciate the support. I spend a lot of time creating these videos for you guys, to help with your projects. I share everything I know and learn with you. I need any support I can get, it helps me keep going.
——————–
CODE
——————–
——————–
SUBSCRIBE ON YOUTUBE
——————–
Never miss a video: Subscribe to educ8s.tv
hey i am trying to do this project nut the lcd only lights up and doesnt show text. i have checked the wiring and its ok i dont know what else to do
Panagioti there was a small mistake at the Schematic. I have uploaded a new one, please try it again. It should work now. Cheers!
A mi me ocurre lo mismo
Hello Antonio, there was a small mistake at the Schematic. I have uploaded a new one, please try it again. It should work now. Cheers!
Same problem here. The schematic is not clear as to what the pin designations are on the Nokia display, they differ between suppliers, and the pins on the Nano are unreadable as well. Very cool project but trying to understand the display connections of this project is frustrating.
Thanks for the message, my friend. I am sorry you can’t figure out the connections from the schematic. I will try to improve it soon.
I have uploaded a new, corrected schematic. Let me know if it better now. Thanks for your feedback!
RDS &
Hello Nick,
i’m a bit stuck on a couple things, i want to set the frequency range between 89.0 and 108.0, how do i write this string and adjust the sensitivity of the encoder?
Thanks
Steve.
Thanks for this tutorial, everything is working.
Is it possible to align the frequency to the middle (center)?
I want to use the whole thing to build in a portable radio :)
Next question: when i turn on the rotary encoder, he isn’t very responsive … changing 0.1 is no problem, but when i turn fast (15 ‘clicks’) he changes something like 6 clicks.
friend, add the ability to output RDS information, signal level and volume to the display. Thanks. waiting for the continuation of the video
The FM Radio chip we are using does not support RDS. If we want to add this functionality, we have to use another module.
Hi Nick,
Why my LCD is showing 0.0 and when I increase it increases by .1 .i.e 0.1, 0.2, 0.3…..
There must be something written in the EEPROM of the board you are using. Try another one, or delete the value in the EEPROM.
I canot get the code to work need to load the library and I canot figure what to doArduino: 1.8.6 (Windows Store 1.8.14.0) (Windows 10), Board: “Arduino/Genuino Uno”
FMRadio:7:59: error: TEA5767N.h: No such file or directory
compilation terminated.
exit status 1
TEA5767N.h: No such file or directory
This report would have more information with
“Show verbose output during compilation”
option enabled in File -> Preferences.
I built the project. It worked! But… there are brief disconnections with the signal(for exp.: Music plays for 15 seconds, then a second disconnection then reconnects), how can I fix this?
And the board resets
the disconnections happen more frequent as I ncrease the volume
What kind of capacitors do I solder on to the speakers?
Hi Nick
I am trying to compile your code but I get this message : FMRadio:11:31: error: GrenadierNF18pt7b.h: No such file or directory. Where can I find this file?
Thanks
Hi Found it , radio is working, thanks for your video. Now I going to design a enclosure for this
radio.
Hello my friend !
Can you tell me what did you do to fix this problem ?
thank you !
Can you tell me where you find the library Hans. i am missing both of the 2 Grenadier files… Thanks.
Beste Hans,
Mocht je dit lezen en je bent bereid de code voor dit project naar mij te sturen zou ik dat zeer waarderen. De link naar de code hier werkt niet meer. Misschien kan je me gelijk jouw “Grenadier” oplossing meesturen. Excuus dat ik dit aan een vreemde vraag maar ik weet niet meer waar ik het vandaan moet halen.
Vriendelijke groet, Leo Franssen
franssenleo@gmail.com
hey where were you able to find the file? I’m trying to build the project but keep running into the same issue
thnk you very muchfor share. the project works perfect which fm radio modul have rds please write me. have a good day my dear friend
Greetings for South Dakota! I built this after the display on a different project I had built using the Arduino and, well the rest of this project less the amp. Of course I didn’t have the docs on the old project so hooking up the display was out of the question, so a search using the items of the project as search terms brought me to this project. I do like the project, however I did like having the Stereo indicator on the display, but it isn’t really necessary. I am putting it back in action as my daughter’s radio in her Jeep died, she wants to listen to tunes when she drives on the highway. I had made her an MP3 player but she wants to have the announcers with weather and news, thus the FM radio. Right now she is using a little belt AM/FM set I picked up at a yard sale with some powered speakers so this would be a nice upgrade, as I am putting some nice speakers with it to improve the sound quality.
Hi Nick.I built this project but the only problem is the rotary enconder is tuning at the left not right.Change the voltage on the enconder but nothing.Any help?????
‘GrenadierNF18pt7b’ was not declared in this scope
Finished the wiring and tried to compile the sketch and got the following errors:
Arduino: 1.8.10 (Windows 10), Board: “Arduino/Genuino Uno”
C:\Users\mcraf\AppData\Local\Temp\cc9TsWQF.ltrans0.ltrans.o: In function `printSignalStrength’:
C:\Users\mcraf\AppData\Local\Temp\Temp1_FMRadio.zip\FMRadio/FMRadio.ino:117: undefined reference to `signal5′
C:\Users\mcraf\AppData\Local\Temp\Temp1_FMRadio.zip\FMRadio/FMRadio.ino:117: undefined reference to `signal5′
C:\Users\mcraf\AppData\Local\Temp\Temp1_FMRadio.zip\FMRadio/FMRadio.ino:120: undefined reference to `signal4′
C:\Users\mcraf\AppData\Local\Temp\Temp1_FMRadio.zip\FMRadio/FMRadio.ino:120: undefined reference to `signal4′
C:\Users\mcraf\AppData\Local\Temp\Temp1_FMRadio.zip\FMRadio/FMRadio.ino:124: undefined reference to `signal3′
C:\Users\mcraf\AppData\Local\Temp\Temp1_FMRadio.zip\FMRadio/FMRadio.ino:124: undefined reference to `signal3′
C:\Users\mcraf\AppData\Local\Temp\Temp1_FMRadio.zip\FMRadio/FMRadio.ino:128: undefined reference to `signal2′
C:\Users\mcraf\AppData\Local\Temp\Temp1_FMRadio.zip\FMRadio/FMRadio.ino:128: undefined reference to `signal2′
C:\Users\mcraf\AppData\Local\Temp\Temp1_FMRadio.zip\FMRadio/FMRadio.ino:132: undefined reference to `signal1′
C:\Users\mcraf\AppData\Local\Temp\Temp1_FMRadio.zip\FMRadio/FMRadio.ino:132: undefined reference to `signal1′
C:\Users\mcraf\AppData\Local\Temp\cc9TsWQF.ltrans0.ltrans.o: In function `showSplashScreen’:
C:\Users\mcraf\AppData\Local\Temp\Temp1_FMRadio.zip\FMRadio/FMRadio.ino:78: undefined reference to `splash’
C:\Users\mcraf\AppData\Local\Temp\Temp1_FMRadio.zip\FMRadio/FMRadio.ino:78: undefined reference to `splash’
collect2.exe: error: ld returned 1 exit status
Hi there. I’m doing this project by myself and I counter a problem, lcd only lights up and doesn’t show text. What should I do? I followed the schematic properly.
I am facing same problem. If you found solution to it, please help me
Great project! I just finished it and it works fine. I’m going to design a simple enclosure to package the parts and print it on my 3D printer!
Thank you so much for this fun project. It forced me to learn how to solder, which is much easier than I thought.
Keep up the great work!
Hey, im getting no signal do i have to change something in the code or not
dear Nick,
Thanks for your beautiful project, it is much appreciated.
I notice i am stuck on the same thing a lot of other people are also stuck.
Where can we find the 2 “Grenadier” and the “splash” libraries ?
It would be so helpful to a lot of people…and me.
Thanks a lot for your efforts and leading hand.
Best regards, Leo, The Netherlands.
Nick
Thanks for this great project. Have the parts ordered and once here I will be building this for my grandson birthday. He really enjoys music.
I to were missing some include files, so I looked at your sketch, did a search under the Library Manager for the files I was missing and was able to install them Ran verify without any errors. I hope this helps if anyone is still having problems.
Just completed this project everything works fine except for a the frequency jumps when the encoder is turned. How can we eliminate the bounce using this encoder?
what is the electricity consumption of the set? I am thinking of using a mobile charger, and put all electronic into a empty case of a old router
what is the another onr connected in tea5767 radio module sir ?
Hi, if I were to add a gesture sensor and an
additional speaker (stereo), can you recommend how much voltage and current I need to feed the arduino nano?
Beste Hans,
Mocht je dit lezen en je bent bereid de code voor dit project naar mij te sturen zou ik dat zeer waarderen. De link naar de code hier werkt niet meer. Misschien kan je me gelijk jouw “Grenadier” oplossing meesturen. Excuus dat ik dit aan een vreemde vraag maar ik weet niet meer waar ik het vandaan moet halen.
Vriendelijke groet, Leo Franssen
franssenleo@gmail.com
C:\Users\NameHere\Desktop\FMRadio (1)\FMRadio\FMRadio.ino:14:10: fatal error: ClickEncoder.h: No such file or directory
#include //https://github.com/0xPIT/encoder
^~~~~~~~~~~~~~~~
compilation terminated.
exit status 1
Compilation error: ClickEncoder.h: No such file or directory
why did I get this error message even though ClickEncoder.h does exist in my arduino IDE library
though if I try to add the ClickEncoder manually, it will be called #include and not ClickEncoder.h?
it will be called #include Encoder.h insted of ClickEncoder.h
Hi, I used your code and connected everything properly, but the only thing that can be seen on the scher is FM Radio, I used version 2 of yours so it doesn’t work for me, what do I haveDone wrong ?
hi there I am trying to build this project but keep receiving this error code:
In file included from C:\Users\jackm\AppData\Local\Arduino15\RemoteSketchbook\ArduinoCloud\103769840539186239308\FMRadio\FMRadio.ino:10:0:
C:\Users\jackm\OneDrive\Documents\Arduino\libraries\Adafruit_GFX_Library/Adafruit_GFX.h:12:10: fatal error: Adafruit_I2CDevice.h: No such file or directory
#include
^~~~~~~~~~~~~~~~~~~~~~
compilation terminated.
exit status 1
Compilation error: exit status 1
how would I fix this as I have installed all required libraries?