Dear friends welcome back! The summer is over here in Greece, and I am thrilled to be back with a new video. In this Arduino Tutorial, we are going to build a simple Arduino FM Radio with a Nokia LCD display. Let’s get started!
Intro to the Arduino Arduino FM Radio project
Hello, guys, I am Nick and welcome to educ8s.tv a channel that is all about DIY electronics projects. In this channel, I share everything about the projects I build to help you build similar projects or inspire you to start building things because it is easy, fun and creative. Subscribe to the channel now if you do not want to miss any future video.
In this video, we are going to build this. A simple Arduino FM Radio receiver on a breadboard. Let’s listen to it for a few seconds … As you can see the radio is working fine and we can hear some music coming out of it. I am transmitting some YouTube safe tracks using this inexpensive FM transmitter at this frequency. I am using the Nokia 5110 LCD display, to display the selected frequency, the signal strength, and a stereo icon if we are receiving stereo sound. The brains of the project are the small and inexpensive Arduino Nano. We can control the volume of the speaker using this potentiometer, and we can change the Radio frequency using this potentiometer. It is a fascinating project and relatively easy to build. Let’s see how to build it.
——————–
WHERE TO BUY
——————–
Arduino Nano: https://educ8s.tv/part/ArduinoNano
FM Radio Module: https://educ8s.tv/part/FMRadioModule
Nokia 5110 LCD: https://educ8s.tv/part/NOKIA5110
10K Potentiometer: http://bit.ly/Potentiometer10K
Audio Amplifier: http://bit.ly/LM386_Module
3W Speaker: https://educ8s.tv/part/SmallSpeaker
Large Breadboard: https://educ8s.tv/part/LargeBreadboard
Audio Cable: http://bit.ly/AudioCable35
Jumper Wires: https://educ8s.tv/part/JumperWires
3 in 1 wires: https://educ8s.tv/part/Wires
FM Transmitter: http://bit.ly/FMTransmitterSmall
Power Bank: https://educ8s.tv/part/Powerbank
Full disclosure: All of the links above are affiliate links. I get a small percentage of each sale they generate. Thank you for your support!
[adsense]
The cost of the electronics is about 15$!
The project is built around this Arduino FM radio module. The module uses the TEA5767 radio chip, this one here. The chip uses the I2C interface, so it is straightforward to use with Arduino. On the module, we can also find an audio amplifier, this little chip here. Unfortunately, this is a headphone amplifier so we cannot connect a speaker to the output of the module directly since the audio signal is very weak. We need to amplify it first. Also, there is no way to control the volume that comes out of the module with software, so we are going to use a potentiometer later on. On the module there are two headphone jacks, one is for the antenna, and the other one is the standard headphone output. The module comes with this antenna, but you can easily build your own if you wish. Let’s now build the circuit according to this schematic diagram.
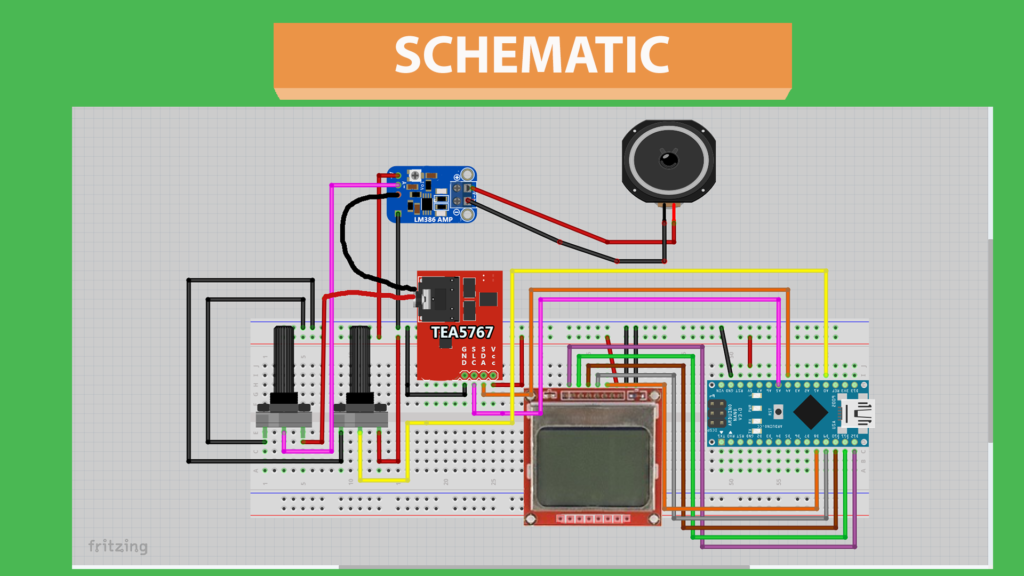
First of all, let’s place all parts on the breadboard. We connect the ground pin of every part to the breadboard’s ground rail and the Vcc pin of every part to the breadboard’s positive rail except the Potentiometer which will control the volume. Now, let’s connect the radio module. The SLC pin goes to analog pin 5 of the Arduino Nano, and the SDA pin goes to analog pin 4. Now we connect the middle pin of the potentiometer to analog pin 0. With this potentiometer, we are going to select the frequency.
Now we need to connect the Volume potentiometer to able to control the volume. I used an audio cable. I plugged in one end of the cable to the audio output of the module. Next, I cut the other end to find 4 wires inside the cable. The module outputs stereo sound, but we are going to use only one audio channel this time. So, I connect only two of the wires. One of them is GND, and the other one is the audio signal which needs to be amplified. The audio signal wire goes to the input pin of the volume potentiometer. The middle pin of the potentiometer is the audio signal that comes out.
To amplify the audio signal, I use this module which uses the LM386 amplifier chip. The audio signal goes to this pin, the ground pin from the audio cable goes to this pin. Now, all we have to do is to provide power to the module. So we connect this pin the positive rail of the breadboard and this pin to the negative rail of the breadboard. The only thing that we have to do now is to connect a small speaker to the output of the module like this. With this small potentiometer, we can control the amplification of the signal. Now, all we have to do is connect the Nokia 5110 display. Please watch my detailed video on how to use the Nokia 5110 display to see how to connect it, or follow this schematic. The last step, which is optional is to connect a 330μF capacitor to the breadboard like this to reduce the noise on the audio signal.
If we now power up the project, we can see that a splash screen is displayed for 3 seconds that and after that, we can hear sound from the speaker. The sound quality is not the best with this speaker and this audio amplifier. If I use another commercial speaker with an embedded amplifier, the sound quality is perfect. Check it out. So, the output signal from the module is perfect, but the amplifier and the speaker I used reduce the sound quality, so I need to search for better quality ones. Now that we have built the hardware let’s take a look at the software side of the project.
——————–
LIBRARIES
——————–
? Nokia 5110 Graph: http://www.rinkydinkelectronics.com/library.php?id=48
? FM Radio Library: https://github.com/mroger/TEA5767
In the Arduino FM Radio project, we use two libraries. I am using the Nokia5110 graph library and a library for the TEA5767 FM chip.
The code works like this. At first, we initialize the radio module and the display, and we display a splash screen for three seconds. I designed this splash screen in Photoshop. Watch this tutorial if you want to know how to upload your graphics to a Nokia 5110 display. Next, in the loop function, we read the value from the potentiometer that controls the frequency every few milliseconds. We get the analog value from the potentiometer, and we map it to a frequency value. Since we read an analog value this value is not constant; it goes up or down slightly even if we do not turn the potentiometer.
So to achieve a stable frequency, we only tune the radio to a different frequency if the frequency has changed considerably. So, if there is a significant shift in the frequency, we tune the radio module to that frequency, we get the signal strength, and we print it on the screen, we print the stereo icon if needed and lastly, we print the selected frequency. That is how the code works, it is simple but works ok. As always you can find the code of the project in a link the description below.
As you can see in about half an hour, we can build an Arduino FM Radio on a breadboard. How cool is that! The sound quality that we get out of this project is not great, yet. I am going to work more on this project to improve it in every field. I want to turn this project into complete radio with a retro 3D printed enclosure. First of all, I am going to try different audio amplifiers and speakers to get good audio quality out of this project. I will also move it away from the breadboard and make a permanent version of it on a prototyping board. I will also design an enclosure for this project to make it look like a radio. Of course, the code of the project needs a lot of improvements and tweaks as well. One feature I would like to add is a fine-tune functionality which will improve the sound quality even more. The project requires around 50mA of current when the backlight of the display is disabled. We can further reduce the current some software and hardware tricks so this project can be battery powered. I think, the result will be impressive, I cannot wait to see this project completed on my desk. This video was just the beginning of the long term Arduino FM Radio project!
——————–
CODE AND SCHEMATIC
——————–
——————–
SUBSCRIBE ON YOUTUBE
——————–
Never miss a video: Subscribe to educ8s.tv
I am having a problem making the code compile, it says cannot compile for Arduino nano, but shows no errors in the code, HELP PLEASE
Please provide more info to help you
Check Whether You Have Provided The Libraries Installed To The Arduino Ide
Problem with compile the code : ,,cannot compile for Arduino nano”. And the messages from below are these:
C:\Users\CONSTA~1\AppData\Local\Temp\cc6xsTFC.ltrans0.ltrans.o: In function `printSignalStrength()’:
D:\Arduino\Programe\Radio FM\Radio cu TDA 5767\Arduino TEA5767 FM Radio Receiver\FMRadio/FMRadio.ino:118: undefined reference to `signal5′
D:\Arduino\Programe\Radio FM\Radio cu TDA 5767\Arduino TEA5767 FM Radio Receiver\FMRadio/FMRadio.ino:118: undefined reference to `signal5′
D:\Arduino\Programe\Radio FM\Radio cu TDA 5767\Arduino TEA5767 FM Radio Receiver\FMRadio/FMRadio.ino:121: undefined reference to `signal4′
D:\Arduino\Programe\Radio FM\Radio cu TDA 5767\Arduino TEA5767 FM Radio Receiver\FMRadio/FMRadio.ino:121: undefined reference to `signal4′
D:\Arduino\Programe\Radio FM\Radio cu TDA 5767\Arduino TEA5767 FM Radio Receiver\FMRadio/FMRadio.ino:125: undefined reference to `signal3′
D:\Arduino\Programe\Radio FM\Radio cu TDA 5767\Arduino TEA5767 FM Radio Receiver\FMRadio/FMRadio.ino:125: undefined reference to `signal3′
D:\Arduino\Programe\Radio FM\Radio cu TDA 5767\Arduino TEA5767 FM Radio Receiver\FMRadio/FMRadio.ino:129: undefined reference to `signal2′
D:\Arduino\Programe\Radio FM\Radio cu TDA 5767\Arduino TEA5767 FM Radio Receiver\FMRadio/FMRadio.ino:129: undefined reference to `signal2′
D:\Arduino\Programe\Radio FM\Radio cu TDA 5767\Arduino TEA5767 FM Radio Receiver\FMRadio/FMRadio.ino:133: undefined reference to `signal1′
D:\Arduino\Programe\Radio FM\Radio cu TDA 5767\Arduino TEA5767 FM Radio Receiver\FMRadio/FMRadio.ino:133: undefined reference to `signal1′
C:\Users\CONSTA~1\AppData\Local\Temp\cc6xsTFC.ltrans0.ltrans.o: In function `showSplashScreen’:
D:\Arduino\Programe\Radio FM\Radio cu TDA 5767\Arduino TEA5767 FM Radio Receiver\FMRadio/FMRadio.ino:79: undefined reference to `splash’
D:\Arduino\Programe\Radio FM\Radio cu TDA 5767\Arduino TEA5767 FM Radio Receiver\FMRadio/FMRadio.ino:79: undefined reference to `splash’
collect2.exe: error: ld returned 1 exit status
Can you ,please, help me to find the solution?
did you manage to solve it? i’m having the same issue
nvm found the problem you should put the three files in the same folder, FMRadio.ino(the code) with both splash.c and icons.c so the code can use both files.
if i want to do it without the amplifier since i would use an amplified speaker as you showed as alternative for better sound, then is the volume potentiometer needed and then how to cable it ?
Hello any idea what could be causing these error messages any help appreciated
Arduino: 1.8.5 (Windows 10), Board: “Arduino Nano, ATmega328P”
C:\Users\fox\Documents\ARDUINO\FM radio\FMRadio\FMRadio.ino: In function ‘void printStereo()’:
C:\Users\fox\Documents\ARDUINO\FM radio\FMRadio\FMRadio.ino:107:30: warning: deprecated conversion from string constant to ‘char*’ [-Wwrite-strings]
lcd.print(“STEREO”,55,2);
^
C:\Users\fox\AppData\Local\Temp\ccyJnbIN.ltrans0.ltrans.o: In function `printSignalStrength’:
C:\Users\fox\Documents\ARDUINO\FM radio\FMRadio/FMRadio.ino:113: undefined reference to `TEA5767N::getSignalLevel()’
C:\Users\fox\AppData\Local\Temp\ccyJnbIN.ltrans0.ltrans.o: In function `printStereo’:
C:\Users\fox\Documents\ARDUINO\FM radio\FMRadio/FMRadio.ino:103: undefined reference to `TEA5767N::isStereo()’
C:\Users\fox\AppData\Local\Temp\ccyJnbIN.ltrans0.ltrans.o: In function `__static_initialization_and_destruction_0′:
C:\Users\fox\Documents\ARDUINO\FM radio\FMRadio/FMRadio.ino:11: undefined reference to `TEA5767N::TEA5767N()’
C:\Users\fox\AppData\Local\Temp\ccyJnbIN.ltrans0.ltrans.o: In function `setup’:
C:\Users\fox\Documents\ARDUINO\FM radio\FMRadio/FMRadio.ino:32: undefined reference to `TEA5767N::setMonoReception()’
C:\Users\fox\Documents\ARDUINO\FM radio\FMRadio/FMRadio.ino:33: undefined reference to `TEA5767N::setStereoNoiseCancellingOn()’
C:\Users\fox\AppData\Local\Temp\ccyJnbIN.ltrans0.ltrans.o: In function `loop’:
C:\Users\fox\Documents\ARDUINO\FM radio\FMRadio/FMRadio.ino:54: undefined reference to `TEA5767N::selectFrequency(float)’
collect2.exe: error: ld returned 1 exit status
exit status 1
Error compiling for board Arduino Nano.
I forgot to mention I did have the splash and icons files in the same directory. Libraries are in the Arduino programfiles library directory
You have to install the FM library correctly. Please Google how to install a library on Arduino for more info. Cheers!
Is there any way i can make it so it will scan all the stations unmuted in a constant loop?
Hello friend. I’m getting the following errors when compiling:
C:\Users\Rasmu\Documents\Arduino\FMRadio\FMRadio.ino: In function ‘void printStereo()’:
C:\Users\Rasmu\Documents\Arduino\FMRadio\FMRadio.ino:107:30: warning: ISO C++ forbids converting a string constant to ‘char*’ [-Wwrite-strings]
lcd.print(“Stereo”,55,2);
^
C:\Users\Rasmu\Documents\Arduino\libraries\TEA5767-master\TEA5767N.cpp: In function ‘transmitData.constprop’:
C:\Users\Rasmu\Documents\Arduino\libraries\TEA5767-master\TEA5767N.cpp:92:13: warning: iteration 5 invokes undefined behavior [-Waggressive-loop-optimizations]
Wire.write(transmission_data[i]);
^
C:\Users\Rasmu\Documents\Arduino\libraries\TEA5767-master\TEA5767N.cpp:91:18: note: containing loop
for (int i=0 ; i<6 ; i++) {
^
I have the same problem. Please let me know if you have found a solution to these problems. If anybody else has the answer to this please post the solution.
Hello, I have created this schematic and when booting it up, the screen is stuck at the frequency 78.0 and the signal strength is not shown. What would be the main cause of this? Know any troubleshooting methods I should do?
It’s work fine fine fine!!!!! Many thanks!!! from Brazil.
Hi Nick,
Love you tutorials.
One this tutorial you said “The last step, which is optional is to connect a 330μF capacitor to the breadboard like this to reduce the noise on the audio signal.” however I can not see on the schematic were exactly the capacitor needs to go. Can you please help. Thanks
Hi Nick,
A great tutorial! It has driven me to retrofit Arduino + FM into my old radio and voila – the outcome is here:
https://github.com/pskowronek/unitra-fm-radio-arduino/
Hello I’ve the same issue than Rasmus :
I’m getting the following errors when compiling:
C:\Users\leggxix\Documents\Arduino\FMRadio\FMRadio.ino: In function ‘void printStereo()’:
C:\Users\leggxix\Documents\Arduino\FMRadio\FMRadio.ino:107:30: warning: ISO C++ forbids converting a string constant to ‘char*’ [-Wwrite-strings]
lcd.print(“Stereo”,55,2);
^
C:\Users\leggxix\Documents\Arduino\libraries\TEA5767-master\TEA5767N.cpp: In function ‘transmitData.constprop’:
C:\Users\leggxix\Documents\Arduino\libraries\TEA5767-master\TEA5767N.cpp:92:13: warning: iteration 5 invokes undefined behavior [-Waggressive-loop-optimizations]
Wire.write(transmission_data[i]);
^
C:\Users\leggxix\Documents\Arduino\libraries\TEA5767-master\TEA5767N.cpp:91:18: note: containing loop
for (int i=0 ; i<6 ; i++) {
^
So display works but I can't change radio frequency.
Hello m8…
I’m trying to construct this FM Radio and i’m not able to get it working.
The trick seems to be in the reading of the frequency pot.
I’ve added this few lines :
“Serial.print(F(“analogPin=”));
Serial.println(analogRead(analogPin));
Serial.print(F(“val=”));
Serial.println(val);”
between the line “val = val/30;” and the line “frequencyInt = map(val, 2, 1014, 8700, 10700); //Analog value to frequency from 87.0 MHz to 107.00 MHz ”
to see what is happening. It seems the the reading of the analog pin is good (I obtain on the serial monitor lines as “analogPin=904” with values between 0 and 999 according to the position of the pot.
The value of “val” is always zero.
What is happening ….
Thank you for any help.
Regards
Serge
I have been reviewing your work for a while. The initial FM radio v.1 picture appears, but then there is no image or text. I could not fix what I did. I would be very happy if you could help. I would appreciate it if they shared similar experiences.
Solved the problem.Arduino nano card is broken
Can you help me pleasse.
I can not compile the program.
When I tree says:
FMRadio:7:10: fatal error: TEA5767N.h: No such file or directory
#include //https://github.com/mroger/TEA5767
^~~~~~~~~~~~
compilation terminated.
exit status 1
TEA5767N.h: No such file or directory
Sorry, now it’s OK. Lib was in a diferent folder. Sorry for that-
i am still facing this problem please help i have made this project for my college
Where can I found a detalled schematic diagram of the connections.
Thank you
I’ve been having a lot of issues trying to make this work on an Arduino micro. Is the code incompatible? On my screen, the signal of my antenna is always 0 and the frequency is stuck in 87.0 MHz.
Hello!
I´m having the same problem with nano. The screen works fine, but the frequency is stuck at 87.0 and there’s no sound at all. Can someone pleas tell, what could be the problem. Thanx.