Hey guys. welcome to today’s tutorial. Today we will look at how to establish a C# Application Communication with the Arduino. We will basically be building a C# windows application to send data and commands to an Arduino.
Intro to the C# Application Arduino Communication Tutorial
In today’s tutorial, we are going learn how to send commands from applications and programs running on a computer to the Arduino.
To demonstrate the ease with which you can control an Arduino project using a C# Application running on your computer, we will be equipping this project with the ability to receive commands from the application to control its IO pins to perform actions like turning on or off an LED, displaying information on an LCD amongst others.
The main ingredient which makes communication between the Arduino and the c# software we will be building possible is the Serial communication protocol. Applications and programs (including the Arduino IDE) running on a computer are able to interact with the Arduino due to the presence of the onboard USB to Serial converter (FTDI chip) on the Arduino. So whenever a command is sent from the C# program either via the click of a button or any other action on the GUI, the C# program sends the corresponding instruction to the Arduino via a previously established serial communication port. The Arduino receives the command and takes the related action.
Required Parts and Where to Buy
The following components are required to build this project and they can each be bought by clicking on the link in front of them.
- Arduino Mega: https://educ8s.tv/part/ArduinoMega
- LCD Shield: https://educ8s.tv/part/KeypadShield
- LEDs: https://educ8s.tv/part/LEDs
- Resistors: https://educ8s.tv/part/Resistors
- Small Breadboard: https://educ8s.tv/part/SmallBreadboard
- Wires: https://educ8s.tv/part/Wires
- Power Bank: https://educ8s.tv/part/Powerbank
Full disclosure: All of the links above are affiliate links. I get a small percentage of each sale they generate. Thank you for your support!
[adsense]
Schematics
The first thing we should do is to build the hardware for this project. The hardware as earlier described will include 3 LEDs and a 16×2 LCD display shield to display text sent via the C# application.
Connect the components as shown in the schematics below. The LCD shield is plugged directly on the Arduino board without wires.
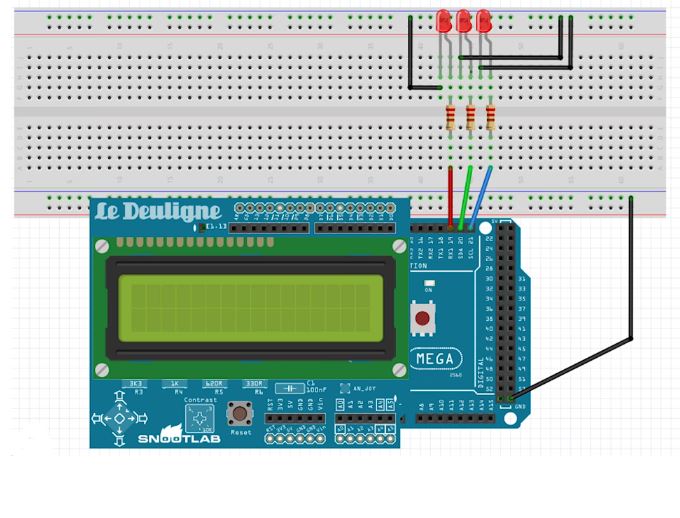
The schematics is simple but check again to ensure everything is connected as it should be especially the LEDs. The schematic is also available for download under the download section alongside the code.
Code
The code for this project is divided into two: The C# Application and the Arduino code to run on the hardware. To start with the most challenging, we will go over the c# application first.
C# Application
The C# based application software that we are going to develop today, will run only on Windows, it won’t work on Linux or Mac. We will be using the use Visual Studio 2017 community edition in order to develop the application. This edition of the visual studio is absolutely free, it is easy to use and one can easily build a windows application in minutes using it.
The first thing is to install the visual studio IDE following the prompt from the installer after downloading and launch an instance of the IDE.
Now you have two options, you can create a new project and build your own application from scratch using the C# programming language or you can download my project and modify it to achieve your desired results. Of course, you want to just test the project and can just run the executable that you can find in the description of the video. If this is the first time you are using Visual Studio, please watch some tutorials on YouTube to help you get started. Since Visual Studio is very popular you can find great tutorials online. I won’t show how I built this Windows Application in detail in this video but if you are interested I can prepare another very detailed tutorial on that. Are you interested in a detailed tutorial on how to build a Windows Application like this on Visual Studio? Please vote by clicking on the card here.
Let’s see how you can build your own Application. From the Menu on the Start Page we Select File-> New -> Project and we select to create a Visual C# -> Windows Classic Desktop -> Windows Forms App. We define a name for the Project and we press OK. That’s it a new project has been created and we can start to build our UI. As you can see, there are two tabs on the main project window. In the Form1.cs file we write our C# code. In the Form1.cs [Design] tab we design the User Interface of our Application. From the toolbox on the Left, we can select any tool we like and we can drag and drop it on our form. It is that easy. Each User Interface element has some Properties. We can modify them from this window. For example, we can change the button text here. If we now press the Start button we can see our application running.
Let’s now open the ComputerToArduino project to see how it works. This is the UI design and this is the code of the project. Before we start let me explain to you how this project works. I have created a simple communication protocol for this project which consists of 6 commands. Each command is 4 characters long and it can be followed by some data. Each command starts with the # character and it is terminated by the \n symbol. This symbol will tell the Arduino that the command is complete so it can act. So we have the following commands:
- STAR for Start
- STOP
- TEXT
- LED1
- LED2
- LED3
The STAR command tells the Arduino to wait for commands from the computer.
The STOP command tells the Arduino that the computer has disconnected from it.
The TEXT command is followed by the text we want to display on the LCD. For example, if we write #TEXTYOUTUBE\n on the serial port the word YOUTUBE will appear on the display.
The LED1, LED2 and LED3 commands control the state of each LED. So if we want to turn on the first LED we write the following command to the serial port: #LED1ON\n . If we want to turn off the second LED we send the command #LED2OF . The same thing applies to the third LED as well.
That’s the very basic protocol I use in this project. Of course, you can design and use your own protocol which can use many more commands.
In the code now at first, after the User Interface is initialized we disable all the controls. Then we get the available serial ports on the computer and we load them on the combox. When we press the Connect button, the button1_Click method is called and we try to connect to Arduino if we are not already connected. In order to connect to Arduino, we open the Serial port, and we send a command to it. We simply write #STAR\n to the serial port. Then we change the button text and we enable all the controls on the user interface. Now if we write a text on the textbox and press the write button, we get the text from the textbox and write it to the Serial port with the command TEXT. Also, when the state one of the checkboxes changes we send the command LED1 for example with the state, on or off. Lastly, when we press the connect button and we are already connected to Arduino we send the STOP command.
Now let’s take a quick look at the Arduino code. At first, we initialize the display. Then
we wait for serial data. When we receive data on the serial port we save them in the variable inputString until we receive the \n character. When we receive this character we know that command is complete, so we have to act. If we receive the TEXT command for example, we know that we have to print something on the LCD display. So, we remove the first five characters from the inputString variable, because that’s the command, we delete then last 2 character which is the \n symbol and we print the remaining characters on the display. We do something similar when we receive an LED command. We read the next two characters after the command to see if we need to turn the LED on or off and we act accordingly. As you can see the Arduino code is very simple, we just use so if statements to respond to the commands sent by the computer. As always you can find the code of the project, both the Arduino Code and the C# code in the description of the video below.
From this demonstration project, you can see that it is relatively easy to build your own Windows applications to control an Arduino. If you learn the basics of C# and Visual Studio you can build impressive projects. You can build your own computer peripherals! There are so many projects that we can build around a computer. I have already a project in mind that I am going to build soon. It is going to build an external Arduino computer monitor which will display the CPU usage, memory usage and so on in real time. I think this is going to be cool. I would love to hear your ideas as well. Do you find Computer to Arduino communication useful and if so what kind of projects are you going to build? Please post your comments in the comments section below and don’t forget to like the video and share it with your friends if you find it interesting!
From the link below you can download the code for the C# Application Arduino Communication Tutorial.
If we program the Arduino, we can see, that the LCD display shows the message “Ready to connect”, which means the Arduino is programmed successfully and it is waiting for commands from the computer. Then we open the Computer application, we select the serial port that the Arduino is connected to and we press connect.
Now we can control the Arduino from the computer! How cool is that! Let’s now see how to develop the computer software to send commands to the Arduino.
——————–
CODE OF THE PROJECT
——————–
——————–
SUBSCRIBE ON YOUTUBE
——————–
Never miss a video: Subscribe to educ8s.tv
Hey Nick, I think the C# code in the project above Is from another project!
Only the .exe .ino .png and the README seems ok, the additional files especially the FORM files looks like they are from another project, Maybe the upcoming project you mention in this projects video. which Actually sounds very interesting.
Keep up the good work.
best whishes
FUJAC
good job
Dear friend
I’m from chile. Some time ago I follow your publications on youtube. You really do it professionally. Congratulations..
This post has been very useful for me, I have been able to send instructions to my arduino without problems. And everything works very well.
But I have not been able to do the opposite, ie send commands from arduino to do my software in C #.
Should I use a team or something? Could you help me with that?
Thank you very much
Claudio
Claudio, a casi 2 años tu posteo, pero yo estoy trabajando en lo mismo, leer info desde el puerto USB del arduino. Si por alguna casualidad lles esto, por favor dime si lograste hacerlo.
Claudio, almost 2 years since you post here, I’m working in that, read from USB port at Arduino. If you read this comment, please tell me if you could do that.
Cheers.
Mauricio.
thanks Bro … you are the best
wahid
Indonesia
The project above is just Awesome:)
I think we can also improve the app by adding UI element to the form like Progress bars for temperature sensor,many similar UI elements can also make a data acquisition (DAQ) systems like we can store the reading from Arduino to excel sheet using USB connection only.
Again,keep posting & Thank You!!:)
Am I the only whos source code in visual studio is missing? Not sure what I am doing wrong but can’t seem to find this source code in .net. Please advise.
hello sir …This is awesome topic
good work sir…
But I have not been able to do the opposite, i e send data from arduino to my software like notepad build on computer. pls help
Hello there,
First of all, I congratulate you for your works and follow you.
I want to consult you something,
How can i change the codes according to two different write box for send to two different lcd 16×2 display.
and first lcd connected to pc and the other is connected to esp8266 (+ narduino Nano) or using nrf24L01.
….
I look forward to your answer.
Thanks alot.
Hello, I will use ssd1306 oled instead of lcd 16×2,
so How can i change to codes (arduino and C#)
hey! if you are still waiting help reply me