ESP32 Internet Radio
Dear friends welcome to another project video! Today we are going to build an ESP32 Internet Radio device with a big 3.5” display using an inexpensive ESP32 board. Believe it or not, we can now build an ESP32 Internet Radio in less than 10 minutes and with less than 30$. There is a lot to cover so, let’s get started!
Intro to the ESP32 Internet Radio
Hello, guys, I am Nick and welcome to educ8s.tv a channel that is all about DIY electronics projects. In this channel, I share everything about the projects I build to help you develop similar projects or inspire you to start making things because it is easy, fun and creative. Subscribe to the channel now if you do not want to miss any future video.
A few months ago, I completed this FM Radio project which works great and looks even better in my opinion. If you want to see how I built this project you can watch the following video.
The problem is that, although this radio looks cool it is not practical because I live in a small town in southern Greece and the big Greek radio stations I prefer to listen to, do not have transmitters around here. So, I listen to my favorite radios online on my laptop or tablet pc which is also not so practical. So, today I am going to build an Internet radio device in order to be able to listen to my favorite radio stations from all over the world!
As you can see, a first version of the ESP32 Internet Radio project is ready on a breadboard. Let’s power it up. As you can see the project connects to the Internet and then streams music from predefined Radio Stations. Let’s listen to it for a few seconds.…………..I have tuned in to the Real FM radio station from Athens and by using these buttons we can change the Radio Station we are listening to. I have saved my favorite radio stations to the memory of the ESP32 so I can access them easily.
With this potentiometer, I can change the volume of the speaker. I display the Name of the Radio Station we are listening to on a big 3.5” display with a retro User Interface. The project works fine and it is very easy to build. You can build the same project in less than 10 minutes but you need to have some experience. If this is your first project, consider building a simpler one first, to gain some experience. Check my channel for simple project ideas and when you are more comfortable with the Arduino the electronics come back to build this cool project. Let’s now start building our own ESP32 Internet Radio.
——————–
WHERE TO BUY
——————–
ESP32: https://educ8s.tv/part/ESP32
MP3 decoder: https://educ8s.tv/part/MP3Decoder
Amplifier: https://educ8s.tv/part/PAM8403
3W speaker: https://educ8s.tv/part/3WSpeaker
3.5″ Nextion Display: https://educ8s.tv/part/Nextion35
Push Buttons: https://educ8s.tv/part/Buttons
Breadboard: https://educ8s.tv/part/LargeBreadboard
Wires: https://educ8s.tv/part/Wires
Full disclosure: All of the links above are affiliate links. I get a small percentage of each sale they generate. Thank you for your support!
The total cost of the project is around 40$ but if you don’t use a display the cost of the project is around 20$. Amazing stuff. We can build our own Internet radio with just 20$!
[adsense]
The Electronics
The heart of the project is, of course, the powerful ESP32 board which offers Wi-Fi connectivity and a lot of memory. As you can see from the specs, the ESP32 is a beast and it costs around 7$! The ESP32 board connects to the Internet and then it receives MP3 data from the radio station we are listening to.
The MP3 data is then sent to the MP3 decoder module using the SPI interface. This module uses the VS1053 IC. This IC is a dedicated hardware MP3 decoder. It gets the MP3 data from the ESP32 and converts it really fast into an audio signal. The audio signal that it outputs at this audio jack is weak, so we need to amplify it. That’s why I am using a PAM8403 audio amplifier to amplify the audio signal and then send it to a speaker. I have also connected two buttons to the ESP32 just to change the MP3 Stream we are getting data from and a Nextion display to display the Radio station we are listening to.
I chose to use a Nextion display for this project since it is very easy to use. We only need to connect one wire to control it. The Nextion displays are new kind of displays. They have their own ARM processor at the back which is responsible for driving the display and creating the graphical user interface. So, we can use them with any microcontroller and achieve spectacular results. I have prepared a detailed review of this Nextion display which explains in depth how they work, how to use them and their drawbacks. You can watch it by clicking on this card.
All we have to do now is to connect all the parts together according to this schematic diagram. You can find a link to it in the description of the video below. The connection is straightforward.
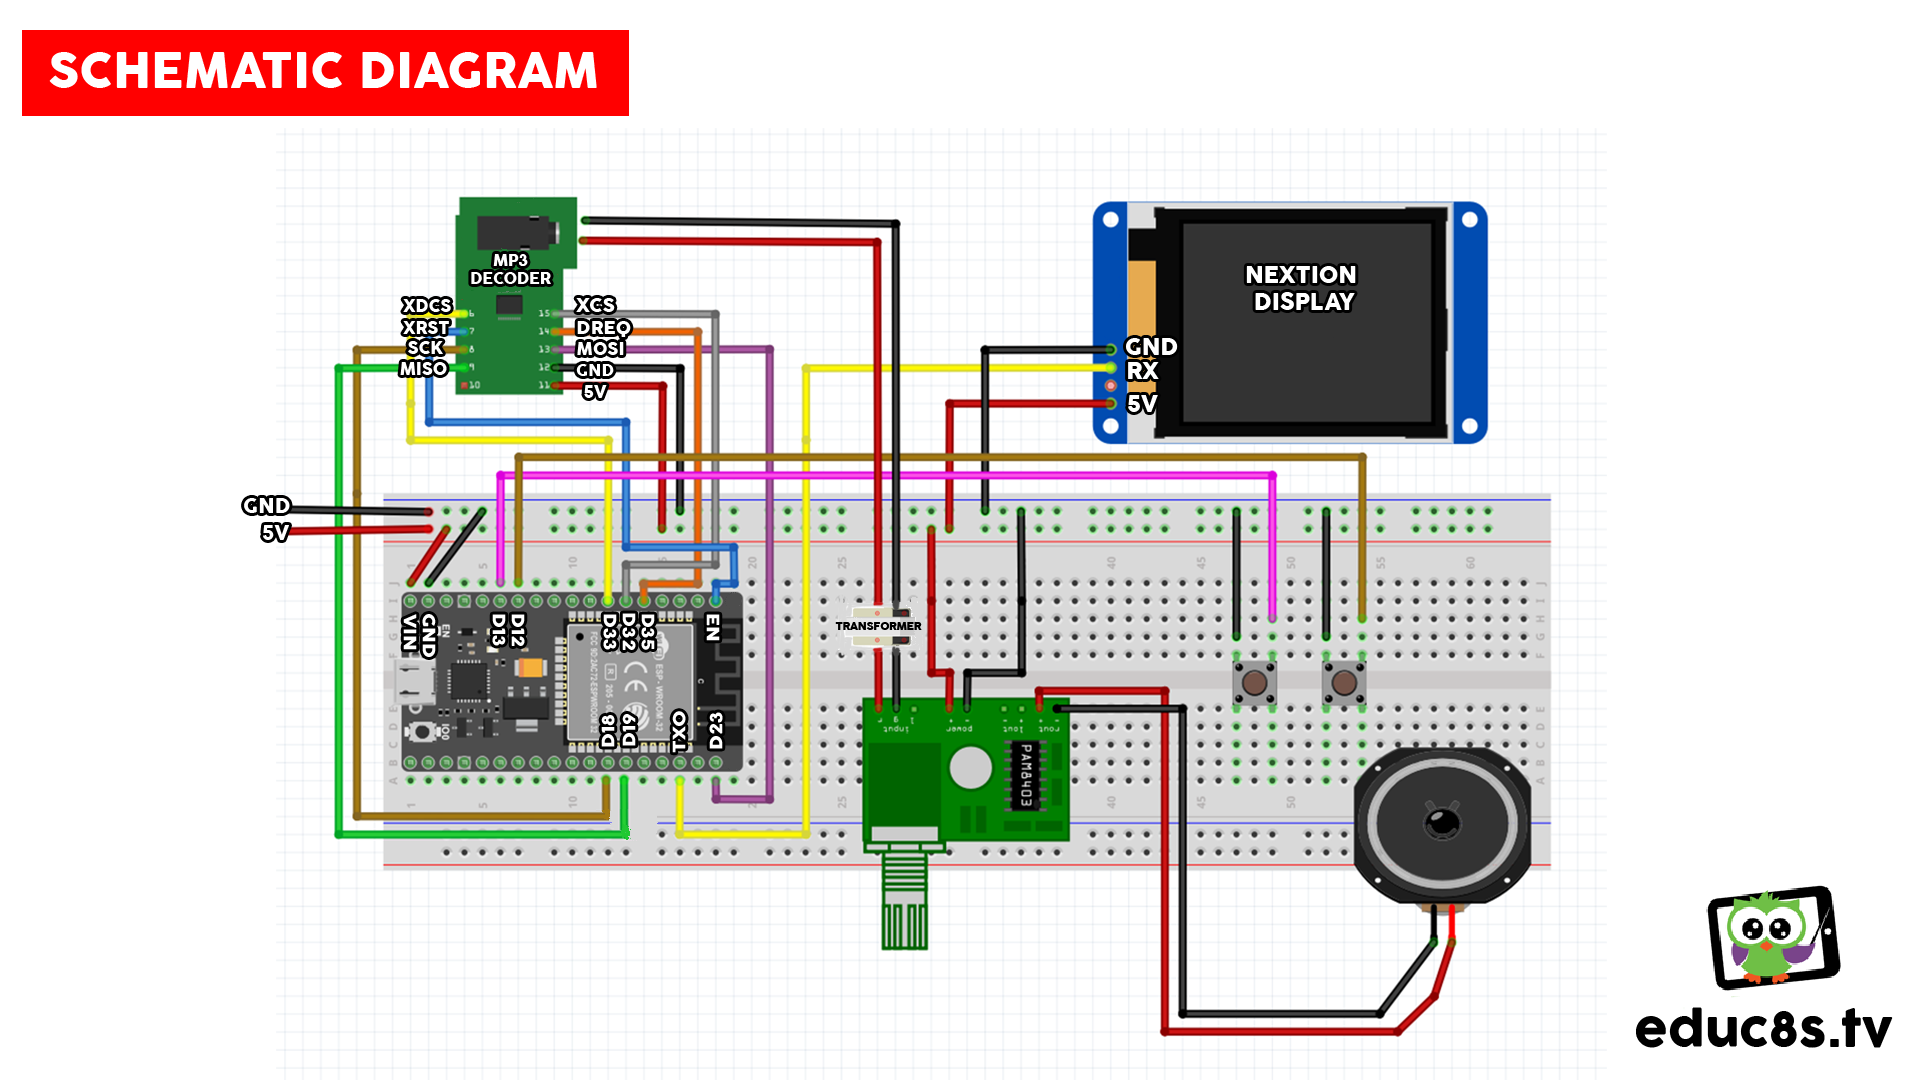
There is one thing to note though. The MP3 decoder module outputs a Stereo Signal but I am using only one audio channel in this project. In order to get the audio signal, I connected an audio cable to the audio jack of the module, and cut it to reveal four wires inside. I connected two of the wires. One of them is the GND and the other one is the audio signal of one of the two audio channels. If you wish you can connect both channels to the amplifier module and drive two speakers.
To send data to the display, we only need to connect one wire to the TX0 pin of the ESP32. After connecting the parts, we have to load the code to the ESP32, and we have to load the GUI to the Nextion display.
To load the GUI to the Nextion display, copy the InternetRadio.tft file I am going to share with you to an empty SD card. Put the SD card into the SD card slot at the back of the display. Then power up the display, and the GUI will be loaded. Then remove the SD card and connect the power again.
After successfully loading the code, let’s power up the project. It displays the text “Connecting…” for a few seconds on the display. After connecting to the internet the project connects to a predefined radio station. The hardware is working as expected but now let’s see the software side of the project.
The code of the ESP32 Internet Radio project
First of all, let me show you something. The code of the project is less than 140 lines of code. Think about it, we can build an Internet Radio with a 3.5” Display with 140 lines of code, this is amazing. We can achieve all this using various libraries of course which contain thousands of lines of code. This is the power of Arduino and the Open source community. It makes things easy for makers.
In this project, I am using the VS1053 library for the ESP32 board. At first, we have to define the SSID and the Password of the Wi-Fi network. Next, we have to save some Radio Stations here. We need the host URL, the path where the stream is located and the port we need to use. We save all this info into these variables. I have included 4 radio stations in this example. In the setup function we attach interrupts to the buttons, we initialize the MP3 decoder module and we connect to the Wi-Fi.
In the loop function, first of all, we check if the user has selected a different radio station than the one we are getting data from. If so, we connect to the new radio station else we get data from the stream and send them to the MP3 Decoder module. That’s all! When the user presses a button, an interrupt happens, and changes the value of a variable which tells which stream to connect to. To update the display, we simply send some commands to the serial port.
Now let’s take a look at the Nextion Display GUI. The Nextion GUI consists of a background picture and a picture which displays the name of the Radio Station. The ESP32 board send commands to change the name of the radio station from the embedded images. It is very easy. Please watch the Nextion display tutorial I have prepared some time ago for more information. You can quickly design your own GUI if you wish and display more things on it. As always you can find the code of the project in a link in the description of the video.
——————–
CODE
——————–
——————–
SUBSCRIBE ON YOUTUBE
——————–
Never miss a video: Subscribe to educ8s.tv
To change the ssid and password I tried to open the InternetRadio.tft file, but I can not. Do you have a solution for that?
Then I opened the file ESP32_Web_Radio.ino in Arduino and changed ssid and password in that file. But, how do I save that modified file as InternetRadio.tft file? Can you help me? Thank you in advance, Fred.
You cannot edit the .tft file. You can edit the .hmi file using the Nextion editor:
https://nextion.itead.cc/resources/download/nextion-editor/
I am having difficulty in understanding what information is in these lines of code and how to the radio stations with stations of my own choosing
“// Few Radio Stations
char *host[4] = {“149.255.59.162″,”radiostreaming.ert.gr”,”realfm.live24.gr”, “secure1.live24.gr”};
char *path[4] = {“/1″,”/ert-kosmos”,”/realfm”,”/skai1003″};
int port[4] = {8062,80,80,80};”
For example, how would I properly insert this radio stream URL into the code?
“KDHX: http://kdhx-ice.streamguys1.com/live”
Thank you
All 3 of the arrays have the same number of entries. Therefore, he’s possibly building the full domain with host1+path1+port1. Let’s try it out. Connect the 4th part of every array, we get: http://secure1.live24.gr:80/skai1003
… which works! So, to add as the 5th, you have to go this way:
// Few Radio Stations
char *host[4] = {“149.255.59.162″,”radiostreaming.ert.gr”,”realfm.live24.gr”, “secure1.live24.gr”, “kdhx-ice.streamguys1.com”};
char *path[4] = {“/1″,”/ert-kosmos”,”/realfm”,”/skai1003″, ”/live″};
int port[4] = {8062,80,80,80, 80};
of course with char *host[5] = …. char *path[5] = … int port[5] = … because they are now 5 instead of 4 entries.
Where do we find the answer to the questions that have been asked?
char *host[number of stations] = {“kdhx-ice.streamguys1.com”, “another station”, “..station”};
char *path[path to stream – number of path] = {“/live”,”others”,..};
int port[number of port above stations] = {80, , ,}
Port number you can check netstat command.
Wojtek,
Thank you very much. Work with your example. Learning at a snails pace but by golly, with the help of folks like yourself, I eventually get over the bumps in the road.
Thanks you, it’s working :-)
The quality is not very good (the sound is hatched), do you think the problem is coming from mp3 décoder or esp32?
I am working on a solution, I will post a video when ready! Cheers!
Hi there,
I’ve built this project, however I’ve changed few things:
– the display is LCD 20×4 connected by I2c
– instead of the buttons I’ve used the rotary encoder
– I’ve added automatic connection to one of four hardcoded wifi networks
What I noticed – from time to time after the player start it is connected to the wifi and the station but there is no sound. If I change the station to another one, everything starting working fine, then I can change back to the first station (the one that initially didn’t play) and that plays fine too.
I am happy with what I have – the player is working pretty good, sound quality isn’t bad (well at least to my ears). I can even play stations with 128Kbps bitrate.
Another issue I have isn’t really related to the project, it is rather internet speed problem. Sometimes the sound is “jumping”, i’d guess that is when the connection is slow – I have noticed that during the in a lunch break and hour or two later everything is playing fine again.
I think adding a buffer would sorted out that problem, but I am not good enough to program that myself. :(
Another things that I’d like to have is a configuring the whole device over the wifi and displaying information about the currently played song. But that can wait – the buffer and nice case have to be sorted out first.
Anyway – thank you very much – great project. I really liked it. And I learned a lot!
Hello, could you share with us drawings and changes in the code, automatic connection on more networks etc. what you have done in the your project. Thanks
hello, any reply..?
I am sorry, I didn’t visit this page for very long time.
Here is my code, Please note I am not a programmer so it is probably can be done much better, but it works for me.
There are 4 wifi networks coded in – the radio automatically connect to the one that is available.. wifi3 is a network that use proxy to connect to the internet. Proxy servers are often used in schools or offices.
Please note passwords for those networks are put in to the code – that bly not the safest option.
I also put in some stations to choose from.
Rotary encoder is connected to pins 26 and 26, and encoder push button to pin 25.
LCD display 20×4 uses i2c module connected to pins 21 and 22 (see this tutorial: https://randomnerdtutorials.com/esp32-esp8266-i2c-lcd-arduino-ide/).
[code]
/////////////////////////////////////////////////////////////////
// ESP32 Internet Radio Project v1.00 //
// Get the latest version of the code here: //
// https://educ8s.tv/esp32-internet-radio //
// //
// Modified by Michael //
// March 2019 //
/////////////////////////////////////////////////////////////////
#include //https://github.com/baldram/ESP_VS1053_Library
#include
#include
#include
#include
#include
#include
// Set the LCD I2C address
LiquidCrystal_I2C lcd(0x3F, 20, 4);
ESP32Encoder encoder;
#define VS1053_CS 32
#define VS1053_DCS 33
#define VS1053_DREQ 35
#define VOLUME 90 // volume level 0-100
#define encoderButton 25
int encoderCount = 0;
int previousencoderCount = 0;
int station_no = 0;
int radioStation = 0;
int previousRadioStation = -1;
int nextStation;
int previousStation;
int wifiConnected = 0;
char *wifiNetwork[] = {“wifi1”, “wifi2”, “wifi3”, “wifi4”};
char *wifiPassword[] = {“pass1”, “pass2”, “pass3”, “pass4”};
int networkCount = sizeof(wifiNetwork) / sizeof(int);
IPAddress proxyServer(10, 168, 0, 12);
int proxyPort = 8080;
// Few Radio Stations
char *host[] = { “bb34.sonixcast.com”, “192.111.140.11”, “66.70.187.44”, “149.255.59.162”, “bbcmedia.ic.llnwd.net”, “uk3.internet-radio.com”, “us2.internet-radio.com”, “206.223.188.169”, “stream.szpila-radio.pl”, “144.217.253.136”, “146.71.124.10”, “167.114.64.181”, “144.217.180.30”, “50.7.99.163”, “ca10.rcast.net”, “us4.internet-radio.com”, “50.7.29.178”, “192.99.35.215”, “149.255.59.164”};
char *radioName[] = {“Irish Pub”, “Live Ireland Radio”, “All Irish Dublin”, “UK 1940s”, “BBC4 FM”, “Smooth Jazz Global”, “Megaton Cafe”, “Jazz FM 91”, “Szpila Radio”, “ABC 70s”, “24-7 Legends”, “HD Radio”, “Radio Addictive 50s”, “WHIP Blues Radio”, “Austin Blues Radio”, “Bulldogs-Radio”, “AlienWare”, “Classical Oasis”, “Classical Radio GB”};
char *path[] = { “/”, “/”, “/”, “/1”, “/stream/bbcmedia_radio4fm_mf_p”, “/”, “/”, “/”, “/”, “/”, “/”, “/”, “/”, “/”, “/”, “/”, “/”, “/”, “/”};
int port[] = { 20038, 8058, 9123, 8062, 80, 8021, 8443, 8008, 8200, 8602, 8012, 8352, 8022, 16544, 8036, 8062, 9330, 5338, 8182};
int stationCount = sizeof(host) / sizeof(int);
int status = WL_IDLE_STATUS;
WiFiClient client;
uint8_t mp3buff[32]; // vs1053 likes 32 bytes at a time
VS1053 player(VS1053_CS, VS1053_DCS, VS1053_DREQ);
void connectToWIFI() {
int network;
for (network = 0; network = 15000) {
break;
}
}
if (WiFi.status() == WL_CONNECTED) {
Serial.println(“”);
Serial.print(“WiFi connected to: “);
Serial.println(WiFi.SSID());
Serial.print(“IP address: “);
Serial.println(WiFi.localIP());
wifiConnected = 1;
break;
}
}
if (WiFi.status() != WL_CONNECTED) {
Serial.println(“”);
Serial.print(“WiFi not connected”);
wifiConnected = 0;
}
}
void initMP3Decoder() {
player.begin();
player.switchToMp3Mode(); // optional, some boards require this
player.setVolume(VOLUME);
}
void drawRadioStationName(int id) {
lcd.setCursor(0, 0);
lcd.print(“Playing: “);
lcd.setCursor(0, 1);
lcd.print(” “);
int col = (20 – strlen(radioName[id])) / 2;
lcd.setCursor(col, 1);
lcd.print(radioName[id]);
updateLCD(id);
}
void updateLCD(int id) {
lcd.setCursor(0, 2);
lcd.print(“Next: “);
lcd.setCursor(0, 3);
lcd.print(” “);
if (id == stationCount – 1) {
int col = (20 – strlen(radioName[0])) / 2;
lcd.setCursor(col, 3);
lcd.print(radioName[0]);
} else {
int col = (20 – strlen(radioName[id + 1])) / 2;
lcd.setCursor(col, 3);
lcd.print(radioName[id + 1]);
}
}
void station_connect (int station_no ) {
if (WiFi.SSID() == “wifi3”) {
if (client.connect(proxyServer, proxyPort) )
Serial.println(“Connected to proxy.”);
client.print(String(“GET http://“) + host[station_no] + “:” + port[station_no] + path[station_no] + ” HTTP/1.1\r\n\r\n”);
} else {
if (client.connect(host[station_no], port[station_no]) )
Serial.print(“Connected to: “);
Serial.println(host[station_no]);
client.print(String(“GET “) + path[station_no] + ” HTTP/1.1\r\n” + “Host: ” + host[station_no] + “\r\n” + “Connection: close\r\n\r\n”);
}
drawRadioStationName(station_no);
}
void IRAM_ATTR readencButton() {
noInterrupts();
// Serial.println(“function readencButton called”);
unsigned long last_interrupt_time = 0;
unsigned long interrupt_time = millis();
if (interrupt_time – last_interrupt_time > 300) {
radioStation = encoderCount + 1;
if (encoderCount + 1 >= stationCount) {
radioStation = 0;
}
if (encoderCount = stationCount) encoderCount = 0;
if (encoderCount 0) {
uint8_t bytesread = client.read(mp3buff, 32);
// uint8_t bytesread = client.read(mp3buff, 64);
// uint8_t bytesread = client.read(mp3buff, 128);
player.playChunk(mp3buff, bytesread);
}
} else {
lcd.clear();
lcd.print(“WiFi not Connected”);
}
}
[/code]
It looks the libraries have been removed. probably because they are in brackets ,Here is the list of used libraries:
VS1053.h //https://github.com/baldram/ESP_VS1053_Library
WiFi.h
HTTPClient.h
esp_wifi.h
Wire.h
LiquidCrystal_I2C.h
ESP32Encoder.h
each f them should be added after #include between “less than” and “more than” brackets.
For example:
#include “less than” Wire.h “more than”
I hope moderator can fix that in the code in my previous comment.
Michael
Big problem with your code :
no setup, no loop no spi.begin …
This can’t work!
I am sorry my code posted above is not working. It looks like that is not the best idea to post the code in the comments…
I didn’t know – sorry. I’ll prepare a zip-archive on my code.
But where should I upload it? Any suggestion?
Michael
Hi Michael,
I want to build this radio project with an LCD and a rotary switch, could you please send your modified code?
Thank you very much,
Alberto
alberto33183@gmail.com
Hi. My name is Dan.
I want to build this radio project and want to use the sam LCD that you have used 20X4.
Can you share the updated code so I will be able to do what you did?
Thank you.
Dan
dankatzman1954@gmail.com
Hi Michael!
I want to use 20*4 LCD and rotary encoders. Could you please send your modified code? Thanks! tor.paulin@gmail.com.
Hi Nick,
I built your project, it works great all day long.
Is it possible to add an NTP clock and date without lagging the system.
Please help me with the code.
Thanks for this educational project and thanks in advance.
Hello
I made the esp32 internet radio.
It took some efforts to get it working but now it works fine. Thank you very much.
I only succeeded to replace one station. (for OTR Audio Noir.)
My favorite station is WDR5 (German).
One link is:
http://wdr-wdr5-live.icecast.wdr.de/wdr/wdr5/live/mp3/128/stream.mp3
I have read your answer to Charlie.
I tried Netstat (new to me, thank you again.)
I tried for hours but no success.
No port or working path found.
Any suggestions?
regards,
Walter
Yeah, had the same issue. Wanted to add my own radio stations, but nothing works.. Tried everything, every possible site but still nothing! Looking forward for the solution.
Tried also all possible sollutions, but no succes..
Cheers,
Bjorn
Found your sollution:
char *host[1] = {“212.122.129.10”};
char *path[1] = { “/wdr/wdr5/live/mp3/128/stream.mp3”};
int port[1] = {80};
After some searching it finaly worked!
Hope it works for you to. Enjoy!
Hello Bjorn
You’re a genius, it works. Thank you.
I did replace allready the four stations and changed the pictures on the screen.
But I couldn’t find WDR5.
My next step will be to add one or more stations.
Regards and thanks again,
Walter
Hello! Your radio is awesome and simple to make, but how to turn it into stereo radio?
Nick, sorry, I have found the answer in your video.
Hey I try to do a Internet Radio out of the ESP32 LyraT, is that possible?
Have you seen this library, or something simular as an enhancment for functionality. :)
https://github.com/schreibfaul1/ESP32-audioI2S Sorry heres the link
Good morning.
I first apologize for my English.
I have assembled the project with wemos 32
arduino version 1.8.9.
compile well and upload to the processor.
but it stays in the reset loop.
Attached message algion can help me.
thank you.
the esp with another program works well.
———————————————————
ets Jun 8 2016 00:22:57
rst:0x1 (POWERON_RESET),boot:0x13 (SPI_FAST_FLASH_BOOT)
flash read err, 1000
ets_main.c 371
ets Jun 8 2016 00:22:57
rst:0x10 (RTCWDT_RTC_RESET),boot:0x13 (SPI_FAST_FLASH_BOOT)
configsip: 0, SPIWP:0xee
clk_drv:0x00,q_drv:0x00,d_drv:0x00,cs0_drv:0x00,hd_drv:0x00,wp_drv:0x00
mode:DIO, clock div:1
load:0x3fff0018,len:4
load:0x3fff001c,len:928
ho 0 tail 12 room 4
load:0x40078000,len:8424
ho 0 tail 12 room 4
load:0x40080400,len:5868
entry 0x4008069c
good morning
No one can help me ??
Thank you.
hi Ramon
at random did you or someone resolve this problem???
I have the same problem here too
thank you
hi, try changing the flash frequency to 40Mhz
Hello same error at 80 mhz and 40 MHZ
Please help.
rst:0xc (SW_CPU_RESET),boot:0x13 (SPI_FAST_FLASH_BOOT)
configsip: 0, SPIWP:0xee
clk_drv:0x00,q_drv:0x00,d_drv:0x00,cs0_drv:0x00,hd_drv:0x00,wp_drv:0x00
mode:DIO, clock div:2
load:0x3fff0018,len:4
load:0x3fff001c,len:1216
ho 0 tail 12 room 4
load:0x40078000,len:9720
ho 0 tail 12 room 4
load:0x40080400,len:6364
entry 0x400806b8
…..WiFi connected
readFrequencyFromEEPROM(): 1073479679
Guru Meditation Error: Core 1 panic’ed (LoadProhibited). Exception was unhandled.
Core 1 register dump:
PC : 0x4011c84c PS : 0x00060230 A0 : 0x8011c980 A1 : 0x3ffb1e50
A2 : 0x00000081 A3 : 0x3ffb1e9c A4 : 0x400d2374 A5 : 0x3ffb1ed0
A6 : 0x00000002 A7 : 0x3ffb8528 A8 : 0x00000000 A9 : 0x00000000
A10 : 0x00000000 A11 : 0x3ffb8058 A12 : 0x00000001 A13 : 0x00000001
A14 : 0x00060220 A15 : 0x00000000 SAR : 0x0000000a EXCCAUSE: 0x0000001c
EXCVADDR: 0x00000081 LBEG : 0x400014fd LEND : 0x4000150d LCOUNT : 0xffffffff
Backtrace: 0x4011c84c:0x3ffb1e50 0x4011c97d:0x3ffb1e70 0x400d24b0:0x3ffb1e90 0x400d1b77:0x3ffb1ed0 0x40140751:0x3ffb1f00 0x400d1277:0x3ffb1f20 0x400d1382:0x3ffb1f60 0x400d44d5:0x3ffb1fb0 0x4008b329:0x3ffb1fd0
Rebooting…
Jose,
I was getting the same error and I originally just commented it out as you did. Watching the serial monitor, I noticed the EEPROM reads were working just fine later, it was just that initial read before the loop starts that was not working. After much experimentation, I found that I could read it twice and get a proper value out of it. Here is that bit of code:
int throwaway = readStationFromEEPROM();
Serial.println(“ReadFromEEPROM(): “+String(throwaway));
throwaway = readStationFromEEPROM();
Serial.println(“ReadFromEEPROM(): “+String(throwaway));
radioStation = throwaway;
In the serial monitor I see:
readFrequencyFromEEPROM(): 1073414148
ReadFromEEPROM(): 1073414148
readFrequencyFromEEPROM(): 4
ReadFromEEPROM(): 4
And now my last listened to station gets streamed when the radio powers on, as intended. :)
Hey Charles
What part of the program do you install this bit of code?
Hey Charles
Never mind, I see what your doing. This project did nothing when I tried it with the original software.
I guess it was trying to find the last station playing in the EEPROM but couldn’t. Added you code and
the program is running.
Thanks for the fix.
Hello the solution for this error is comment this line and all ok
//radioStation = readStationFromEEPROM();
hi, i have done the project,and it works.but there is voice breakage when it streams.is there a way to eliminate it.
well the radio “works” buuuuuut, the nextion display didnt show the radio
just stay in “CONNECTING…”, even the radio connected and playing the station
somebody have some idea???
thank you
ooops…
I solved this problem :D
It was the lack of the same grounding from NEXTION and ESP32
now
Nice project, so I thought I would build it. I could not get it to work. Audio and dev board
draw 80ma for 1 second and 110ma for 1 second which keeps alternating. Seems pretty low. All wave forms going to the audio board look like a 1 second oscillation and 1 second of no waveform.Could this be a revision problem with the libraries?
I loaded the dev board with another web radio program, which uses the same VS 1053 library and that other web radio project works fine. Has anyone experienced this with this
project? Any ideas?
Thanks Jose Luis
The comment lines solved my problem of constantly rebooting.
When I put the comment lines in, the program runs, but now at power up it does not play the last staion
selected when it was turned of
Is there a good way to find HOST, PATH, and PORT information for these websites that you want to
plug into the program?
After installing Charles bit of code, the program reads the last station on power up just fine.
Now when selecting stations , the program skips over stations. Probably needs some kind of
anti bounce software.
So frustrating, cant upload the tft – Model does not match!!!!!
Even without the display no sound from the 1053 and the buttons dont work
Checked so many times
Going to sleep
Erik Hoffman
I get this funny error – why any help guys
23:29:28.935 -> Rebooting…
23:29:28.935 -> ⸮⸮⸮⸮l⸮⸮⸮xJ!⸮bc@⸮……WiFi connected
23:29:35.898 -> readFrequencyFromEEPROM(): 1073479679
23:29:35.935 -> Guru Meditation Error: Core 1 panic’ed (LoadProhibited). Exception was unhandled.
23:29:36.036 -> Core 1 register dump:
23:29:36.036 -> PC : 0x400f2c30 PS : 0x00060230 A0 : 0x800f2d64 A1 : 0x3ffb1e50
23:29:36.144 -> A2 : 0x00000081 A3 : 0x3ffb1e9c A4 : 0x400d2bdc A5 : 0x3ffb1ed0
23:29:36.246 -> A6 : 0x00000002 A7 : 0x3ffb8528 A8 : 0x00000000 A9 : 0x00000000
23:29:36.316 -> A10 : 0x00000000 A11 : 0x3ffb8058 A12 : 0x00000001 A13 : 0x00000001
23:29:36.418 -> A14 : 0x00060220 A15 : 0x00000000 SAR : 0x0000000a EXCCAUSE: 0x0000001c
23:29:36.524 -> EXCVADDR: 0x00000081 LBEG : 0x4000c349 LEND : 0x4000c36b LCOUNT : 0xffffffff
23:29:36.594 ->
23:29:36.594 -> Backtrace: 0x400f2c30:0x3ffb1e50 0x400f2d61:0x3ffb1e70 0x400d2d0c:0x3ffb1e90 0x400d2b6a:0x3ffb1ed0 0x400d2b97:0x3ffb1f00 0x400d1c0f:0x3ffb1f20 0x400d1d1d:0x3ffb1f60 0x400d4a2d:0x3ffb1fb0 0x40088679:0x3ffb1fd0
23:29:36.830 ->
23:29:36.830 -> Rebooting…
Regards
Erik
Can anyone tell me how to edit the text boxes in the Nextion program to change the name of the radio stations?
Where can I find that information?
Hi,
I tried to compile but I miss “httpclient.h”
Where can I find that?
Have a rummage around in expressif’s ESP32 GitHub:
https://github.com/espressif/arduino-esp32/tree/master/libraries/HTTPClient
How to identify the port of a website?
in chrome browser f12 – then Network bookmark and in Headers bookmark will be Remote Address: with port
Hi all,
how to add radio address when some last characters are changing f.e. http://stream.rcs.revma.com/ypqt40u0x1zuv?rj-ttl=5&rj-tok=AAABc6nsboMAYqaLjL99iiTspg where AAABc6nsboMAYqaLjL99iiTspg is changing (is something like rj-tok from html headers?)?
Hi there,
The problem is that this address http://stream.rcs.revma.com/ypqt40u0x1zuv is redireted to another one every time we connect. I do not find any way to follow that redirection. Not even sure if the WiFiclient library supports redirection.
Hopefully someone helps us with the proper piece of code. Anyone?
Thanks in advance.
try this:
#include
—–
char *host;
char *path;
——-
HTTPClient http;
http.begin(“https://stream.rcs.revma.com/ye5kghkgcm0uv”);
http.collectHeaders(headerKeys, numberOfHeaders);
int httpCode = http.GET();
int httpPort = 80;
String headerServer = http.header(“location”);
Serial.println(headerServer);
String hostStr = (headerServer.substring(8,29));
Serial.println(hostStr);
String pathStr = (headerServer.substring(29,86));
Serial.println(pathStr);
http.end();
char* host;
host = &hostStr[0];
char* path;
path = &pathStr[0];
You might get rid of all these parts and build whole radio based only on ESP32:
https://github.com/earlephilhower/ESP8266Audio
I have build a retro style wooden enclosure and simplified the circuit design and the code above by dropping out display and multi channel features. You can look over there: https://youtu.be/wQ5pKPaDRXE
FUCKM YOU THIS SHIT DOESNT WORK
Maybe Your incompetent??? Asshole!!!
Support for this program is as good as the price paid.
Hi,
I tried to compile but I miss “esp_wifi.h”
Where can I find that?
Same problem here… They just uploaded the code withous saying what library to install…
I changed the code to work with an ESP8266-12F (D1 mini) and it works just fine. I have removed the TFT and the buttons and replaced them with a rotary encoder.
I have problems adding a buffer to it (see https://github.com/educ8s/ESP32-Web-Radio-Simple/issues/1). Anyone has any ideas about this?
For the ESP32 Internet Radio:
So looking at your diagram for the breadboard (I am new to breadboards) it looks like you ESP32 is connected as such:
– A single breadboard (830 Point, which I have).
– B The ESP32 pins are connected to the board starting with pin 16 (3V3) connected at row b on the BB and pin 15 (VIN) connected to row i.
The problem I have is my ESP32 pins will not “squeeze” into that position. If I place pin 16 in row b than I must place pin 15 in row j.
Here is the ESP32 board and breadboards I’m using…
Breadboard: https://www.amazon.com/EL-CP-003-Breadboard-Solderless-Distribution-Connecting/dp/B01EV6LJ7G/ref=sr_1_2_sspa?dchild=1&keywords=large+breadboard+for+esp32&qid=1618017598&sr=8-2-spons&psc=1&spLa=ZW5jcnlwdGVkUXVhbGlmaWVyPUFEOTlUNDJUV0lBR0kmZW5jcnlwdGVkSWQ9QTA2NDk2ODJUNFFPWlk2UjJONzEmZW5jcnlwdGVkQWRJZD1BMDQyNzM2OUMwMTRUUFdFVkxXViZ3aWRnZXROYW1lPXNwX2F0ZiZhY3Rpb249Y2xpY2tSZWRpcmVjdCZkb05vdExvZ0NsaWNrPXRydWU=
ESP32: https://www.amazon.com/gp/product/B08HN1PCDX/ref=ppx_yo_dt_b_asin_title_o04_s00?ie=UTF8&psc=1
Please advise,
Dean
Interesting project. After having removed the first station with the ip address, I got it working (did not connect a display yet) and could listen to some Greek radio stations (unfortunately, I do not understand Greek).
Many radio stations only provide https urls, nowadays. Does anybody have an idea how I could change the code to make it work with https URLs? I found the following instructions:
https://medium.com/@sanghviyash6/migrating-any-http-request-to-https-on-esp32-5545a6de7845
However, I do not know where to specify the protocol The original code does not seem to set the protocol anywhere. I am not so familiar with TCP/IP, so that I do not understand these client.print statements.
Hi there,
Your ESP32 radio worked great until yesterday my favorite station updated the URLs. I have updated this in the sketch, without success. The ESP32 radio is silent.
Here is an example LINK:
https://dispatcher.rndfnk.com/rbb/radioeins/live/mp3/mid
Do you have any idea why it no longer works?
Thank you for your help!!
Hi there,
I suspect it is because the server name changes each time it is called. I opened the link once in a browser and the URL was changed.
Hallo, ich warte immer noch auf eine Lösungsidee zu meinem Problem oben.
Freue mich über eine zeitnahe Rückmeldung.
Danke
Ich warte immer noch auf eine Rückmeldung
Schade, dass dierses Forum scheinbar inaktiv ist.
so I purchased a new Nextion NX4832T035_011
when trying to load the nextion display, I get a Too Low Version.
1. Does the .HMI version get loaded (doesn’t work)
2. Does the .TFT version get loaded..(it doesn’t work)..then I’ll worry about the .ino
thanks
n2aie@arrl.net
Oh never mind on the Nextion display..
I recompiled it with the new Nextion editor and output a new .tft
all good now..
next to get the esp 8266 12E loaded and working…then interconnect.
shouldn’t I get something on the serial output to see if it connects to my wifi?
so i have a LoLin esp8266, and would just like to see the esp and the nextion connect to internet and see any station that is in the list.
Can this be done without the MP3 vs0153 installed??
if so how?
Hi,
Great project, but, can someone help me how to add streaming title for the station where available?
Thanks
Does anybody know where to find the “esp_wifi.h” library needed for this project? It is not in my Arduino library manager and I cannot find the proper one on GitHub.