ESP32 E-Paper Thermometer [UPDATED Oct. 2020]
Dear friends welcome to another project video! Today, we are going to use this small e-paper display with the ESP32 board and build a simple ESP32 E-Paper Thermometer! It is a very easy project to build. It won’t take us more than 5 minutes so let’s get started!
Intro to the ESP32 E-Paper Thermometer Project
Hello, guys, I am Nick and welcome to educ8s.tv a channel that is all about DIY electronics projects. In this channel, I share everything about the projects I build to help you develop similar projects or inspire you to start making things because it is easy, fun and creative. Subscribe to the channel now if you do not want to miss any future video.
Let’s see what we are going to build today. As you can see, I have connected a small e-paper screen to an ESP32 board. At the screen, we display the temperature which is being measured by this temperature sensor the DS18B20. The temperature reading on the screen is updated every 5 seconds. The cool thing is that we don’t refresh the whole screen which is very slow, only part of the screen which is fast and low-power! Great, the project is working fine but let’s now see how to build it!
——————–
WHERE TO BUY
——————–
ESP32: https://educ8s.tv/part/ESP32
E-Paper Display: https://educ8s.tv/part/EPaper154
DS18B20 Sensor: https://educ8s.tv/part/DS18B20
Small Breadboard: https://educ8s.tv/part/SmallBreadboard
Wires: https://educ8s.tv/part/Wires
Powerbank: https://educ8s.tv/part/Powerbank
Firebeetle Board: https://educ8s.tv/part/FireBeetle
Full disclosure: All of the links above are affiliate links. I get a small percentage of each sale they generate. Thank you for your support!
[adsense]
A few days ago we took a first look at this small e-paper display, and we built a small project with it using an Arduino Uno board. Unfortunately, the libraries for the screen require a lot of RAM memory. The Arduino Uno offers a limited amount of memory just 2KBs so we can’t build big projects with it using this e-paper display. So we are going to use something more powerful. Actually let’s use the most powerful board we have, the ESP32.
As you can see, the ESP32 compared to an Arduino Uno is a beast! It offers two 32bit cores which operate at 160Mhz, 520KBs of RAM memory, WiFi, Bluetooth, many analog and digital pins at a price of just $7! I prepared a detailed review of the ESP32 a few months ago; you can watch it by clicking on the card here. One of the most exciting things about the ESP32 is that even though it is so powerful, it offers a deep-sleep mode which requires only 10μΑs of current. This makes the ESP32 the ideal chip for low power applications.
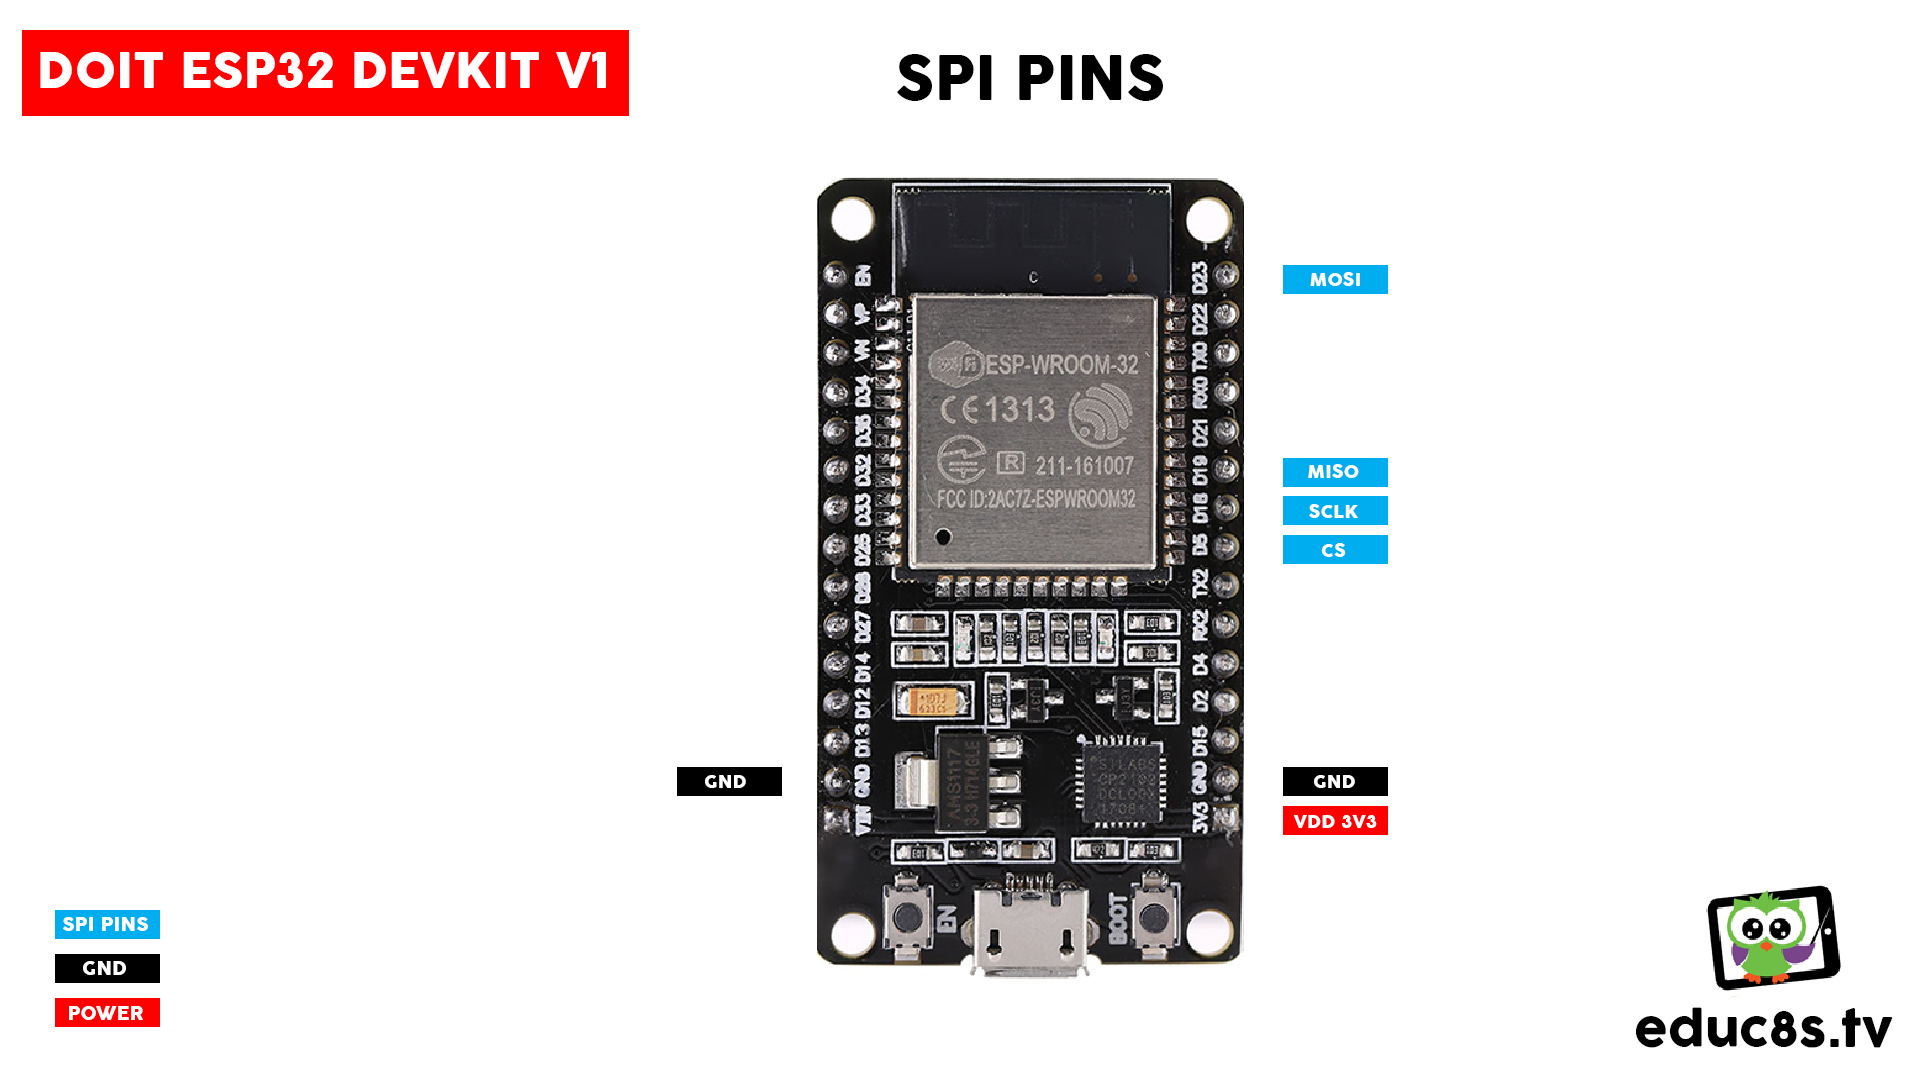
The E-Paper screen uses the SPI interface to communicate with the ESP32 board so we must connect it to the hardware SPI pins of the ESP32 board we use. It took me some time to find out which pins are the SPI pins on this board searching online. After I discovered them, I designed this, to save you some of your precious time.
Now that we know the pins we need all we have to do is to connect the display and the sensor to the ESP32 according to this schematic diagram. Luckily all the SPI pin are placed on the same side of this ESP32 board so we can use a breadboard to test our project. After connecting all the parts together all we have to do is to power up the project.
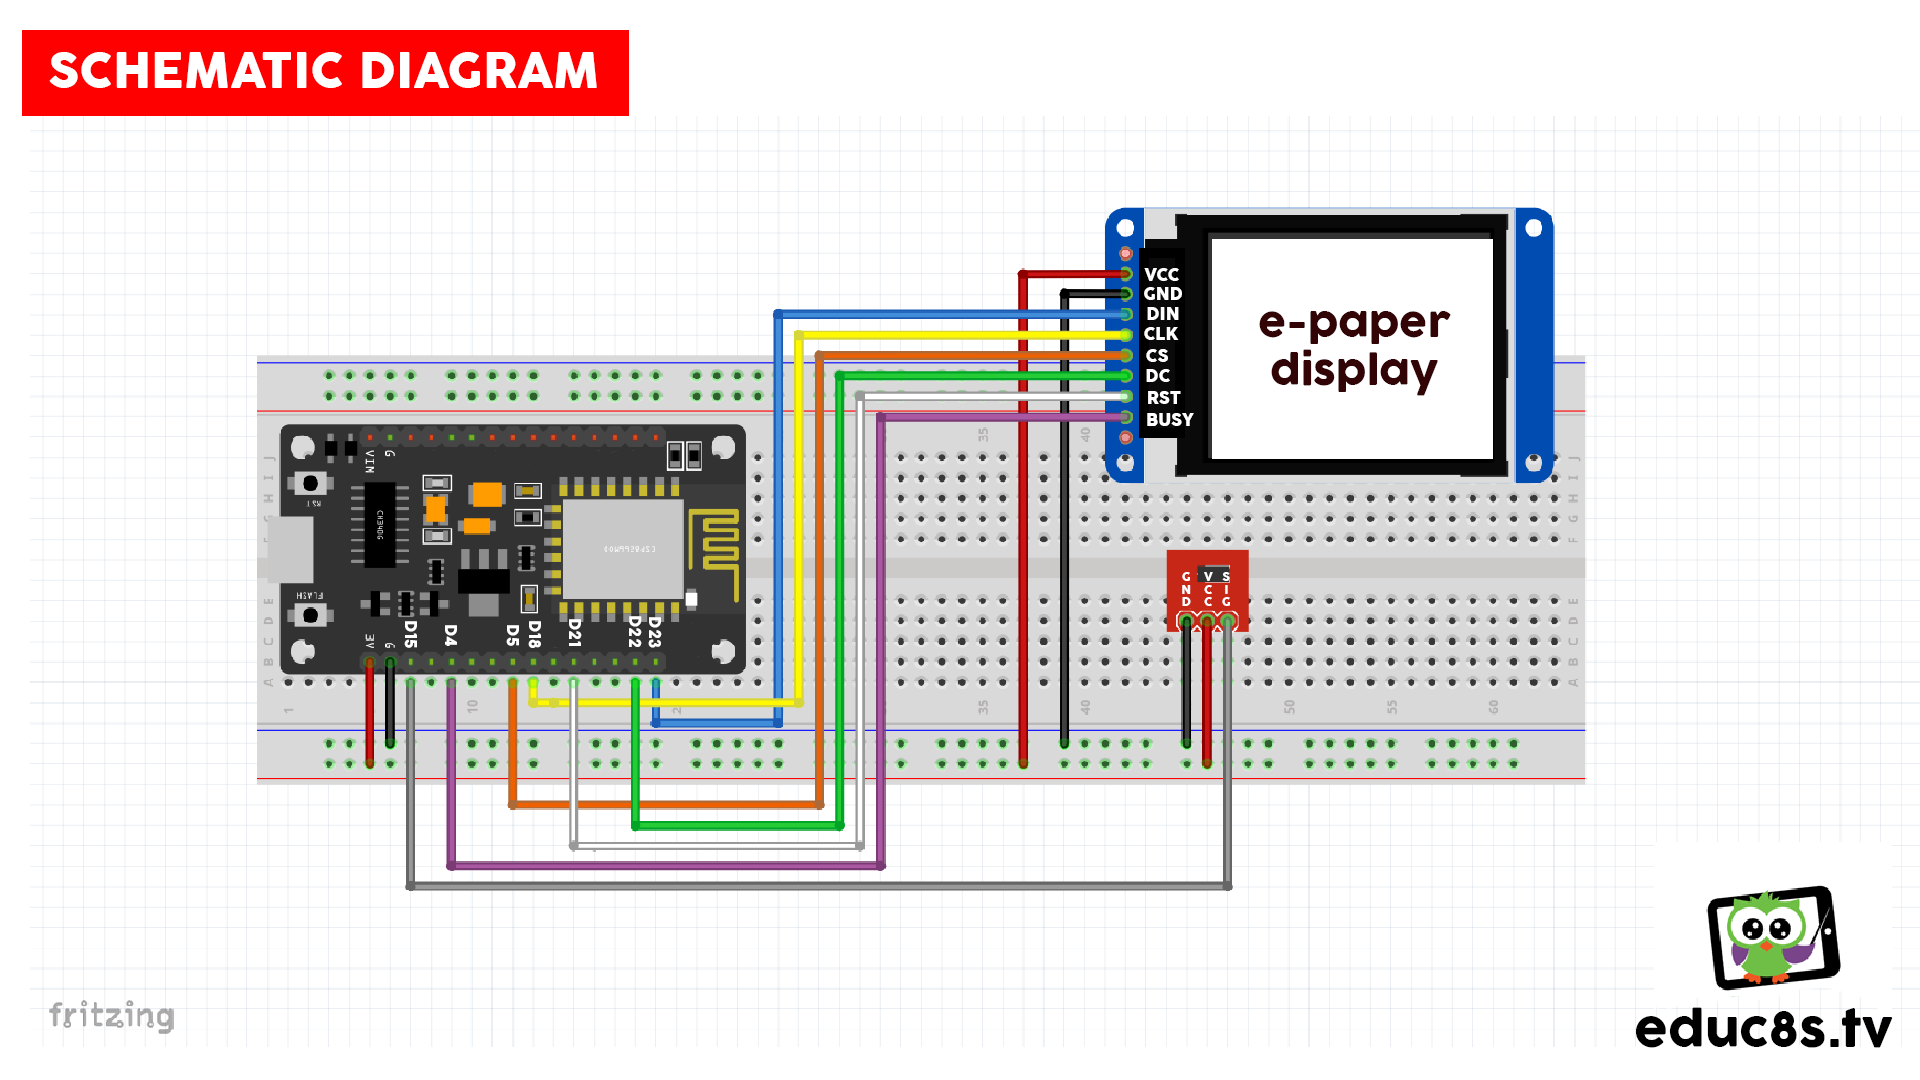
At first, the project displays a splash screen for 3 seconds and then it shows the temperature icon. A few moments later the temperature reading appears. The temperature reading is updated once every 5 seconds. I have also prepared a version of the code with the temperature displayed in degrees Fahrenheit for the friends of the channel living in the United States.
——————–
LIBRARIES
——————–
? DS18B20: https://github.com/milesburton/Arduino-Temperature-Control-Library
? GxEPD: https://github.com/ZinggJM/GxEPD
The code of the project is relatively simple. We use the great GxEPD library to drive the display and a library for the temperature sensor. At first we display the splash screen which is a bitmap file designed in Photoshop. Then we display another bitmap which is the main GUI of the project. The Wiki of the screen has detailed instructions on how to load bitmap graphics on this screen. In the loop function, we read the temperature every five seconds and we print the temperature we read on the display. We don’t refresh the whole display because it takes a lot of time, only the temperature part using the partial screen update function. As always you can find the code of the project in a link the description below.
The project works fine, and it looks great. The e-paper display is ideal for a project like this because it offers great readability and extremely low-power consumption. When the screen is not updating it needs only 0.02mAs of current! The ESP32 board needs around 60mA of current when operating. In the next video, I will try to reduce the power consumption of the project. The goal is to make this project able to run on batteries for months. To achieve that I am going to learn how to put the ESP32 to sleep to conserve power and I am going to use another ESP32 board, the Firebeetle ESP32 by DFrobot. The creators of the board claim that this board requires only 12μΑ of current in sleep mode. So, in theory, the DFrobot Firebeetle board with an E-Paper display will need only 0.03mA in sleep mode! This means that we can easily make this project last on batteries for over a year! I can’t wait to try it and share my results with you.
I would love to hear your opinion about this project. Are you going to build any project with an ESP32 and an e-paper display? Please post your ideas in the comments section below; I love reading your thoughts!
——————–
CODE
——————–
——————–
SUBSCRIBE ON YOUTUBE
——————–
Never miss a video: Subscribe to educ8s.tv
Amazing
Thank you, my friend! Cheers!
hello,
I have the error:
Adafruit_GFX.h: No such file or directory
Now i see that the file too large for the arduino
im having a loooooot errors, like:
libraries\GxEPD\GxGDEP015OC1\GxGDEP015OC1.cpp.o: In function `GxGDEP015OC1::drawBitmap(unsigned char const*, unsigned short, unsigned short, unsigned short, unsigned short, unsigned short, short)’:
Luke me…
It should have been “like” ;-)
There is an error in the file ESP32_Epaper.ino
.cpp files are included instead of .h files.
How to use it with Arduino Uno? Do I have to change something in the code? I can’t understand but it doesn’t work!
But thank you very much, great video!
I haven’t tried it, but I think the Arduino does not have enough memory to support this project.
hi nick,
i had a project with tasmota on esp2866 nodemcu (yeah, a good programmer is a lazy programmer :p) and i had a similar setup but …. 2 of my temp sensors are broken :( Then looking on the internet, i saw a guy (randomnerdtutorials) connecting the signal output with an additional 4k7 resitor to 3V. Is it necessary or what is the purpose of this 3V+4k7?
i think they are broken because they do not return a serial nr on the onewire …
mario
PS i asked new sensors to santa claus :D
Hello Nick,
Your programs are all top. I’m more a hardware typ guy (since 1976) and try to stay a bit modern. ;-)))..
I rewrote the beginning of your good programs for the new libraries:
#include
#include
//#include
#include
#include
//#include
//#include
.
.
.
.
GxIO_Class io(SPI, /*CS=5*/ SS, /*DC=*/ 17, /*RST=*/ 16);
GxEPD_Class display(io, /*RST=*/ 16, /*BUSY=*/ 4);
//GxIO_Class io(SPI, SS, 22, 21);
//GxEPD_Class display(io, 16, 4);
This part works ok, but I do have a problem with my display. It is a three colour 154 200*200
GxGDEW0154Z04 display and everything is mirrored on it. It looks a bit strengh black display and white Temperature mirrored.
I got no glue how to solve that????. The numbers of the temperature I can’t see at all.
Do you have a solution on that??
Kurt
It should Read
#include
#include
//#include
#include
#include
//#include
//#include
Sorry, but somehow it clears the rest after the includes
#include
//#include
#include
#include
#include
//#include
//#include
Anyway, all the :cpp shouild be .h i.e GxIO/GxIO.h
HI, with the 1.54inch display rev 2.1 it doesn’t work.
Can you help me?
Hi I do have the same problem with Dispaly 2.1 is ther any solution to fix it and what might be the details on this ??
I can’t get this to compile, I keep getting:
C:\Users\dunch\OneDrive\Documents\Arduino\esp32_epaper\BitmapGraphics.h:316:21: note: ‘const unsigned char gImage_gui [5000]’ previously defined here
const unsigned char gImage_gui[5000] = { /* 0X01,0X01,0XC8,0X00,0XC8,0X00, */
^
In file included from C:\Users\dunc\OneDrive\Documents\Arduino\esp32_epaper\ESP32_Epaper.ino:14:0:
BitmapGraphics.h:631:38: error: redefinition of ‘const unsigned char gImage_gui_f [5000]’
const unsigned char gImage_gui_f[5000] = { /* 0X01,0X01,0XC8,0X00,0XC8,0X00, */
Can I use the same code for Node MCU.