hi guys, today we will build an Arduino IR thermometer (non-contact thermometer), using the MLX90614 Infrared temperature sensor and a Nokia 5110 LCD display shield.
A few weeks ago ICStation.com webstore contacted me and asked me if I wanted any items to build projects with them. After searching through the cool collections of several products that they had, I discovered two gems; the Nokia 5110 LCD shield for Arduino and the MLX90614 IR temperature sensor.
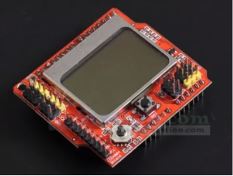
Nokia 5110 LCD Shield
The Nokia 5110 is one of my favorite display for Arduino projects, seeing the display in a shield version was the coolest thing. I couldn’t resist it because having it in a shield form takes away the need for wires and reduces the chances of errors. The LCD shield also had a small joystick embedded all at a price less than 4$!
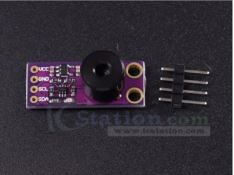
Infrared Temperature Sensor
The second item I received from ICStation is the MLX90614 Infrared temperature sensor. The MLX90614 is an infrared temperature sensor for non-contact temperature measurement. It can measure temperatures within the range of -70 to 380 degree Celsius with an accuracy of about 0.5degree in room temperature.
Some of the features of this sensor are listed below;
- Small size and low cost
- Easy to integrate
- Factory calibrated in wide temperature range: -40 to 125°C for sensor temperature and -70 to 380°C for object temperature
- High accuracy of 0.5°C over a wide temperature range (0..+50 C for both Ta and To)
- Measurement resolution of 0.02°C
- Single and dual-zone versions
- SMBus compatible digital interface for fast temperature readings and building sensor networks
- Customizable PWM output for continuous reading
- Available in 3V and 5V versions
I combined these two items that ICStation.com was kind enough to send me with an Arduino and to build this Arduino IR thermometer. The project is capable of measuring the temperature of an object without touching it, from a small distance.
Required Parts and Where to Buy
The following components are required to build this project and they can all be bought from ICStation via the link in front of each part.
1. MLX90614 IR SENSOR: http://goo.gl/E6mYkP
2. NOKIA 5110 SHIELD: http://goo.gl/jFgDW5
3. Arduino Uno: https://educ8s.tv/part/ArduinoUno
Schematics
The schematics for this project is fairly easy, the Nokia 5110 LCD display from ICStation comes as a shield so it plugs directly into the Arduino. The Nokia display shield has all the pins of the Arduino Uno broken out so it makes it easy to connect other components to the Arduino even after connecting the display. The connection between the Arduino and the IR temperature sensor is shown in the schematics below.

Schematics
To make it easier to follow, the pin connections between the Arduino and the IR temperature sensor is also described below.
MLX90614 – Arduino Uno
VCC ▶ 5V
GND ▶ GND
SCL ▶ A5
SDA ▶ A4
Go over the connections once again to ensure the temperature sensor is rightly connected. If you are using a board different from the Uno ensure the SCL and SDA pin of the sensor are connected to the matching SCL and SDA pin of the board respectively.
Code
The code of the project is very easy as well. We use the Adafruit MLX90614 library for the sensor and the Nokia 5110 Graph library for the display. These libraries can be downloaded via the links below.
Libraries
Adafruit MLX90614 library: https://github.com/adafruit/Adafruit-MLX90614-Library
Nokia 5110 Graph library: http://www.rinkydinkelectronics.com/library.php?id=47
To briefly explain the code for this project, the first thing we do is include the libraries that we will be using for the code. since the IR temperature sensor communicates over I2C, we will need to add the wire.h library in addition to the two libraries mentioned above.
#include <LCD5110_Graph.h>
#include <Wire.h>
#include <Adafruit_MLX90614.h>
Next, we create an object of the LCD library specifying the pins of the LCD as shown below.
LCD5110 lcd(2,3,4,6,5); //Use this line with the shield
This line above is what we change if we were using the standalone Nokia 5110 LCD Display. With that done, we create variables for the User interface and fonts, after which we create an object of the IR temperature sensor library.
char TEMPERATURE = 'C';

extern uint8_t SmallFont[];
extern uint8_t BigNumbers[];
extern uint8_t uic[];
extern uint8_t uif[];
extern uint8_t splash[];

Adafruit_MLX90614 mlx = Adafruit_MLX90614();
Next up, is the void setup function. We start by initializing all the parts including the LCD and the temperature sensor after which we used the LCD.drawbitmap() function to draw the UI interface that has been prepared. The reason for the UI is to provide the user with a more interesting experience and you can learn about how to make your own cool user interface for the Nokia 5110 LCD from the tutorial at this link(https://educ8s.tv/nokia-5110-bitmap-graphics/).
void setup()
{
  Serial.begin(9600);
  lcd.InitLCD(60);
  mlx.begin();
  lcd.drawBitmap(0, 0, splash, 84, 48);
  lcd.update();
  delay(3000);
}
The scope of the void loop function is simple. We initially determine if the temperature is to be displayed in Celsius or in Fahrenheit, after which we read the temperature from the temperature sensor and display on the LCD. A time delay of 1000ms was inserted in between readings for accuracy.
void loop()
{
  String temperature="";
  lcd.clrScr();

  if(TEMPERATURE == 'C')
  {
     temperature = String(mlx.readObjectTempC(),1);
     lcd.drawBitmap(0, 0, uic, 84, 48);
  }else
  {
     temperature = String(mlx.readObjectTempF(),1);
     lcd.drawBitmap(0, 0, uif, 84, 48);
  }

  if(temperature.length()>4)
  {
    temperature.remove(3,2);
  }

  Serial.println(temperature);
  lcd.setFont(BigNumbers);

  if(temperature.length()==4)
  {
    lcd.print(temperature,5,19);
  }else
  {
    lcd.print(temperature,15,19);
  }

  lcd.update();
  delay(1000);
}
The complete code for this sketch can be downloaded from the link below.
[adsense]——————–
CODE OF THE PROJECT
——————–
Copy the code and paste in your Arduino IDE and upload to the Arduino board. You should see the display come alive as shown in the image below.

IR non-contact temperature sensor in Action
Test the sensor with different surfaces, you should see the exact temperature of that surface. The IR temperature sensor also has the ability to measure the ambient temperature in an environment but we won’t be using that feature in this tutorial.
That’s all for this tutorial guys, thanks for watching/reading. If you have any questions about today’s tutorial, please feel free to leave a comment under the comment section. Don’t forget to subscribe to our youtube channel, new tutorials are released every Thursday and you shouldn’t miss it.
SUBSCRIBE ON YOUTUBE
——————–
Never miss a video: Subscribe to educ8s.tv
Hi dear. Thank you for your description. But.
I am try to use this provided code, but in time of compilation we receive mistake:
fatal error: Wire.h: No such file or directory
#include “Wire.h”
Tell me please, how to solve it?
Know that this is a old post.. but someone else may run into this issue.
Alex,
I believe the Wire.h comes from the MLX90614 sensor library example.
Hope that helps.
can i use a 16X 2 i2c lcd module as an alternative for the nokia 5110 lcd?
yes , 16×2 20×4 20×2 nokia lcd, etc
can you help do a video that shows how to connect led light that blinks when the temperature exceeds 37.5
Sir How about my nokia 5110 without shield, how will be the connection of that sir to the arduino? please help mee, thank you sir