Hi guys, welcome to today’s tutorial. A few weeks ago, we took a first look at a very promising new board, the WeMos D1, which is an esp8266 based board with the Arduino Uno form factor. We explored the huge processing power, memory and wifi capability possessed by this cheap board (less than $8) and we will be going further today. You can check that tutorial/video by clicking on this link (https://youtu.be/VkBLvjNgH50 ).
Today, we are going to see how to wirelessly upload code to the Wemos D1 ESP8266 based project.
This procedure known as over the air(OTA) Update involves uploading code to the microcontroller without physical connection(USB) between the board and the computer. This is a very impressive and useful procedure as it gives us the ability to change the firmware of our project at any time even after it has been deployed and already in use.
To demonstrate how the OTA works, we will be using a simple sketch that will change the speed at which an LED is blinking. This, of course, can be expanded to achieve whatever your project requirements are.
Required Components and Where to Buy
The following components/parts are required to build this tutorial and they can be bought via the links attached in front of them.
1. WeMOS D1 ▶ https://educ8s.tv/part/WemosD1
2. Powerbank ▶ https://educ8s.tv/part/Powerbank
3. Resistor ▶ https://educ8s.tv/part/Resistors
4. Mini Breadboard ▶ https://educ8s.tv/part/MiniBreadboard
5. Wires ▶ https://educ8s.tv/part/Wires
6. LED ▶ https://educ8s.tv/part/LEDs
Full disclosure: All of the links above are affiliate links. I get a small percentage of each sale they generate. Thank you for your support!
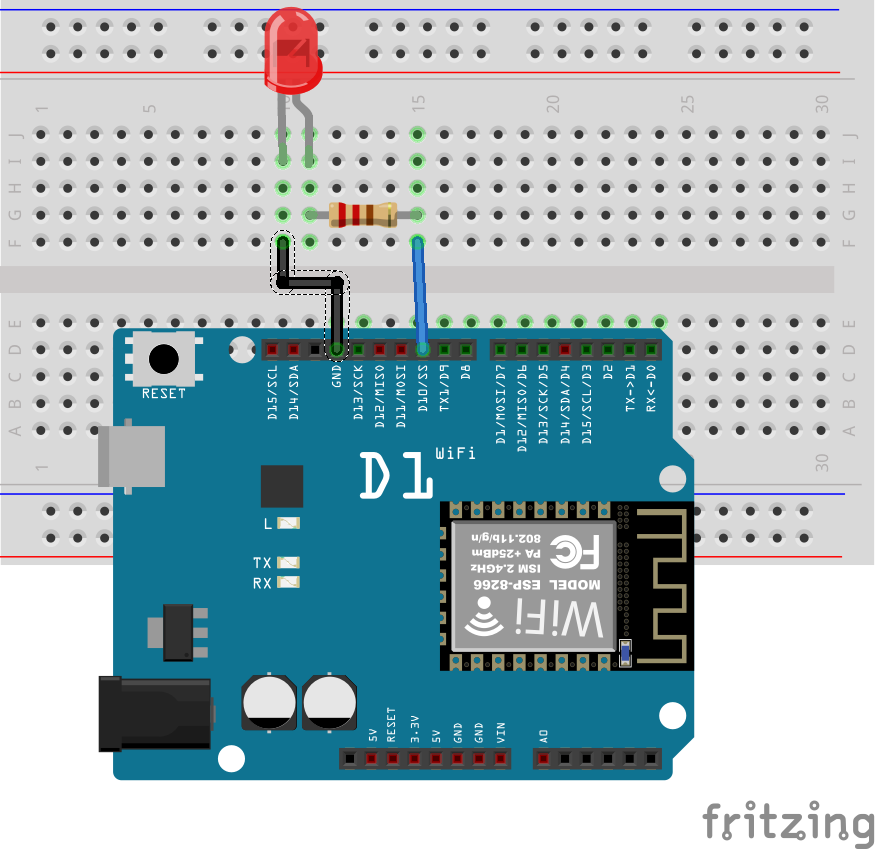
Schematics
This demonstration will be based on the blink example, which makes connecting the components required for this project very easy. Connect the components as shown in the schematics diagram below.
Preparations for OTA Update
To be able to use the OTA update, we need to first and foremost download and install Python 2.7 on our computer. Python 2.7 will install some of the files that will enable the serial port which we will use later on for the OTA update. With python installed, we then open an instance of the Arduino IDE. It is important that the version of the IDE being used be up to date. It is also important to setup the Wemos D1 board for programming with the Arduino IDE and this was covered in one of my previous tutorial which can be found at this link.
Over the Air Update uses the ArduinoOTA library which makes it easy to update the code on Arduino boards ( and the ESP8266 based boards) wirelessly over WiFi. This library comes preloaded for the ESP8266 boards and as soon as the board is installed via the board manager, the library and its examples get installed on the Arduino IDE. So next, we load the BasicOTA program which will now be available Under File -> Examples -> ArduinoOTA.
For the OTA to work, the system must be able to connect to a WiFi so we need to change the SSID and password in the BasicOTA code to match the credentials of our WiFi Access. with this done, we can select the board and upload the code to it. After few minutes the board should connect to the specified WiFi access and we should see the esp8266-ota port show up on the Arduino IDE and we can then select it so as to upload another code(say blink for example) to the board. If the esp8266-ota port doesn’t show up, restart the Arduino IDE and it should then come up.
The basicOTA program contains commands and functions which induces the Wemos D1 board to create an OTA port through which code can then be uploaded to the board wirelessly, but the downside to this basic program is that as soon as the code as we upload another code using the OTA means, we will not be able to upload code to the board using the OTA medium again as the commands needed to create the OTA port will no longer be available in the flash memory of the microcontroller.
To overcome this, we need to include some part of the Arduino OTA functions in all the codes will send to the wemos D1 via OTA and to demonstrate this, I created a sample sketch which can be edited to suit the needs of your project.
Code
In order to update the program over and over again wirelessly, we have to include some of the commands from the BasicOTA code in our code. So as an example, I updated the ESP8266 blink example code to include the OTA commands. This will give us the ability to update the code on the Wemos D1 wirelessly, as many times as we want, as the program will connect the WiFi network at startup and create the OTA port.
To do a brief explanation of the code, as usual, the first thing we do is include all the libraries which are needed to achieve our goal. Do not that all these libraries will be included in the basicOTA update.
#include <ESP8266WiFi.h>
#include <ESP8266mDNS.h>
#include <WiFiUdp.h>
#include <ArduinoOTA.h>
Next, we define the credentials of the WiFi through which we want to perform the OTA; the SSID and the password.
const char* ssid = "yourssid";
const char* password = "yourpassword";
Next, we move to the void setup function. This is where the bulk of work is done. We start out by setting the pin mode of the pin to which the LED is connected as output. After this, we set the mode of the wifi and instruct it the board to join the WiFi network.
void setup() {
  pinMode(D10, OUTPUT);
  Serial.begin(115200);
  Serial.println("Booting");
  WiFi.mode(WIFI_STA);
  WiFi.begin(ssid, password);
  while (WiFi.waitForConnectResult() != WL_CONNECTED) {
    Serial.println("Connection Failed! Rebooting...");
    delay(5000);
    ESP.restart();
  }
Next, we create the data to be displayed so we can be aware of the status of the OTA communication, so as to know when the system is running or when there is an error. Next, we start the OTA communication displaying the Ip address for it.
ArduinoOTA.onStart([]() {
    Serial.println("Start");
  });
  ArduinoOTA.onEnd([]() {
    Serial.println("\nEnd");
  });
  ArduinoOTA.onProgress([](unsigned int progress, unsigned int total) {
    Serial.printf("Progress: %u%%\r", (progress / (total / 100)));
  });
  ArduinoOTA.onError([](ota_error_t error) {
    Serial.printf("Error[%u]: ", error);
    if (error == OTA_AUTH_ERROR) Serial.println("Auth Failed");
    else if (error == OTA_BEGIN_ERROR) Serial.println("Begin Failed");
    else if (error == OTA_CONNECT_ERROR) Serial.println("Connect Failed");
    else if (error == OTA_RECEIVE_ERROR) Serial.println("Receive Failed");
    else if (error == OTA_END_ERROR) Serial.println("End Failed");
  });
  ArduinoOTA.begin();
  Serial.println("Ready");
  Serial.print("IP address: ");
  Serial.println(WiFi.localIP());
To cap the code, we move to the void loop function. The code for this function is basic as all that needs to be done is read the status of the OTA and perform the normal action for which the code was created which is to blink the LED at a particular rate. This could be anything else in your own code, it could be an update that changes the behavior of the project totally.
void loop() {
  ArduinoOTA.handle();
  digitalWrite(D10, HIGH);
  delay(500);
  digitalWrite(D10, LOW);
  delay(500);
}
That’s it! If you need to update your programs wirelessly from now on, all you will need to do is to add a few lines of code to it and you are ready.
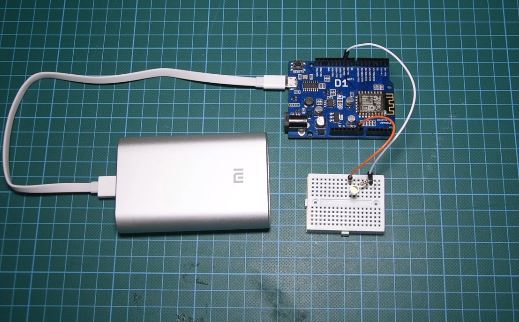
Updating the ESP8266 OTA is so easy! Such functionality is extremely useful in case of limited or no physical access to the board. I will be using this feature a lot in the future as it means I can deploy a project to its final position with a setup just like the image below and then update the code to add new functionality to it without touching the project at all. Sounds Awesome!
Hardware Setup
The complete code for this project/demonstration can be downloaded by clicking on the download button below or by clicking the download link under the description of the video on youtube.
——————–
CODE OF THE PROJECT
——————–
What do you think about this feature? Do you find it useful? Please post any comments or ideas in the comments section below. Thank you!
SUBSCRIBE ON YOUTUBE
——————–
Never miss a video: Subscribe to educ8s.tv
Hi Nick, I got a problem with this, every time I try to connect remotely or use the serial monitor Arduino software ask me for the board password, but I haven’t set any pass in the sketch. Please help!!
it says D10 was not declared in this scope. How do I proceed now. I have jutst copied and pasted your code and just modified the wifi details and it connect etc. But only this doesnt seem to work.
Also, how is the Python thing being used in this ccode? I am not sure.
hello,
i cant see the serialport olso after restart the ide
help plz
Try having a look at the hardware driver your d1 mini supports. Normally it is the CH340 driver, try installing the driver here https://www.arduined.eu/ch340-windows-10-driver-download/ . Once you have installed this driver (or the different one that your board uses), your computer should notice the port and youre ready to flash.
Dear Nick, as I had some trials & errors up getting the final result, that is, making the Wemos D1 R2 working in a good and controlled way, I would like to share my experience with those that follow your postings. As my first exercise, after loading the recommended libraries, I’ ve loaded (using the serial cable connected to the PC) your sketch named WiFiTest.ino (initially aimed to ESP8266 modules). After doing the proper changes for my environment, it worked without troubles.
Then I’ve tried the OTA sketch. I spent some time trying to make it work, but, at last I did it. My main troubles were: (1) I had to uncomment some command lines referring to OTA; (2) This was my fault…I did’nt read the sketch password for OTA utilization: ==> “123”. After these blunders, at last I understood the whole thing. Python is used just to open an windows to provide the “123” password…
To Fix the D10 not declared issue
Add
#define D0 16
#define D1 5 // I2C Bus SCL (clock)
#define D2 4 // I2C Bus SDA (data)
#define D3 0
#define D4 2 // Same as “LED_BUILTIN”, but inverted logic
#define D5 14 // SPI Bus SCK (clock)
#define D6 12 // SPI Bus MISO
#define D7 13 // SPI Bus MOSI
#define D8 15 // SPI Bus SS (CS)
#define D9 3 // RX0 (Serial console)
#define D10 1 // TX0 (Serial console)
Before
void setup() {
Hi,
Cool video, thanks. I have a question though.
While OTA is running on the D1 can I use Wifi to connect to other hosts or is the D1 wifi adapter waiting for a new program to be loaded?
Thanks
Hi,
i always get that one:
warning: espcomm_sync failed
error: espcomm_open failed
error: espcomm_upload_mem failed
error: espcomm_upload_mem failed
Your ESP is not is scetch upload mode i.e pin 0 is not grounded
dear master,
i have a problem with wemos d1 r2 connecting wire, read and write SD card-RTC data logger from Deek Robot .. it monitor always show “SD card failed”.
would u give some execise with it, please?
thank you very much
How to solve this problem please give a suggestions?solution
”
Connection Failed! Rebooting…
ets Jan 8 2013,rst cause:2, boot mode:(1,6)
ets Jan 8 2013,rst cause:4, boot mode:(1,6)
wdt reset
”
the problem is within double quotes
Can this theory be used on other esp8266 boards ?
Super I immediately joined my wifi.
This is seen in the router as the dhcp client
ESP_7027A9 *xx: 01: 94: 70: 27: *xx 192.168.0.*xx Wireless (802.11n) -50 2018-05-04 15:43:20
(xx * xx just for sure) :-)
hello,
the led doesnt blink
its just connected ans wrote :
Ready
19:56:03.415 -> IP address: 192.168.1.87
does i miss something?
thanks
This is an old article, and most posted questions haven’t been answered.
Note that on the WeMOS D1 mini board pin labeled D2/GPIO2 is attached to the “LED_BUILTIN”, the internal LED.
To both fix the D1 not declared error AND to use the onboard LED I added, after line 5, the line:
#define D4 2 // Same as “LED_BUILTIN”, but inverted logic
Then I replaced the 3 occurrences of “D1” in the remaining code with “D4”.
Now the blue LED on the board blinks when the code is run