Welcome to this Arduino Two-Way Bluetooth Communication Tutorial! Today we are going to learn how to use Bluetooth to exchange data between two Arduino boards! As a demonstration project, we are going to build a simple weather station. There is a lot to cover so let’s get started!
Intro to the Arduino Two-Way Bluetooth Communication Tutorial
Hello, guys, I am Nick and welcome to educ8s.tv a channel that is all about DIY electronics projects. In this channel, I share everything about the projects I build to help you develop similar projects or inspire you to start making things because it is easy, fun and creative. Subscribe to the channel now if you do not want to miss any future video.
Today’s project is this. An Arduino Nano is measuring the temperature and the humidity using the DHT22 sensor. This board sends the data from the sensor to another Arduino Nano board, which displays the data from the sensor on a small screen, and sends back a message that the data was received OK. When the first Arduino board receives the OK message the LED lights up. As you can see we have established a bi-directional communication channel, and the two Arduino boards can exchange data! To achieve that we use a low-cost Bluetooth module, the HC-05! The range we can achieve is excellent; we can easily get about 10 meters of range even with walls between the modules! It is a perfect solution for indoor use and very easy to implement! Let’s now see how to build this project.
——————–
WHERE TO BUY
——————–
Arduino Nano: https://educ8s.tv/part/ArduinoNano
HC – 05 Bluetooth: https://educ8s.tv/part/HC05
DHT22 Sensor: https://educ8s.tv/part/DHT22
1.8″ Color TFT: https://educ8s.tv/part/7735
Resistors: https://educ8s.tv/part/Resistors
Large Breadboard: https://educ8s.tv/part/LargeBreadboard
Jumper Wires: https://educ8s.tv/part/JumperWires
Wires: https://educ8s.tv/part/Wires
Devastator Robot: https://educ8s.tv/part/DevastatorRobot
Full disclosure: All of the links above are affiliate links. I get a small percentage of each sale they generate. Thank you for your support!
[adsense]
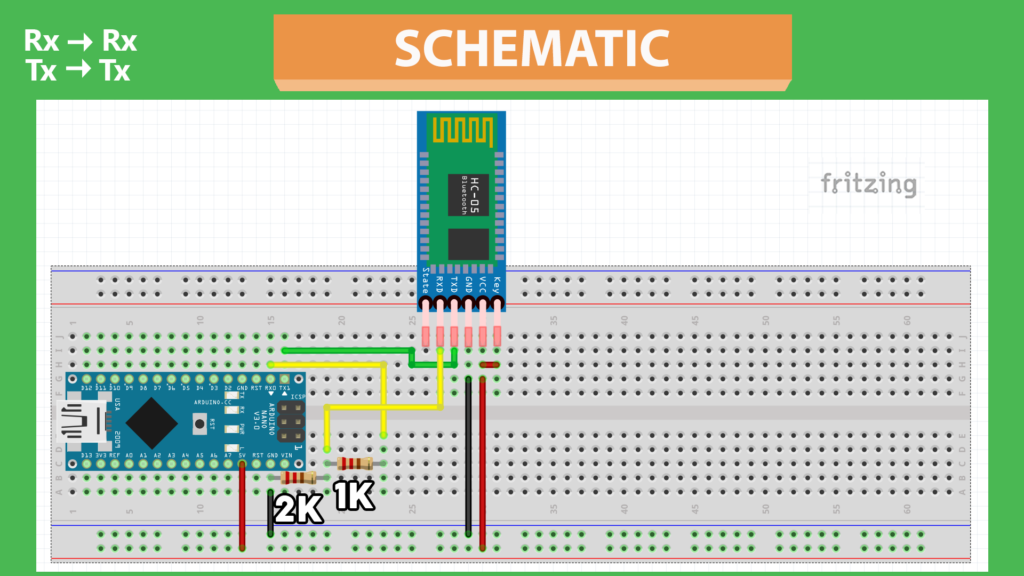
We are going to use two modules in this project, so one of them must be set in Master Mode and the other one to Slave mode to achieve bidirectional communication. That’s what we are going to do now. First of all we have to connect the module to an Arduino. We need to connect five wires. Please follow this schematic diagram. The Rx and Tx pins of the module use 3.3V logic levels, so we use a simple voltage divider at the Rx pin of the module and we do not connect it directly to the Arduino board. Also, note that the Rx pin of the module goes to the Rx Pin of the Arduino and the Tx Pin of the module goes to the Tx pin of the Arduino. Now we are ready to power up the Arduino. Before plugging in the USB cable, press the button on the Bluetooth module to enter the command mode. If the LEDs on the module start flashing slowly, that means that we have entered the command mode successfully.
Schematic for Configuration
ow, all we have to do is to upload an empty sketch to the Arduino board. Before pressing upload remove the wires from the serial port of the Arduino board and connect them again after the sketch has been uploaded. The next step is to open the Serial monitor to send some commands to the Bluetooth module.
We select both New Line and Carriage return here and we set the baud rate at 34800. Now we can send commands to the module. First, let’s send the command AT to see if we can communicate with the module. The module return OK. Then we send the command AT+UART? To see the default baud rate. As you can see it is set to 9600. Then we send the command AT+ROLE? To find out if the module is in master or slave mode. The module returns 0 which means that the module is set at slave mode. Since we need to configure the Slave module first, we won’t change the mode of this module. If you need to change the mode of the module send the following command: AT+ROLE=0 if you want the module to be in slave mode or AT+ROLE=1 if you want the module to be in master mode.
Next, we need to find its address. We send the command AT+ADDR? And we get back the address of the module. We need this value later, so note it down. The slave Bluetooth module is ready. Let’s now configure the master.
We follow the same procedure. We send the command AT to see if we can communicate correctly. We find the default baud rate of the module which is 9600. The baud rate must be the same for both modules. If the baud rate of your modules is not set to 9600 you can set it to that speed with the command: AT+UART = 9600,0,0 .Now we set the module to master mode with the command AT+ROLE = 1. Then we send the command AT+CMODE=0 which means that the module will connect to a fixed address. The last step is to send the command AT+BIND = followed by the address of the slave module. Note that we write the address like this, we are using commas instead of colons. That’s it, if we power up the modules once more, after a few seconds, they will pair automatically, and the LEDs will start flashing every two seconds!
Schematic Slave
Schematic Master

We can now quickly send data from one module to the other. It is as easy as writing to the Serial! Let’s now connect a sensor and a display to build a useful project.
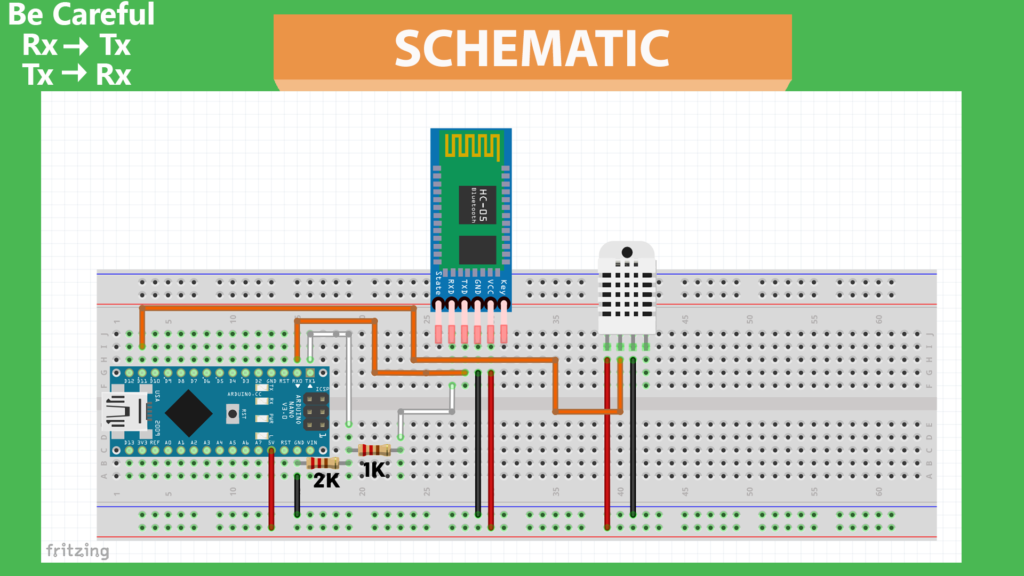
This the schematic diagram of the circuit which uses the slave Bluetooth module. You can find links to all the schematic diagrams of the project in a link in the description of the video. We have connected a DHT22 temperature sensor and an LED. Every two seconds we read the values from the sensor, and we send them to the other Bluetooth module. If the data is received from the other part, the LED lights up.
——————–
LIBRARIES
——————–
? Easy Transfer: https://github.com/madsci1016/Arduino-EasyTransfer
? DHT22: https://github.com/adafruit/DHT-sensor-library
? Adafruit GFX: https://github.com/adafruit/Adafruit-GFX-Library
? Adafruit ST7735: https://github.com/adafruit/Adafruit-ST7735-Library
The code is straightforward for an advanced project like this one. I am using the EasyTransfer library to make things easier. This library enables us to send data structures to the Serial Port which means we can send structured data via the Bluetooth module. So, I have created a very simple data structure which contains two float variables, the temperature and the humidity we read from the sensor.
We save the readings from the sensor to the variables and then we send the structure to the Bluetooth module with the command ETout.SendData. We can also read the data structures that the other Bluetooth module sends with the command receive data. Note that we need two EasyTransfer objects to achieve bidirectional communication. One object is responsible for sending data, and the other to receive data.
Let’s now take a look at the circuit which uses the master Bluetooth module. I have connected a small screen to it to display the data we are receiving from the other circuit. As you can see, the information on the display is updated every two seconds. When we receive the data, we send back a message to the other module that the data was received.
As you can see the code is very simple as well. We use the same data structures and the same logic. We receive weather data with the command ETin.ReceiveData and we send out an acknowledgment message with the Command ETout.SendData.
——————–
CODE & SCHEMATICS
——————–
——————–
SUBSCRIBE ON YOUTUBE
——————–
Never miss a video: Subscribe to educ8s.tv
Hi, is this compatible with the HM-10 module?
Hello how are you ?
Plz I need some help with my project
Im trying to connect tow Arduino uno using Bluetooth to transfer data from first Arduino which connect with MQ-4 sensor to the second Arduino which connect with lcd (i2c) to show data on the LCD
I need the code for that I try a lot and it did not work with me
Plz help
HELLO,
I’m new and would really need your experience and help: Here is my project:
First of all, I want to do the test between the 2 arduinos nano 33 ble sens: For example, detect the temperature of the first card and send it to the second card in real time?
I have: TWO arduino nano 33 ble sense cards and two pc