Hi guys, Welcome to today’s tutorial. About a year ago I made this tutorial (https://educ8s.tv/arduino-project-real-time-clock-with-ds3231-module/ ) which was about how to create a real-time clock with temperature monitor using the DS3231 real-time clock, an Arduino and a 1602 LCD shield. Today, we will be upgrading that particular project and instead of the LCD shield, we will be using a 1.8″TFT display with the Arduino. This tutorial will be a sort of demonstration to show how easy it is to use the ST7735 based 1.8″ color TFT display with the Arduino.
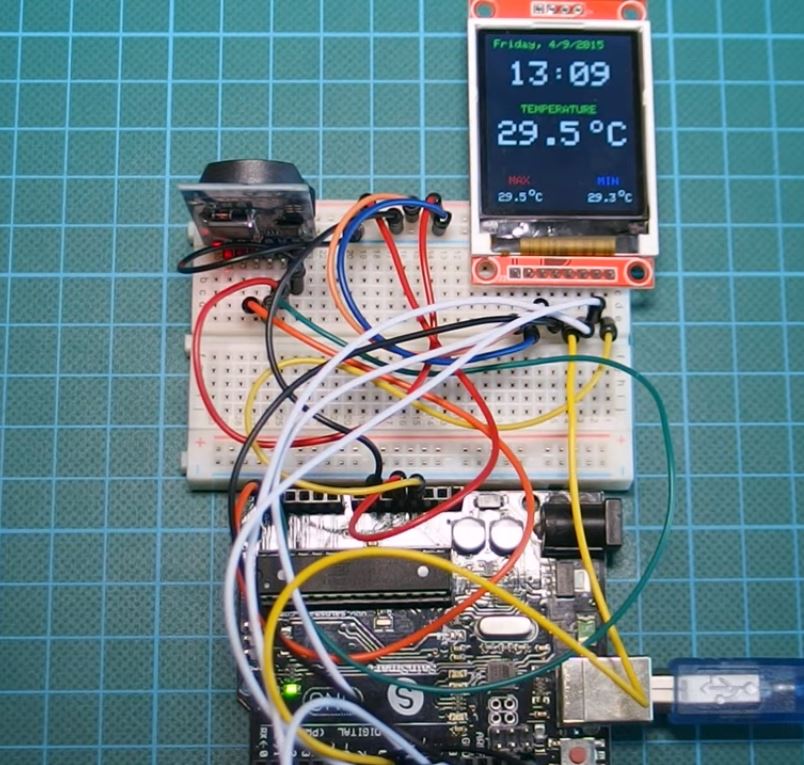
As an upgrade, Instead of just displaying date, and time like we did the last time, this project displays the current date and time along with the temperature. It also displays the minimum and maximum temperature that has been read.
To better understand how to use the 1.8″ color display, check out this my tutorial on it (https://www.youtube.com/watch?v=boagCpb6DgY)
Components Required and Where to Buy
The following components/parts are required to build this project and each part can be bought by clicking on the link in front of it.

Parts
1. Arduino Uno ▶ https://educ8s.tv/part/ArduinoUno
2. DS3231 RTC module ▶ https://educ8s.tv/part/DS3231
3. 1.8″ Color TFT ▶ https://educ8s.tv/part/7735
4. Small Breadboard ▶ https://educ8s.tv/part/SmallBreadboard
5. Wires ▶ https://educ8s.tv/part/Wires
[adsense]
Schematics
Connect the components as shown in the schematics below.

Schematics
The pin connection between the components is described below to make the schematics easier to understand.
For the TFT display and the Arduino;
ST7735 ▶ Arduino
LED ▶ 3.3V
SCK ▶ D13
SDA ▶ D11
DC ▶ D9
CS ▶ D10
Reset ▶ D8
GND ▶ GND
VCC ▶ 5V


For DS3231 and Arduino;
DS3231 ▶ Arduino
VCC ▶ 5V
GND ▶ GND
SDA ▶ A4
SCL ▶ A5
Code
To facilitate communication between the Arduino and other components involved in this project, we will be using the Sodaq library for the DS3231 RTC module and the Adafruit ST7735 Arduino library to facilitate easy communication with the LCD.
To do a brief explanation of the code, as usual, the first thing we do is include the libraries we will be using.
/////////////////////////////////////////////////////////////////
   //         Arduino Real Time Clock fahrenheit         v1.02    //
  //       Get the latest version of the code here:              //
 //       https://educ8s.tv/arduino-real-time-clock/             //
/////////////////////////////////////////////////////////////////


#include <Adafruit_ST7735.h>
#include <Adafruit_GFX.h>
#include <Wire.h>
#include "Sodaq_DS3231.h"
#include <SPI.h>
Next, we declare the pins of the Arduino to which the LCD is connected after which we create an object of the ST7735 library, with those pins as arguments.
#define TFT_CS     10
#define TFT_RST    8
#define TFT_DC     9
Adafruit_ST7735 tft = Adafruit_ST7735(TFT_CS,  TFT_DC, TFT_RST);
Next, we declare the Code variables including, min temperature, max temperature, date, time etc.
#define TFT_CS     10
#define TFT_RST    8
#define TFT_DC     9float maxTemperature=0;
float minTemperature=200;
char charMinTemperature[10];
char charMaxTemperature[10];
char timeChar[100];
char dateChar[50];
char temperatureChar[10];
uint32_t old_ts;

float temperature = 0;
float previousTemperature = 0;

String dateString;
int minuteNow=0;
int minutePrevious=0;
Adafruit_ST7735 tft = Adafruit_ST7735(TFT_CS,  TFT_DC, TFT_RST);
Next, we write the code for the void setup.
We initialize the system, starting all communication needed to interact with both the screen and the RTC.
void setup ()
{
    tft.initR(INITR_BLACKTAB);
    tft.fillScreen(ST7735_BLACK);
    Serial.begin(57600);
    Wire.begin();
    rtc.begin();
Next, we setup the screen and the create the information to be updated.
printText("TEMPERATURE", ST7735_GREEN,30,65,1);  // Temperature Static Text
    printText("MAX", ST7735_RED,18,130,1);
    printText("MIN", ST7735_BLUE,95,130,1);
The last part of the void setup() function is the SetRTCtime function. This function allows us to set the date and time of the RTC. This line should be uncommented the first time the code is to be uploaded and commented out and reuploaded after the date and time have been set.
//setRTCTime();
Next, we move to the void loop function.
The void loop function basically reads the current time and temperature and updates the display with their values but driving this display with the Arduino is a bit slow and results in visible flickering when the information on the display is being updated or changed. To combat this, I developed a small trick which involves only updating some part of the display when needed. This means the amount of data being pushed to the display is minimal thus, there is a reduction in the amount of time it takes to update the display. For example, the temperature of an environment may not change every second so, in the code, We measure temperature and only update the display when there is a difference between the current temperature being displayed and the new readings.
void loop ()
{
  rtc.convertTemperature();
  float temperature = Celcius2Fahrenheit(rtc.getTemperature());
  DateTime now = rtc.now(); //get the current date-time
  uint32_t ts = now.getEpoch();

    if (old_ts == 0 || old_ts != ts) {
	  old_ts = ts;

  minuteNow = now.minute();
  if(minuteNow!=minutePrevious)
  {
    dateString = getDayOfWeek(now.dayOfWeek())+", ";
    dateString = dateString+String(now.date())+"/"+String(now.month());
    dateString= dateString+"/"+ String(now.year());
    minutePrevious = minuteNow;
    String hours = String(now.hour());
    if(now.minute()<10)
    {
      hours = hours+":0"+String(now.minute());
    }else
    {
      hours = hours+":"+String(now.minute());
    }

    hours.toCharArray(timeChar,100);
    tft.fillRect(10,0,160,65,ST7735_BLACK);
    printText(timeChar, ST7735_WHITE,20,25,3);
    dateString.toCharArray(dateChar,50);
    printText(dateChar, ST7735_GREEN,8,5,1);
  }

  if(temperature != previousTemperature)
  {
    previousTemperature = temperature;
    String temperatureString = String(temperature,0);
    temperatureString.toCharArray(temperatureChar,10);
    tft.fillRect(10,80,128,30,ST7735_BLACK);
    printText(temperatureChar, ST7735_WHITE,35,80,3);
    printText("o", ST7735_WHITE,85,75,2);
    printText("F", ST7735_WHITE,100,80,3);

    if(temperature>maxTemperature)
    {
      maxTemperature = temperature;
      dtostrf(maxTemperature,3, 0, charMaxTemperature);
      tft.fillRect(3,142,33,20,ST7735_BLACK);
      printText(charMaxTemperature, ST7735_WHITE,10,145,1);
      printText("o", ST7735_WHITE,35,140,1);
      printText("F", ST7735_WHITE,41,145,1);
    }
    if(temperature<minTemperature)
    {
      minTemperature = temperature;
      dtostrf(minTemperature,4, 0, charMinTemperature);
      tft.fillRect(75,140,36,18,ST7735_BLACK);
      printText(charMinTemperature, ST7735_WHITE,80,145,1);
      printText("o", ST7735_WHITE,112,140,1);
      printText("F", ST7735_WHITE,118,145,1);
    }
  }
}
    delay(1000);
}
The complete code for the project can be downloaded via the link below.
——————–
CODE
——————–
Check your connections once again to ensure everything is as it should be, then proceed to upload the code to the Arduino board. Don’t forget to uncomment the line used to set the time and date the first time the code is being uploaded and don’t forget to comment it and re-upload after the time and date has been set.
With the code uploaded the second time, your screen should now look like that of the image below.
Demo
That’s it for today’s tutorial guys, thanks for reading/watching. If you get stuck at any point while building this project, feel free to reach out to me via the comment section, I will be glad to answer whatever questions you might have. Don’t forget to share, like and subscribe on youtube. Thanks!
——————–
SUBSCRIBE ON YOUTUBE
——————–
Never miss a video: Subscribe to educ8s.tv
Hi,
My son and I just built this project – and we love it. However, now we want to compartmentalize it – add an external power supply and a case of some sort.
Would you have any recommendations on how to proceed with that?
Thank you!
Hello Craig,
Thank you for your message. For a power supply you can use something like this: http://www.banggood.com/9V-1A-Power-Supply-Adapter-US-Plug-2-Flat-Pin-For-Arduino-p-916174.html?p=DQ30066511122014069J.
For case I don’t know, sorry. I plan to buy a 3D printer soon in order to build custom case for the projects and share them with you!
Cheers,
Nick
Hi Craig your project is nice I liked it but when I down load to the arduino I only see black screen,I am using 1.8 tft display from banggood .please can you help me….thanks Eddy
Hello Eddy,
I had the same black screen when I had the I2C wires connected the wrong way. Please check all your connections carefully!
Hi there.
I have just received the 2 tft colour displays I ordered from China.
I am trying to build the Arduino real time clock with this display. But I am stuck on compiling the code for this.
Please could you send to me the complete code with all of the libraries compiled in the code. As I have downloaded all of the files but I keep getting errors. If it is possible for you to email me the full code so that I can enter it into the arduino without having to make any changes to it.
I am new at this. I have successfully made the pong clock and a binary clock from the instructables site. But I find it very hard with my disabilities to compile the codes for projects like this. Too many errors come up when entering codes.
I would be very grateful If you could help me. I see that you have many projects to make on the internet. I will try to build most of these in time.
So I am sorry to say that this will not be the last you hear from me. Ha ha.
Thanking you kindly for your time.
Kindest regards.
Stuart.
Olá amigo. O código não compila. Aparecem as seguintes mensagens de erro:
C:\ARDUINO\sketch_DISPLAY_TFT_RELOGIO_2_feb15a.ino: In function ‘void loop()’:
C:\ARDUINO\sketch_DISPLAY_TFT_RELOGIO_2_feb15a.ino:85:23: error: ‘Celcius2Fahrenheit’ was not declared in this scope
float temperature = Celcius2Fahrenheit(rtc.getTemperature());
^~~~~~~~~~~~~~~~~~
C:\ARDUINO\sketch_DISPLAY_TFT_RELOGIO_2_feb15a.ino:94:20: error: ‘getDayOfWeek’ was not declared in this scope
dateString = getDayOfWeek(now.dayOfWeek()) + “, “;
^~~~~~~~~~~~
C:\ARDUINO\sketch_DISPLAY_TFT_RELOGIO_2_feb15a.ino:107:7: error: ‘printText’ was not declared in this scope
printText(timeChar, ST7735_WHITE, 20, 25, 3);
^~~~~~~~~
C:\ARDUINO\sketch_DISPLAY_TFT_RELOGIO_2_feb15a.ino:107:7: note: suggested alternative: ‘printf_P’
printText(timeChar, ST7735_WHITE, 20, 25, 3);
^~~~~~~~~
printf_P
C:\ARDUINO\sketch_DISPLAY_TFT_RELOGIO_2_feb15a.ino:117:7: error: ‘printText’ was not declared in this scope
printText(temperatureChar, ST7735_WHITE, 35, 80, 3);
^~~~~~~~~
C:\ARDUINO\sketch_DISPLAY_TFT_RELOGIO_2_feb15a.ino:117:7: note: suggested alternative: ‘printf_P’
printText(temperatureChar, ST7735_WHITE, 35, 80, 3);
^~~~~~~~~
printf_P
exit status 1
Compilation error: ‘Celcius2Fahrenheit’ was not declared in this scope
Se puder ajudar sou grato.
Obrigado por seus videos.
Hello,
Very interesting project. I have interfaced the RTC however its giving me time as:
4 October 2014
And clock stars every time as:
11:29:30
Kindly guide me how to fix this.
You have to set the current date and time. Watch the video carefully in order to see how to do it.
Hello Stroke, I was able to reformat the date.
New formated line… dateString = dateString+String(now.month())+”/”+String(now.date());
Original line ………….dateString = dateString+String(now.date())+”/”+String(now.month());
But I can’t get it out of 24hr time, any help…
Thanks
Steve
Well I finally got the clock to display 12hr time. Here is what I added to Educ8s code.
Serial.print(hours);
switch (hours.toInt())
{
case 13:hours=1;break;
case 14:hours=2;break;
case 15:hours=3;break;
case 16:hours=4;break;
case 17:hours=5;break;
case 18:hours=6;break;
case 19:hours=7;break;
case 20:hours=8;break;
case 21:hours=9;break;
case 22:hours=10;break;
case 23:hours=11;break;
case 24:hours=12;break;
}
hours = String(hours);
Also I changed the format of the date to
dateString = dateString+String(now.month())+”/”+String(now.date());
I hope this helps someone.
exit status 1
‘hours’ was not declared in this scope
this error is occurring
hello, love watching your videos, already much learned, I set some of his projects, the latter was that the RTC, but he lags mine, in two days it ta 5 late seconds jo rode several other RTC, other codes but all delays, tems an opinion.
Greetings …I’m new to Arduino
I am unable to import your code into the Arduino Library correctly …it will not compile properly …any suggestion …I would like to try some of your very interesting projects I’ve tried to run both …Ds 3231 with ST7735 160 x 120 ….also the LCD Keypad Shield….not having any luck!!!!
I think I’m have a problem getting the code into the Arduous library ….I can get the Lcd’s and TFT to run a test pattern everything is connected correctly …I can’t seem to get the clock to work….The clock is set with the correct time….I can see it in the serial monitor….
if you have time…. any direction would be appreciated….
re
please if anyone knows how to modify and explain in a video leave the link and leave here I have difficulty in compiling the libraries code sodaq not he came out with ne nowhere to load them and even go, agradeceria detailed yuda as and modify step by step to understand how this works, thanks in advance.
rene
my email: reiner-1978@outlook.com
you never say where the lib files are.
like = #include “Sodaq_DS3231.h”
https://github.com/SodaqMoja/Sodaq_DS3231
Or you can install inside the Arduino IDE in the library manager
Can you build this very interesting project using another – perhaps bigger -screen ? This screen is out of stock .
Thanks for the comment. Have you seen this project: https://www.youtube.com/watch?v=cOqm09_CiY0
It uses a 3.2″ Color TFT display!
Hello sir, I enjoy your video, they are good and instructive. I am always wandering how I could do a finish project. I can not put a pc, an Arduino Uno, a breadboard, a ds3231 wiht all the cables in a box. Then you are asking for a box. Well, you certainly solved that problem by now. I am wondering, how do you transpose all that breadboard and dss3231 into one integrated board on which I presume i would need to solder the lcd. If you could lighten my way, I would appreciate. Thank you.
Arduino: 1.8.1 (Windows 10), Board: “Arduino/Genuino Uno”
C:\Users\Hidden Name\Documents\Arduino\RTC_TFT_Display\RTC_TFT_Display.ino:4:26: fatal error: Sodaq_DS3231.h: No such file or directory
#include “Sodaq_DS3231.h”
^
compilation terminated.
Multiple libraries were found for “Adafruit_GFX.h”
Used: C:\Users\Hidden Name\Documents\Arduino\libraries\Adafruit_GFX
Not used: C:\Users\Hidden Name\Documents\Arduino\libraries\arduino_376175
Multiple libraries were found for “Adafruit_ST7735.h”
Used: C:\Users\Hidden Name \Documents\Arduino\libraries\Adafruit-ST7735
Not used: C:\Users\Hidden Name\Desktop\Arduino Folder\libraries\Adafruit-ST7735
Not used: C:\Users\Hidden Name\Desktop\Arduino Folder\libraries\Adafruit-ST7735
Not used: C:\Users\Hidden Name\Desktop\Arduino Folder\libraries\Adafruit-ST7735
Not used: C:\Users\Hidden Name\Desktop\Arduino Folder\libraries\Adafruit-ST7735
exit status 1
Error compiling for board Arduino/Genuino Uno.
This report would have more information with
“Show verbose output during compilation”
option enabled in File -> Preferences.
Hi i love your videos and I learn a lot from them… i Just building small project for my aquarium. Using Arduino nano ds3231 1 5v relay 20.4 lcd and 2 float switch to control ATO and display time and date position of float switches and 12v water pump but i stack with the code how to usuing ds3231 control led light to switch on at 21 and turn off at 7am.. i got pwm led driver but i dont know how to set time to control led… any help please…
Cant wait to see more videos about Nextion lcd display. Thanks
Thanks very much. First time to finish a working project. Next up, ESP32 with Nextion display :-)
hi i cant download the code…
Thanks
how to adjust the temperaturę
displays 0
and should display -1
very good . i need for incobtor
it’s pretty bad to use
tft.fillRect(10,0,160,65,ST7735_BLACK);
printText(timeChar, ST7735_WHITE,20,25,3);
because the screen blink each time it refresh, instead use tft.setTextColor and tft.print
tft.setTextColor(ST7735_WHITE, ST7735_BLACK);
tft.setCursor(30, 35);
tft.print(timeChar);
well in facts you can just replace the line tft.setTextColor(color); in void printText by tft.setTextColor(color, ST7735_BLACK); and remove those useless tft.fillRect’s black
Hi Craig,
I’m using a curie nano board and it comes with an onboard clock, i want to use that instead of additional component(RTC) how can i make it possible ?
Hello! how to add seconds to the clock?
I’m trying to make this project using an arduino nano and have copied the library as well as downloaded all the needed libraries for it to work.I am using pin 12 instead of 13 for the #define TFT_SCLK. It will upload to the arduino nano but I do get errors and my LCD screen is lit up but shows nothing.The error I’m getting is
1.(1)\RTCTFT160_F\RTCTFT160_F.ino:46:50: warning: ISO C++ forbids converting a string constant to ‘char*’ [-Wwrite-strings]printText(“TEMPERATURE”, ST7735_GREEN,30,65,1); // Temperature Static Text
2.(1)\RTCTFT160_F\RTCTFT160_F.ino: In function ‘void setup()’:
I have no clue as to how to troubleshoot these error any help would be amazing.Thanks!!
Schematics seem completely wrong.
Sorry just a white blank screen. I did Follow the schematics in the code. Becorse the frizzing schematics seems wrong.
I give up on it
Hi Nick,
really a nice project. I tried it by myself as well, unfortunately there are some mistakes in my case, I got wrong date “e.g.: Monday, 165/165/2165” (I already set the date separately), wrong clock “e.g.: 45:165” and wrong temperature values “e.g.: MIN: -1,8°C -> also I am working in my home at room temperature” and “MAX value is empity”, why ever. The colors are the same, like your display. I am not well experienced with Arduino. Could you pls help, to check what is wrong here? Actually I used the same code. The only difference is, my 1,8inch TFT SPI display has 11 pins. But if I am using the adafruit test sketch, I do not get any problems, that means pinning must be correct. How can I send to you (to the blog) a picture? I think if you see the picture, maybe you can judge better the failure. Many thanks in advance.
Ercan from Germany.
Note: here the link from my display manufacturer, for comparison purposses.
http://www.dsdtech-global.com/2017/06/TFT.html
Hi all,
in between I could solve my above described problem. Unfortunately I did not realized, that TFT and RTC are connected to different pins for SDA and SCL. I had a parallel connection, when I made the hardware setup. Later on, when I changed the Pining for RTC (SDA = A4, SCKL=A5) the clock worked properly. Nevertheless a short notice to the Pining picture above.
-> on the picture SDA and SCL are connected to Arduino pins A0 and A1
-> but on the Pin description below the picture they are connected to Arduino pins A4 and A5
Nick: by the way, it would be very nice, if you could add a function as well, to be able to set the clock and the date by using some buttons. This would ensure the correct settings even after changing the RTC battery, once it will be empity. Finally thanks again for that great project.
Hi my display is a 1.8 TFT SPI 128×160 but pinouts are different to the display in your project. The connections from left to right looking from the back are
LED SCK SDA AO RESET CS GND VCC
Will this display work with your project?
the code was not download please check it ,thanks
Hello ,
sorry for my bad English , i came from Germany.
This code is,awesome for my Projekt. But i Have a few Errors . I post it here:
Arduino: 1.8.16 (Windows 10), Board: “Arduino Nano, ATmega328P”
RTCTFT160_F:17:19: error: redefinition of ‘Adafruit_ST7735 tft’
Z:\Arduino\Sketch Kühlschrank\Set_DS3231\RTCTFT160\RTCTFT160.ino:17:17: note: ‘Adafruit_ST7735 tft’ previously declared here
RTCTFT160_F:23:7: error: redefinition of ‘float maxTemperature’
Z:\Arduino\Sketch Kühlschrank\Set_DS3231\RTCTFT160\RTCTFT160.ino:23:7: note: ‘float maxTemperature’ previously defined here
RTCTFT160_F:24:7: error: redefinition of ‘float minTemperature’
Z:\Arduino\Sketch Kühlschrank\Set_DS3231\RTCTFT160\RTCTFT160.ino:24:7: note: ‘float minTemperature’ previously defined here
RTCTFT160_F:25:27: error: redefinition of ‘char charMinTemperature [10]’
Z:\Arduino\Sketch Kühlschrank\Set_DS3231\RTCTFT160\RTCTFT160.ino:25:6: note: ‘char charMinTemperature [10]’ previously declared here
RTCTFT160_F:26:27: error: redefinition of ‘char charMaxTemperature [10]’
Z:\Arduino\Sketch Kühlschrank\Set_DS3231\RTCTFT160\RTCTFT160.ino:26:6: note: ‘char charMaxTemperature [10]’ previously declared here
RTCTFT160_F:27:18: error: redefinition of ‘char timeChar [100]’
Z:\Arduino\Sketch Kühlschrank\Set_DS3231\RTCTFT160\RTCTFT160.ino:27:6: note: ‘char timeChar [100]’ previously declared here
RTCTFT160_F:28:17: error: redefinition of ‘char dateChar [50]’
Z:\Arduino\Sketch Kühlschrank\Set_DS3231\RTCTFT160\RTCTFT160.ino:28:6: note: ‘char dateChar [50]’ previously declared here
RTCTFT160_F:29:24: error: redefinition of ‘char temperatureChar [10]’
Z:\Arduino\Sketch Kühlschrank\Set_DS3231\RTCTFT160\RTCTFT160.ino:29:6: note: ‘char temperatureChar [10]’ previously declared here
RTCTFT160_F:30:10: error: redefinition of ‘uint32_t old_ts’
Z:\Arduino\Sketch Kühlschrank\Set_DS3231\RTCTFT160\RTCTFT160.ino:51:10: note: ‘uint32_t old_ts’ previously declared here
RTCTFT160_F:32:7: error: redefinition of ‘float temperature’
Z:\Arduino\Sketch Kühlschrank\Set_DS3231\RTCTFT160\RTCTFT160.ino:31:7: note: ‘float temperature’ previously defined here
RTCTFT160_F:33:7: error: redefinition of ‘float previousTemperature’
Z:\Arduino\Sketch Kühlschrank\Set_DS3231\RTCTFT160\RTCTFT160.ino:32:7: note: ‘float previousTemperature’ previously defined here
RTCTFT160_F:35:8: error: redefinition of ‘String dateString’
Z:\Arduino\Sketch Kühlschrank\Set_DS3231\RTCTFT160\RTCTFT160.ino:34:8: note: ‘String dateString’ previously declared here
RTCTFT160_F:36:5: error: redefinition of ‘int minuteNow’
Z:\Arduino\Sketch Kühlschrank\Set_DS3231\RTCTFT160\RTCTFT160.ino:35:5: note: ‘int minuteNow’ previously defined here
RTCTFT160_F:37:5: error: redefinition of ‘int minutePrevious’
Z:\Arduino\Sketch Kühlschrank\Set_DS3231\RTCTFT160\RTCTFT160.ino:36:5: note: ‘int minutePrevious’ previously defined here
Z:\Arduino\Sketch Kühlschrank\Set_DS3231\RTCTFT160\RTCTFT160_F.ino: In function ‘void setup()’:
RTCTFT160_F:39:6: error: redefinition of ‘void setup()’
Z:\Arduino\Sketch Kühlschrank\Set_DS3231\RTCTFT160\RTCTFT160.ino:38:6: note: ‘void setup()’ previously defined here
Z:\Arduino\Sketch Kühlschrank\Set_DS3231\RTCTFT160\RTCTFT160_F.ino: In function ‘void loop()’:
RTCTFT160_F:54:6: error: redefinition of ‘void loop()’
Z:\Arduino\Sketch Kühlschrank\Set_DS3231\RTCTFT160\RTCTFT160.ino:53:6: note: ‘void loop()’ previously defined here
Z:\Arduino\Sketch Kühlschrank\Set_DS3231\RTCTFT160\RTCTFT160_F.ino: In function ‘void setRTCTime()’:
RTCTFT160_F:120:6: error: redefinition of ‘void setRTCTime()’
Z:\Arduino\Sketch Kühlschrank\Set_DS3231\RTCTFT160\RTCTFT160.ino:120:6: note: ‘void setRTCTime()’ previously defined here
Z:\Arduino\Sketch Kühlschrank\Set_DS3231\RTCTFT160\RTCTFT160_F.ino: In function ‘void printText(char*, uint16_t, int, int, int)’:
RTCTFT160_F:126:6: error: redefinition of ‘void printText(char*, uint16_t, int, int, int)’
Z:\Arduino\Sketch Kühlschrank\Set_DS3231\RTCTFT160\RTCTFT160.ino:124:7: note: ‘void printText(char*, uint16_t, int, int, int)’ previously defined here
Z:\Arduino\Sketch Kühlschrank\Set_DS3231\RTCTFT160\RTCTFT160_F.ino: In function ‘String getDayOfWeek(int)’:
RTCTFT160_F:135:8: error: redefinition of ‘String getDayOfWeek(int)’
Z:\Arduino\Sketch Kühlschrank\Set_DS3231\RTCTFT160\RTCTFT160.ino:133:8: note: ‘String getDayOfWeek(int)’ previously defined here
Mehrere Bibliotheken wurden für “Adafruit_GFX.h” gefunden
Benutzt: C:\Users\Lars\Documents\Arduino\libraries\Adafruit_GFX_Library-1.10.12
Nicht benutzt: C:\Users\Lars\Documents\Arduino\libraries\Adafruit_GFX_Library
exit status 1
redefinition of ‘Adafruit_ST7735 tft’
What is my Problem ? I only Change The Days to German. All Libs where loaded.
Can you Please help me a Little?
I got same thing. I think if fix first error then all will be fixed. Did you ever get it going?
Hallo!
Sehr interessantes Projekt. I
Wie kann ich die Temperatur Anzeige in Fahrenheit umstellen auf Celsius?
Bin leider Anfänger.
Bonjour,
comment afficher la température en degré CELSUIS.
Merci
Cordialement,